Quantcast
Channel: Developer Express Inc.
Viewing all 2399 articles
Browse latest View live

WinForms Tips & Tricks — HTML & CSS Syntax Editor

$
0
0

It’s been a couple of weeks since we released our WinForms HTML & CSS Templates option (an entirely new approach to WinForms app design). The DevExpress HTML & CSS Template option for the WinForms platform allows you to re-imagine/re-design our data-aware controls (at present, you can apply templates to our WinForms Data Grid, Scheduler and Gantt Control), and create fully custom UI elements like buttons, editors, toolbars and more (courtesy of the HtmlContentControl and HtmlContentPopup components).

To specify a web-template for a control or component, click the ellipsis button next to the appropriate property (for instance, SchedulerControl.Views.DayView.HtmlTemplates.AllDayAppointment) within the Visual Studio Property Grid and use our Template Editor. This tool uses a built-in Syntax Editor to facilitate the use of templates.

In this post, I’ll show you how to leverage this Syntax Editor and maximize its potential.

WinForms Syntax Editor

Before we start, let me answer a question that might have already popped into your mind: "Are you going to ship a stand-alone Syntax Editor now that you have created one for editing templates?". Well, it's not that simple.

Our embedded Editor is a "set it and forget it" kind of thing: it was built to work with a limited set of supported keywords (HTML tags and CSS parameters that we currently support). If we were to ship it as a stand-alone tool, it would require much more than this. As an absolute minimum, a Syntax Editor would require us to support external dictionaries that you could import to teach the Editor new languages. And it will need to support popular languages out-of-the-box (so you don't need to manually teach it, say, SQL or Markdown). These are costly features to implement, and we do not have plans to include them in our 2022 development cycle.

Intelligent Code Completion

If you already tried DevExpress WinForms HTML templates, you probably know about this feature. Our code-completion aid can:

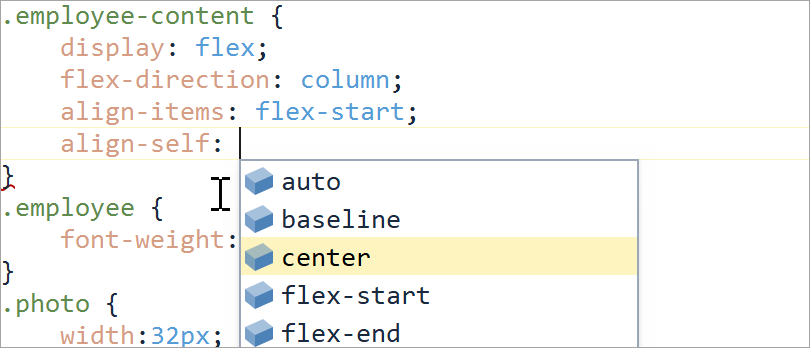
  • Suggest HTML tag names, CSS property names, and parameter values as you type.
  • Suggest names for existing CSS styles when you type class="" inside HTML elements, or create new styles if no class with such a name was found.
  • Add newlines and tabulations to keep your templates well-formatted and easy to read.

To manually trigger automatic suggestions, press the Ctrl+Space shortcut.

Navigation

Select an opening or a closing HTML tag and the Editor will instantly highlight the other half of this tag. You can also find tags by hovering over elements in the "Preview" panel. Double-click an element to keep the corresponding tag highlighted after you move the mouse cursor away from this panel.

Hold Ctrl and hover over class names assigned to HTML elements (the caret will change to a pointer). Click any class name to instantly scroll the CSS panel (up or down) to this class.

Finally, you can press Ctrl+F to invoke a search box. Click its drop-down button to activate "Find & Replace" mode.

Data Bindings and External Images

If a control is bound to a data source, type ${} and enter a source field name to retrieve values from this field. For example, <img src="${Photo}"> creates an image bound to the "Photo" data field. Instead of manually entering a data field name, press the Ctrl+Space hotkey to view the field list.

The same shortcut allows you to retrieve images from an external image collection. Populate a DevExpress SvgImageCollection with icons and assign this collection to a control's HtmlImages property. Once done, you can press Ctrl+Space to quickly insert images from this collection to your HTML elements.

Also note that "Edit HTML Images..." option in the context menu — it allows you to edit the HtmlImages collection without leaving the Template Editor.

Tell Us What You Think

Undoubtedly, HTML & CSS Templates are one of the most significant (and exciting) features introduced to our WinForms product line in years. This technique is spring-loaded for exciting design solutions that simply aren't available with traditional API-based techniques (see our Create Your First Web Template using DevExpress video on YouTube or the Chat Client demo). We cannot wait to see your design ideas and learn how you expect to apply this feature in your next WinForms app. We encourage you to share template-based projects via private Support Center tickets (we'd be happy to publish the most impressive solutions via a separate blog post). As always, feel free to post any questions and thoughts in the comment section below.

FREE WinUI Controls - Windows App SDK 1.0 Support, Data Grid Performance Enhancements, and the Future (v21.2)

$
0
0

As you may know, Microsoft released a new version of Windows App SDK.

For those considering WinUI, we updated the DevExpress WinUI component suite and introduced Windows App SDK 1.0 support. We also added important features/capabilities to our WinUI distribution (read on to learn more).

Before we describe the update, a quick reminder that the DevExpress WinUI component suite continues to be available free-of-charge. This free offer expires on May 1, 2022. For more information, including offer terms and conditions, plcoleaguesease visit the following web page (feel free to spread the word with friends/associates).

Once registered, please review the following help topic to acquaint yourself with the product line: Get Started With DevExpress Controls for WinUI.

When you are ready to explore our WinUI demo apps, download the following installer:

WinUI Component Suite - New Features

You can find a complete list of enhancements here: WinUI What’s New v21.2. The following is a quick synopsis of new features/capabilities:

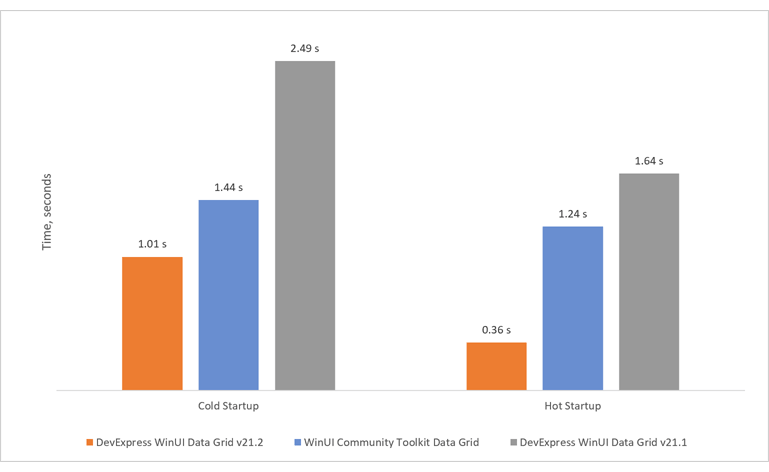
Data Grid Performance

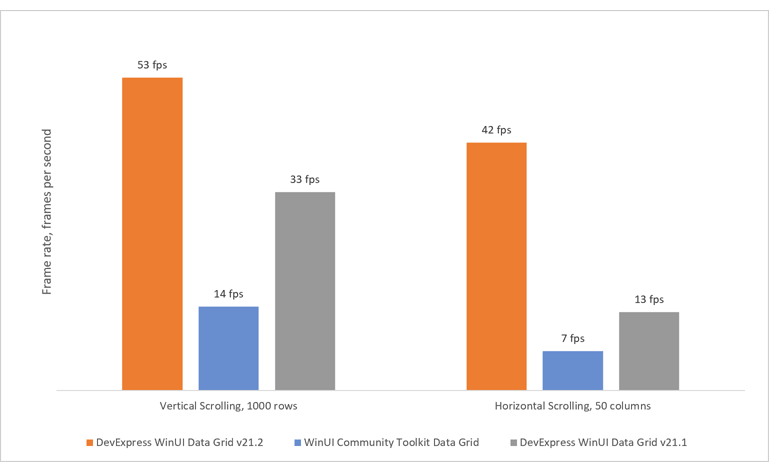
The UI portion of our WinUI Data Grid - the portion responsible for row/cell rendering - has been completely rewritten. It now offers blazing fast loading speed and unmatched scrolling performance.

Startup Performance

Scrolling Performance

Windows 11 Appearance

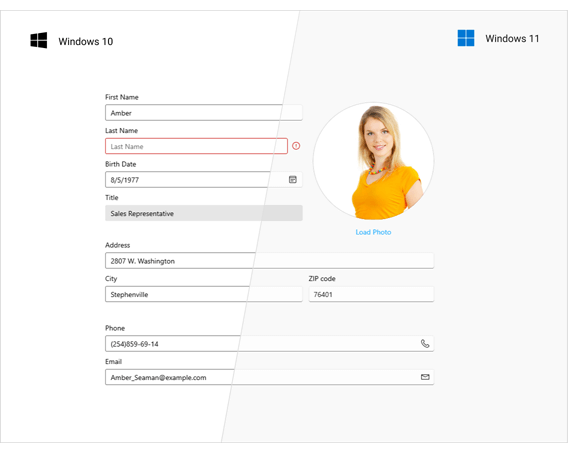
DevExpress WinUI controls now support Windows 11 appearance guidelines and adhere to style standards introduced in Windows App SDK 1.0.

What's Next?

WinUI is a rapidly evolving platform and our products will evolve accordingly. Our current distribution addresses key platform-related requirements. With major challenges behind us, we expect to extend our WinUI component library in 2022. Needless to say, quality and performance remain atop our priority list.

To help us shape our 2022 WinUI Roadmap, we expect to publish a series of surveys to engage those of you considering WinUI and the Uno platform. We look forward to your feedback in the coming weeks/months.

If you are currently targeting the WinUI platform, be sure to comment below or create a DevExpress Support Center ticket. We want to better understand your plans and specific use-cases. The more you share, the better we can help in 2022.

Reporting — Embed PDF Content into DevExpress Reports (v21.2)

$
0
0

With the introduction of the XRPdfContent control in our v20.1 release cycle, we gave users the ability to include/merge external PDF file content within a report.  If you have yet to use the XRPdfContent control, please refer to the following blog post for more information: Reporting - Merge PDF Documents into Your Report (v20.1).

In our most recent update (v21.2), we extended the capabilities of the XRPdfContent control and now allow you to print report elements over merged PDF content. This simply means that you can easily display report headers/footers, pages numbers, or logos atop PDF content. We also allow you to resize merged PDF file content to mirror report page size (to help correct page dimension variances).

XRPdfContent Control - Embedded Mode

DevExpress Reports v21.2 ships with a new GenerateOwnPages property for the XRPdfContent control. When this property is set to true (default), the XRPdfContent control behaves in the manner outlined in the blog post above. When you disable this property, control content is embedded into the report instead.

When used in this manner, XRPdfContent functions like our XRSubreport control (with GenerateOwnPages property disabled) or our XRPictureBox control (displays an image). You can modify PDF page size and place other controls next to/atop PDF content.

Use Cases

Place individual Report Controls atop PDF File Content

Embedded mode will be useful if you need to print specific content (pictures, bar codes, page numbers, or report watermark) on top of a PDF file.

In the following example, we will add a PDF page to a report and place an image on top of the PDF file.

For purposes of this illustration, we will create the report within Visual Studio (If you are new to DevExpress Reports, please refer to the following helping topic to learn more about our Visual Studio Report Designer: Create a Report in Visual Studio).

Step 1: Drop the XRPdfContent control onto the Detail report band:

Step 2: Expand the control’s smart tag and:

  • Assign a PDF file path to the Source property.
  • Disable the Generate Own Pages property.

In this example, we will use the following PDF document: Specification.pdf.

Step 3: Modify control size so that PDF content fits the entire Detail band:

In the following steps, we’ll place the following image on top of our PDF file.

When controls overlap, the Report Designer highlights them in red, and the Report Design Analyzer displays a warning. If you do not want the controls to be highlighted, simply disable the DesignerOptions.ShowExportWarnings property.

Step 4: Drop the XRPictureBox control onto the Detail band and assign the image to the control’s Image Source property.

Step 5: Set the XRPdfContent.PageRange property to 1 to include only the first page of the PDF file and Preview the report.

Though this example might seem a bit artificial, it demonstrates the possibilities available to you. Simply said, you can embed PDF file content to a report and modify this content within the Report Designer. If you are interested in a more advanced example, please refer to the following tutorial: Create a Report with Embedded PDF Content.

Scale a PDF File (and its Page Size) to Fit Inside a Report

If a PDF file’s paper kind (or page size) differs from a report’s page dimensions, output may look like the following once you add the PDF file to your report.

A mismatch between PDF page size and report page size dimensions can produce unexpected consequences. For instance, if you wish to print a report on A4 paper, but your PDF file is in “letter” format, actual print output may be affected. In this section, we will explain how to embed/merge a PDF file into a report and maintain page dimension consistency for the report itself. We will

  • Create a subreport and embed PDF content within it.
  • Modify PDF content size.
  • Add the subreport to the main report.

For this example, we will use a PDF file generated from our Profit and Loss demo.

Steps 1, 2, and 3: Create a blank report and repeat the steps described above:

  • Drop the XRPdfContent control onto the Detail band.
  • Expand the control’s smart tag. Assign a PDF file path to the Source property and disable the Generate Own Pages property.
  • Modify control size so that PDF content fits the entire Detail band:

Step 4: Remove report margins (set margin size to 0). We must set margin to zero because we want to include the file in another report as a subreport. As such, we don’t want subreport margins to be duplicated within the main report’s margins.

Step 5: Create a second report and add the report with PDF content as a subreport report:

Step 6: Enable the subreport’s GenerateOwnPages property and activate the report’s Preview.

Other Use Cases

Embedded mode might also be useful in the following instances:

  • Embed PDF file content into a report with common headers/footers (headers/footers will be printed on PDF file pages as well).
  • Design a pre-printed form and use a PDF file as a watermark.

Refer to the following help topic for more information: Embed PDF File Content into a Report - Use Cases.

Your Feedback Matters

As always, we welcome your feedback. Does this new feature (Embedded mode) address your business needs? Have additional requirements in this regard? Feel free to share your feedback and thoughts below.

DevExtreme Gantt – Export to PDF is Released, Task Sorting, Expand/Collapse API, and Other Enhancements (v21.2)

$
0
0
Using or considering the use of our DevExtreme Gantt UI component? Read on to learn more about the newest features/capabilities we released a couple of weeks ago (v21.2). Should you have any questions about the DevExtreme Gantt component, feel free to comment below.

Export to PDF – Official Release

Export to PDF (available as a preview in v21.1) is now part of our official distribution. 

As you may know, we reworked our export API to unify with other DevExtreme components. All methods that export component content to PDF are now located within the pdfExporter module. To export Gantt as a PDF document, call the exportGantt(options) method included in this module.

Refer to the following help topic for more information: Gantt – Export Data.

Sorting Tasks

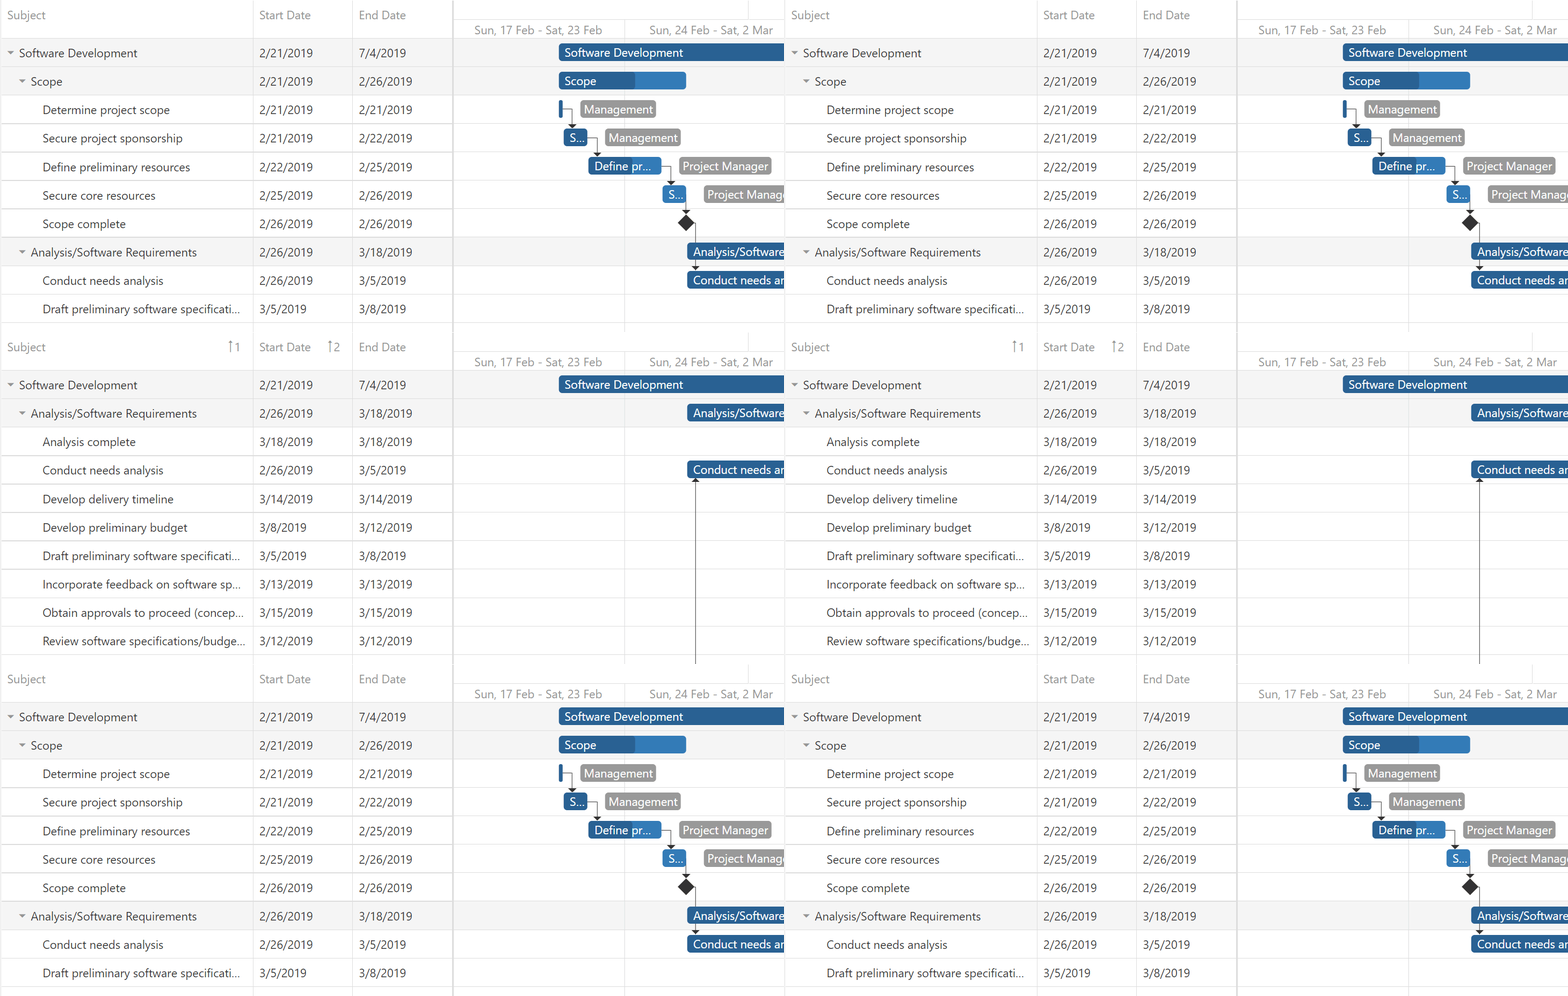
End users can now sort Gantt tasks by multiple columns (sorting.mode property value). When used in multiple sort mode, column headers can display sort indexes when you enable the sorting.showSortIndexes property.

Angular

<dx-gantt ... >
  <dxo-sorting
      mode="multiple"
      [showSortIndexes]="true">
  </dxo-sorting>
</dx-gantt>

View Demo

Task Expand/Collapse API

We implemented several new methods that control task expansion state:

For example, you can use the following code to expand first-level tasks at startup:

jQuery

$("gantt").dxGantt({
  // ...
  onContentReady(args){
    args.component.collapseAll();
    args.component.expandAllToLevel(1);
  }
});

Custom Timeline Date Range

DevExtreme Gantt calculates the available timeline period automatically based on task dates. In some instance, you may want to extend the period beyond task dates or narrow it down to a specific range. To address these scenarios, Gantt v21.2 includes startDateRange and endDateRange properties.

Vue

<template>
  <DxGantt ...
    :start-date-range="startDateRange"
    :end-date-range="endDateRange">
  </DxGantt>
</template>
<script>
import {
  DxGantt
} from 'devextreme-vue/gantt';
export default {
  components: {
    DxGantt
  },
  data() {
    return {
      // ...
      startDateRange: new Date(2018, 11, 1),
      endDateRange: new Date(2019, 11, 1),
    };
  },
};
</script>

View Demo 

Chart Appearance Customization API

Previously, Gantt API only included a showResources property (allowed you to control the visibility of resources in the chart area). With v21.2, the API also includes a showDependencies property (controls the visibility of dependencies).

View Demo

We also introduced showResources(value) and showDependencies(value) methods to change the visibility of a specific resource or dependency programmatically. In addition, the Gantt toolbar can now display "showResources" and "showDependencies" controls:

React

<Gantt ... > 
  <Toolbar>
    {/* … */}
    <Item name="showResources" />
    <Item name="showDependencies" />
   </Toolbar>
</Gantt>

View Demo

Other New APIs

DevExtreme Gantt v21.2 also introduces a number of small but useful enhancements to its API set:

       Gantt cannot track changes in its data source if they were made externally. In this case, call the refresh() method to reload Gantt data.

       Previously, you needed to iterate through all resources to unassign them from a task. You can now do this with one method call.

       These methods zoom in and zoom out the Gantt chart.

       This method opens the Task Details pop-up dialog. Usually, this dialog appears when users double-click a task. You can use this method if you wish to implement custom behaviors.

       View Example

Your Feedback Matters

As always, we welcome your thoughts/feedback. Please tell us what you think of these enhancements and how you’re currently using our Gantt component in your business.

.NET Spreadsheet (WinForms, WPF, Office File API) – Printing Options

$
0
0

In this blog post, we’ll review the extensive printing options available in the DevExpress Spreadsheet Document API and our Spreadsheet UI component for WinForms and WPF.

DevExpress Spreadsheet components support a broad range of print options – options you can apply to worksheets within your workbook. Our Spreadsheet API and our Spreadsheet UI components allow you to execute the following print-related actions with ease:

  • Specify paper size (Letter, Legal, Tabloid, etc.).
  • Define page margins.
  • Change page orientation.
  • Scale a printout to fit a specific number of pages.
  • Specify cell range for a print operation (print area).
  • Add headers and footers to a printout.
  • Repeat specific rows or columns on every printed page.
  • Insert manual page breaks.
  • Print row and column headings.
  • Print worksheet gridlines.

To specify print settings within the WinForms or WPF Spreadsheet control, use ribbon commands on the Page Layout tab or invoke the Page Setup dialog.

Once you configure desired print settings, you can switch to the File tab to print the document or invoke the Print Preview window.

Our WinForms and WPF Spreadsheet controls ship with the SpreadsheetControl.Options.Print.PrintContent property. This property allows you to specify spreadsheet content to print/display within the Print Preview window. The following values are available:

  • Default / EntireWorkbook - prints the entire workbook.
  • ActiveSheets - prints the active sheet and all selected sheets (if any). To print multiple sheets, hold Ctrl when clicking sheet tabs in the component.
  • Selection - prints selected cells for the active worksheet.
// Specify that the Spreadsheet control should print selected sheets.
spreadsheetControl.Options.Print.PrintContent = 
	DevExpress.XtraSpreadsheet.SpreadsheetPrintContent.ActiveSheets;

This option is also available within the new Settings pane that was added to the Print Preview window in our most recent major release (v21.2). This pane allows you to select what to print, set the number of copies to print, and specify page settings (such as document orientation, paper size, page margins, and scaling options). Once print settings are changed, the Print Preview window updates the document’s layout accordingly.

As you may already know, the Print Preview window also allows you to save your workbooks as PDF or image files. In v21.2, we extended our PDF export engine so you can now convert your spreadsheet documents to accessible PDF files. Feel free to review the following blog post to learn more about PDF accessibility support within our Office-inspired products:
Office File API & Office-Inspired Desktop UI Controls - Generate Accessible PDF Files (v21.2)

Print Documents in Code

You can also use our full-featured Spreadsheet API to specify print settings and print documents in code. We created a simple example that defines print options for the active worksheet. Please note that this example uses a new Worksheet.ActiveView.SetCustomPaperSize method (implemented in v21.2) to define custom paper size.

using DevExpress.Spreadsheet;
// …

// Access active worksheet in your document.
var worksheet = workbook.Worksheets.ActiveWorksheet;
// Specify measurement unit for the workbook.
workbook.Unit = DevExpress.Office.DocumentUnit.Inch;

// Specify page margins.
var pageMargins = worksheet.ActiveView.Margins;
pageMargins.Top = 0.7f;
pageMargins.Bottom = 0.7f;

// Add headers and footers to printout.
var headerFooterOptions = worksheet.HeaderFooterOptions;
// Insert sheet name into the header's left section.
headerFooterOptions.OddHeader.Left = "&A";
// Insert page number into the footer's left section.
headerFooterOptions.OddFooter.Left = "Page &P of &N";

// Change page orientation.
worksheet.ActiveView.Orientation = PageOrientation.Landscape;
// Set custom paper size (10 inches by 11 inches).
worksheet.ActiveView.SetCustomPaperSize(10, 11);

The following image illustrates the resulting output:

Use the appropriate Print method (for the Spreadsheet control or a non-visual Workbook instance) to print your document in code. If you need to print individual worksheets, you can call the Sheet.Print method for each worksheet or pass necessary sheet names to the Workbook.Print method (only available for the Spreadsheet Document API). Refer to the following help topics for additional information and examples:

Your Feedback Matters

Should you have any questions/feedback regarding printing support for our Spreadsheet Document API or WinForms/WPF Spreadsheet component, please comment below or submit a support ticket via the DevExpress Support Center. We will be happy to follow-up.

WinForms — New Winter Joy Vector Skin

$
0
0

2021 is slowly coming to an end. We at DevExpress would like to wish you all the very best in the coming year. As a small token of our appreciation, we’ve created a new Winter Joy vector-based skin/theme for our WinForms product line. This new skin includes three built-in palettes: a default palette with subdued colors, a dark palette inspired by the magic of holiday-season evenings, and a palette inspired by snow covered landscapes.


Important Note: This skin will not be included in our primary component distribution. If you wish to incorporate this new skin/theme in your WinForms project, you will need to install the NuGet package to add it to your project. Run the following command in the Visual Studio's Package Manager Console:

Install-Package DevExpress.Win.WinterJoySkin

You can also download this package from NuGet.org or inspect its source code at GitHub.com.

Once you install the package, simply register the skin library at the application startup. And finally, before you can use this skin/theme, you will need to upgrade/use v21.1.7+ or v21.2.4+.

[STAThread]
static void Main() {
    // Register the Winter Joy skin.
    System.Reflection.Assembly asm = typeof(DevExpress.UserSkins.WinterJoy).Assembly; 
    DevExpress.Skins.SkinManager.Default.RegisterAssembly(asm); 
    // Apply the skin.
    DevExpress.XtraEditors.WindowsFormsSettings.DefaultLookAndFeel.
        SetSkinStyle("Winter Joy");
    //
    Application.Run(...);
}

Once again, we wish all of you the best this holiday season.

Before You Go – We Need Your Feedback for Future Skin/Theme Development

As you can imagine, creating new skins/themes is a time consuming process. One reason we did not include Winter Joy in our core distribution is to help determine usage rate for specialty skins such as this. To help us frame our WinForms skin/theme development strategy in 2022, please take a moment to answer the following survey:

PDF Document API – Annotation Enhancements (v21.2)

$
0
0

In our most recent major release (v21.2), we added annotation support to our PDF Document API and desktop PDF Viewers (both for WinForms and WPF). As you may recall, we implemented text annotation (sticky note) support in a previous release (v20.2). For background information on our implementation, please review the following blog post:

PDF – Sticky Notes and Comments

With v21.2, we expanded the list of supported annotation types and added new functionality to our Annotation Facade API. Our PDF API and our desktop PDF Viewers now support the following annotation types:

  • Link
  • Caret
  • Rubber Stamp (including dynamic and custom stamps)
  • Shape (circle, square)
  • File Attachment
  • Free Text (text box, callout, typewriter)
  • Ink
  • Path (line, arrows, polyline, polygon)

You can now create and delete annotations, edit associated content, flatten, add related comments and reviews. The API for previously supported annotation types (text highlights and sticky notes) are also available in our Facade API.

Note: You must own an active DevExpress Office File API Subscription or DevExpress Universal Subscription to use the functionality described herein across production software projects. For more information on Office File API licensing, please send an e-mail to clientservices@devexpress.com.

PDF Facade API

PdfPageFacade.Add[…]Annotation methods (AddCaretAnnotation, AddCirleAnnotation, etc.) allow you to generate all available annotation types.

The code sample below demonstrates how to create a rubber stamp, line, and a circle annotation:

using DevExpress.Pdf;

using (PdfDocumentProcessor processor = new PdfDocumentProcessor())
{
  // Load a document
  processor.LoadDocument("..\\..\\Document.pdf");

  // Access first page properties
  PdfPageFacade pageFacade = processor.DocumentFacade.Pages[0];

  // Define a rubber stamp rectangle
  PdfRectangle rubberStampRectangle = new PdfRectangle(663, 526, 763, 576);

  // Create a "Draft" rubber stamp annotation
  string icon = PdfRubberStampAnnotationIconName.Draft;
  PdfRubberStampAnnotationFacade rubberStamp =
  	pageFacade.AddRubberStampAnnotation(rubberStampRectangle, icon);
  rubberStamp.Author = "Nancy Skywalker";
  rubberStamp.Contents = "Made in PDF Document API";

  // Define line ending points
  PdfPoint point1 = new PdfPoint(430,500);
  PdfPoint point2 = new PdfPoint(430,470);

  // Create a line annotation
  PdfLineAnnotationFacade pdfLineAnnotation =
  	pageFacade.AddLineAnnotation(point1, point2);
  pdfLineAnnotation.Author = "Ryan Anita L";
  pdfLineAnnotation.Contents = "Please swap these statements";

  // Specify ending style and color
  pdfLineAnnotation.LineEndStyle = PdfAnnotationLineEndingStyle.OpenArrow;
  pdfLineAnnotation.LineStartStyle = PdfAnnotationLineEndingStyle.OpenArrow;
  pdfLineAnnotation.Color = new PdfRGBColor(0.23, 0.48, 0.34);
  pdfLineAnnotation.BorderWidth = 1.5; 

  // Find the target phrase in the document
  string circleText = "dogfooded";
  PdfTextSearchResults searchResults = processor.FindText(circleText);

  if (searchResults.Status == PdfTextSearchStatus.Found)
  {
     // Define an area around the phrase to add an annotation
     PdfRectangle circleRectangle = searchResults.Rectangles[0].BoundingRectangle; 

     // Create a circle annotation in this area
     PdfCircleAnnotationFacade circleAnnotation =
     	pageFacade.AddCircleAnnotation(circleRectangle);
     circleAnnotation.Author = "Cardle Anita W";
     circleAnnotation.Contents = "It's better to say 'used' in this case";
     circleAnnotation.Color = new PdfRGBColor(0.77, 0.38, 0.06);
     circleAnnotation.BorderWidth = 1.5;
  }

  // Save the result
  processor.SaveDocument("..\\..\\Result.pdf");
}

Use the PdfPageFacade.Annotations property to access all page annotation properties. You can filter annotation properties, cast them to a corresponding PdfAnnotationFacade class descendant, and use class properties to modify annotation parameters. Refer to the following help topics for additional information and examples:

Annotations in PDF Documents

The Facade API is also available in our PDF Viewers (WinForms and WPF). Call the PdfViewerExtensions.GetDocumentFacade method to retrieve the DocumentFacade object. Add the DevExpress.Docs.v21.2.dll assembly to your project to use extension methods. Once again, please remember that you must own an active Office File API or Universal Subscription to use this assembly in production code.

Try It Now

To explore PDF Annotations feature in greater detail, be sure to check out our new Office File API demo module:

PDF Rubber Stamp Annotations

This demo allows you to create and edit rubber stamp annotations. You can add a predefined stamp (from Standard Business or Sign Here categories) or a dynamic stamp (indicate name, date, and time information). To create a custom rubber stamp, select one of the document stamps, and click Set Custom Icon in the invoked property grid.

Your Feedback Matters

We’d love to know what you think of our PDF annotation support within our Office-inspired product line. Please share your thoughts in the comment section below or submit a support ticket via the DevExpress Support Center.

Reporting — Visual Studio Report Designer for .NET 6 Apps (v21.2)

$
0
0

We are delighted and proud to announce that, after more than a year of active development, our DevExpress Visual Studio Report Designer for .NET 6, .NET 5, and .NET Core projects went gold with v21.2 release!

In v21.1, we first introduced the CTP version: Reporting — Visual Studio-integrated Report Designer for .NET Apps. The CTP version allowed you to create reports in .NET Core applications but was missing important features (for instance, limited support of data sources and the need to create an auxiliary project). With v21.2 release, the DevExpress Visual Studio Report Designer became more stable and addressed the mentioned limitations. We also supported the newly released Visual Studio 2022!

Enhancements

  • Report files are stored in CS format

    The new DevExpress Visual Studio Report Designer uses the *.CS file format to store report layouts by default. Users can add, update, save, and display a report's print preview in .NET 6, .NET 5, .NET Core, and .NET Standard projects. VSREPX report files are supported for those who already store reports in this format.

    CS report files created in .NET Framework projects are compatible: you can open and edit reports stored in this format in the new DevExpress Visual Studio Report Designer in .NET apps. You can as well convert an entire .NET Framework project with reports to .NET Core or .NET 5 - see the following section for details: Migrate Your Non-SDK Projects to SDK Style.

  • The same level of support for Object, XPO, Entity Framework Data Sources, and DataSets as in the DevExpress Visual Studio Report Designer for .NET Framework projects

    With v21.2 release, we added the support of user types for these data sources, so you can now add these to your reports with the help of the Data Source Wizard!

  • Inherited Reports Support

  • User-defined report parameters type support

  • Improved startup time

    The loading speed was slashed. Mostly this was related to how fast we can instantiate types included in a project. The best part of it is, the more complex structure your data source has, the better startup time the Designer shows as compared to that in v21.1!

How to Create New Reports

What do you need to get to the new Report Designer? Nothing. It just works in the same way as in regular .NET Framework apps: we aimed to continue offerring the same level of user experience. In case you are yet to get acquainted with the capabilities of our Visual Studio Report Designer, please follow this help topic to add your first report to a project: Create a Report in Visual Studio.

The new DevExpress Visual Studio Report Designer supports all major development platforms, from WinForms to Blazor.

Note: XAF Report data sources such as CollectionDataSource will be added to the DevExpress Visual Studio Report Designer in a forthcoming update. Once we have a definitive release date (in the next month or two), we will make an announcement here.

Supported Report File Formats

A few words on the file formats used to store reports in Visual Studio projects.

CS format (the .cs file extension) was implemented originally as the first format that stored reports in your projects. It is still used extensively to store reports in C# projects (respectively, VB format is used in Visual Basic projects). In the new DevExpress Visual Studio Report Designer, we follow the path of letting you work with the traditional report file format.

Last year’s v20.2.4 release introduced the VSREPX format (the .vsrepx file extension) that was used to store reports in .NET Standard, .NET 5, and .NET Core projects. This was a temporary format: at the time we were unsure that technology will allow us to offer the same user experience as in .NET Framework applications. If you created and stored reports using this format over the past year, you can stay with VSREPX report files, as the .NET Core Designer continues to support them.

The REPX format is used to save reports created in an End-User Report Designer. You can import .repx layouts into a report created in Visual Studio: in the DevExpress Report Designer, expand the report’s smart tag, click Open/Import, and select the .repx file to import.

Convert Your Project to .NET 6

A useful tool included in the v21.2 package is our new DevExpress .NET Core Migration Tool. If you looked forward to move your application with reports from .NET Framework to .NET Core or .NET 5/6, use this new Migration tool to convert your project in a few easy steps and start using the new DevExpress Visual Studio Report Designer:

  1. Load your non-SDK project in Visual Studio.

  2. Select Extensions | DevExpress | WinForms Controls v21.2.3 | Migrate the Current Project to .NET Core.

  3. In the invoked DevExpress .NET Core Migration Tool, select a target .NET (.NET Core) version and click Convert.

    Note: this tool is based on Microsoft's try-convert tool. We expect to offer an ability to migrate to .NET 6 with the v21.2.4 release.

  4. That’s it, the project is converted!

    The Conversion Tool adds required NuGet packages to the converted project.

Your Feedback Matters

We have completed the journey to adapt our DevExpress Visual Studio Report Designer for developers that create reports in .NET 6 and .NET 5 apps. However, we have a few further enhancement ideas to work on and we’d like to hear from you how we can enhance your experience and productivity while working on reports in Visual Studio. For instance, we consider adding the following capabilities in the future:

  • A way to store reports, their elements and data sources and share all these pieces across your development team;

  • A way to edit reports that are stored outside the project (a database, a custom file storage, etc.) right in DevExpress Visual Studio Report Designer.

Please tell us what do you think about it? We also invite you to engage our development team and share your reporting-related tasks: how we can improve the report designer process further from your point of view?


NuGet Hot-Fixes Are Available, NuGet Licensing Best Practices, and Future Installation Enhancements

$
0
0

Hot-Fixes for Runtime DevExpress Libraries Are Available via Online NuGet Feeds

As you may recall, we conducted a big "Installation & NuGet Experience" survey in April 2021. Your feedback helped us validate a few hypotheses, among them the need for NuGet hot-fixes. Thanks to your engagement, NuGet hot-fixes are now available for nearly all runtime DevExpress .NET libraries. We expect to publish NuGet hot-fixes through nuget.devexpress.com and NuGet.org (for our free XPO ORM library) 3-5 times per month.

NOTE: We will publish hot-fixes via our “battle tested” Unified Component Installer just like before, using the same cadence - this option will also help you obtain hot-fixes for design-time functionality. 

The Why: The Benefits of NuGet Hot-Fixes

For those using CI/CD pipelines to build projects, our new NuGet hot-fixes will help save time during the upgrade/update process. Previously, hot-fixes via our Unified Component Installers required manual intervention within CI/CD systems. 

Even if you are not using a CI/CD system, NuGet hot-fixes will help streamline the upgrade/update process for non-visual components such as the DevExpress Office File API, Role-Based Access Control API (FREE) (products that do not require Visual Studio design-time functionality). If you are using non-visual components, it will be much faster to edit a package version (two bytes) in Directory.Build.props or *.CSPROJ files than to download and execute our Unified Component Installer.
small

The Upgrade/Update Process – Feedback from Your Peers

To appreciate the benefits of NuGet hot-fixes, please review the following "public" DevExpress Support Center ticket. In it, Alex Miller explains some of his frustrations: 

Since then, I think i've updated with 3 different hotfix versions. Each time requiring me to download and install locally. This is a huge killer for productivity.

1. Wait for the the hotfix to download
2. Exit all VS instances…
3. Install DX (this takes over 10 minutes)
4. Relaunch VS
5. Reopen projects
6. Edit Directory.Build.props to set the new DX hotfix package version number
7. Wait for the restore to complete
8. Get back in the working flow

If the hotfixes were available on the DX nuget feed, I could skip steps 1-5 which would roughly save 15+mins and I can remain productive without leaving Visual Studio.

This also causes problems with the build pipeline. The local feed doesn't exists on the build service and the only alternative is to push the DX hotfix packages to my private feed, which not only takes me some time and maintenance, but costs me the artifact storage fees.

Thanks, Alex


How NuGet Hot Fixes Work

  1. Once you request a hot-fix in a Support Center ticket, we will test and publish it within a week (of course, it may take more than a week to issue a hot fix, but our goal is to release a hotfix within a week).

  2. After you receive a hot fix notification email from us, visit the appropriate Support Center ticket and find the following form:
     
  3. To access a hot-fix via the NuGet Package Manager from your personal NuGet feed(1), please check the Include prerelease option (2). Otherwise hot-fix packages will not be displayed (3).

Important: NuGet Licensing Best Practices for Multi-License Holders & CI/CD

In the following section, we’ll define licensing related actions/configurations for CI/CD systems.

Scenario: If your team includes multiple individuals, a license holder (typically a team lead or company owner) assigns individual DevExpress licenses to each developer using the Assign Licenses menu on our web site. An individual DevExpress license assigned to a developer grants this developer the right to use the DevExpress Unified Component Installer or individual NuGet feed credentials.

Question: What NuGet feed should a team of multiple developers use for a shared CI/CD pipeline?

Answer: For a shared CI/CD pipeline, we recommend the use of individual NuGet feed credentials for a developer with a valid DevExpress license (it does not matter whether this individual is a team lead/developer/company owner). And even though this developer "volunteered" a license for your organization’s shared CI/CD pipeline, the developer in question can also develop with valid DevExpress products within the Visual Studio and/or other IDE. Of course, all other developers within the team that use DevExpress products must also own valid DevExpress licenses. 

If the primary license holder assigned ALL licenses to developers within the team, the license owner can NOT use his/her NuGet feed for a shared CI/CD pipeline or any other development purposes. Nothing changes regarding NuGet in this regard - this has always been the case for our Unified Component Installer – primary license holders without a license cannot install our products (whether through NuGet or the Unified Installer).

NOTE: : Our licensing rules (as defined in the DevExpress EULA prohibit the use of a single DevExpress license by multiple developers for build and development purposes within the Visual Studio and/or other IDE - each developer that uses our products must own a license. If you own the appropriate number of developer licenses, but need licensing related clarification for your CI/CD system, be sure to contact us via the DevExpress Support Center. We’ll be happy to accommodate your specific business situation (where possible).

If you have questions regarding our license and terms of use, please write to us at info@devexpress.com.

2021 Recap for Installation & NuGet Experience

Once again, thanks to everyone who shared feedback via the DevExpress Support Center, surveys, email, etc. Your contributions helped us refine our installation/distribution logic and implementation. The following changes were a direct result of community-sourced feedback:

  • Merged .NET Framework and .NET Core Desktop installers, and NuGet packages in v21.1 (removed redundant .NET Core Desktop installer in v21.2);
  • Added Portable PDB support for Windows and Linux debugging;
  • Introduced NuGet trial versions and enhanced the trial experience for DevExpress Reporting;
  • Enhanced NuGet stability and authentication with personal access tokens;
  • Extended the DevExpress Template Gallery with support for .NET Core apps.

For more information, please review my posts in this News blog and also our What's New documentation for 2021.

Future Plans

Before I wrap up, a quick look into hot-fix/distribution/installer plans for 2022:

  1. NuGet hot-fixes for our free Xamarin UI components are coming in about a month. Once Microsoft releases .NET MAUI in Q2 2022, we hope to have NuGet hot-fixes for our .NET MAUI components as well.
  2. Our Unified Component Installer will include an option to install localized resources for certain languages (DE, ES, JA, RU). We will not install these resources by default – you can install them at your discretion. NOTE: based on actual usage, we may completely remove these localization resources from the Unified Component Installer in favor of the DevExpress Localization Service.
  3. We will soon conduct a survey about DevExpress localization in .NET apps. We hope to validate a few hypotheses about our Localization Service, Unified Component Installer, overall localization quality, and ways to translate strings in general.
  4. We hope to include our free WinUI components into the Unified Component Installer in 2022. Simultaneously, we may remove our UWP components from the Unified Component Installer (though we have not finalized this decision yet).
  5. Our Unified Component Installer may include an option to install CodeRush (for licensed CodeRush users) in 2022. Currently, CodeRush is only available in our trial installation and through the Visual Studio Marketplace. If you’ve yet to explore CodeRush, we hope you will consider it for future use as we expect to introduce new features like code snippets for key DevExpress controls (like sort a grid, build a filter criterion, etc.) and DevExpress-specific error diagnostics (like this one). Bottom line – CodeRush will soon help simplify use of DevExpress components within the Visual Studio Code Editor and save time during troubleshooting. Be sure to follow our IDE Productivity Tools blog in for exciting news in this regard in about a month or so.
NOTE: Things may change, but this is what we have at the top of our list at present time

Your Feedback Matters

If the changes we’ve introduced do not fully address your business needs or if you’d like to engage us further on this topic, please leave a comment below or create a new support ticket via the DevExpress Support Center. We’ll be more than happy to follow-up.

Thanks,
Dennis
Principal Product Manager
dennis@devexpress.com

VCL Charts - Early Access Preview (v21.2)

$
0
0

The next major release of our VCL Subscription (v21.2) is just around the corner. Before the official release, we wanted to share some good news that you've probably already guessed from the post title. Yes, v21.2 will ship with an early access preview (EAP) of our new product, ExpressCharts. In this post, I shall highlight the main features and capabilities the product will include in this preview.

Of course, should you have any questions or feedback on our new product, please comment below or submit a support ticket via the DevExpress Support Center. We will be happy to follow-up.

The VCL ExpressCharts Early Access Preview is available for all customers with an active DevExpress VCL Subscription. It is not available in the VCL Subscription trial version.

DirectX, GDI+, and GDI Support

The ExpressCharts Suite fully supports DirectX, GDI+, and GDI rendering and allows you to apply skins and transparency effects to chart elements. Anti-aliasing is enabled in both DirectX and GDI+ render modes and will enhance the graphical elements of charts even more.

Performance

Although the ExpressCharts Suite is currently available as an Early Access Preview, it already includes a number of optimizations that distinguish it from competing VCL chart libraries. Initial rendering is one aspect of performance that we've been concentrating on, another being what happens — and how quickly it gets redisplayed — when a chart is resized. Without a doubt though, the fastest way to display charts is to render them by using DirectX.

As we get closer to the official release for ExpressCharts (the release date is set for June 2022), we’ll share specific benchmarks for a broad range of usage scenarios. And yes, our expectation is that ExpressCharts will outperform its competitors – in some cases by a wide margin (for instance, right now ExpressCharts renders a line chart with one million points in under two seconds with DirectX, and resizing it completes in about one tenth of a second).

Multiple View/Series Types

The EAP version of the ExpressCharts Suite includes the following view/series types:

  • Area, Stacked Area, and Full-Stacked Area
VCL ExpressCharts - Stacked Area Series
  • Bar, Stacked Bar, and Full-Stacked Bar
VCL ExpressCharts - Stacked Bar Series
  • Line, Stacked Line, and Full-Stacked Line
VCL ExpressCharts - Line Series
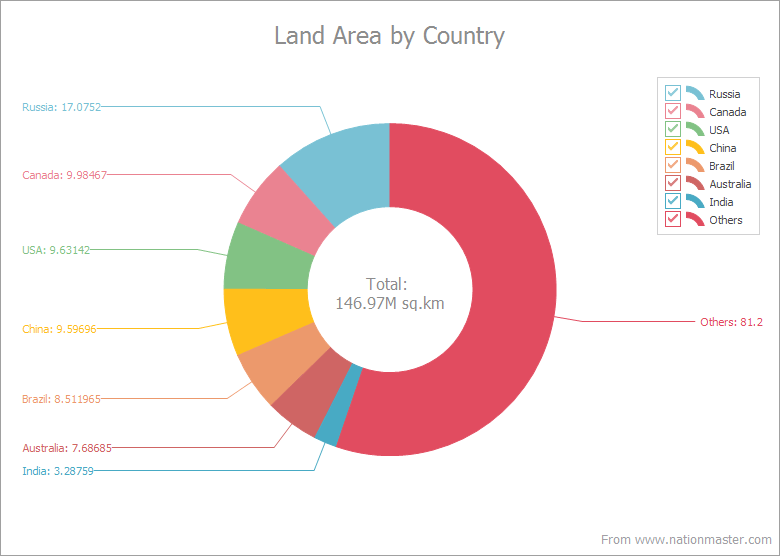
  • Donut chart

VCL ExpressCharts - Donut Series

  • Pie chart

VCL ExpressCharts - Pie Series


You and your users can change the applied chart type with a single option.

VCL ExpressCharts - Switch Series Type

Flexible Design

You can create any number of diagrams and display any number of series/series points in each diagram.

VCL ExpressCharts - Multiple Diagrams

Data Binding Modes

Each series has a DataBinding property that allows you to select the desired mode (Data-aware or Unbound) and specify the data binding options for your chart.

The code examples below show how to bind an Area series to data in these modes and plot it in a diagram.

Data-Aware

var
  ADiagram: TdxChartXYDiagram;
  ASeries: TdxChartXYSeries;
  ABinding: TdxChartSeriesDBDataBinding;
begin
  ADiagram := dxChartControl1.AddDiagram<TdxChartXYDiagram>;
  ASeries := ADiagram.AddSeries('Sales in 2020');
  ASeries.ViewType := 'Area';
  ASeries.DataBindingType := 'DB';
  ABinding := ASeries.DataBinding as TdxChartSeriesDBDataBinding;
  ABinding.DataSource := dsSales;
  ABinding.ArgumentField.FieldName := 'Region';
  ABinding.ValueField.FieldName := 'Sales';
end;

Unbound

const
  ACount = 5;
  ACountries: array[0..ACount - 1] of string = 
    ('Asia', 'Australia', 'Europe', 'North America', 'South America');
  ASales: array[0..ACount - 1] of Double = (4.28, 2.27, 3.72, 4.18, 3.11);
var
  I: Integer;
  ADiagram: TdxChartXYDiagram;
  ASeries: TdxChartXYSeries;
  ABinding: TdxChartXYSeriesUnboundDataBinding;
begin
  ADiagram := dxChartControl1.AddDiagram<TdxChartXYDiagram>;
  ASeries := ADiagram.AddSeries('Sales in 2020');
  ASeries.BeginUpdate;
  try
    ASeries.ViewType := 'Area';
    ABinding := ASeries.DataBinding as TdxChartXYSeriesUnboundDataBinding;
    ABinding.ArgumentField.ValueType := 'String';
    for I := 0 to ACount - 1 do
      ASeries.Points.Add(ACountries[I], ASales[I]);
  finally
    ASeries.EndUpdate;
  end;
end;

Customization Options

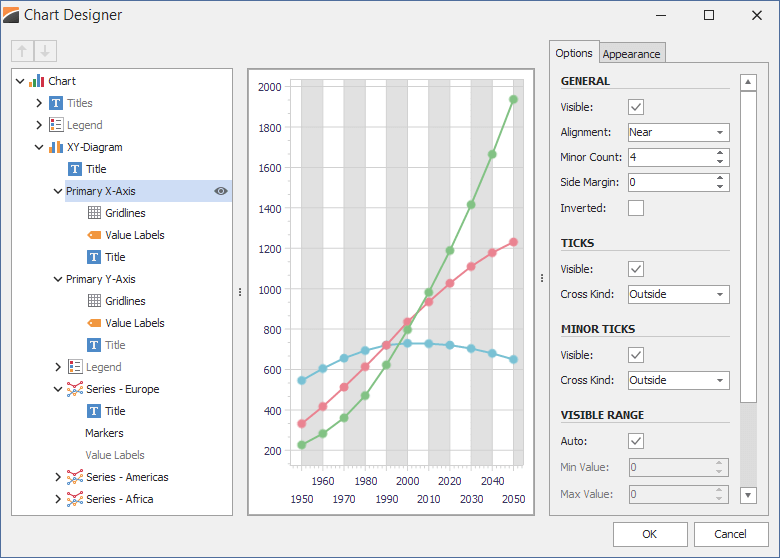
The VCL Chart Control provides an extensive API that allows you to customize chart content as needs dictate. The built-in Chart Designer (available at both design and runtime) helps you and your users preview and apply chart changes.

VCL ExpressCharts - Built-in Chart Designer

CodeRush Shortcut Cheat Sheet v4.0

CodeRush 21.2.5 for Visual Studio – Caps as a Shortcut Modifier

$
0
0

Caps as a Modifier allows you to use the Caps Lock key as a shortcut modifer inside Visual Studio, just as you would use Ctrl, Shift, or the Alt keys as shortcut modifiers.

As an added bonus, this feature can also prevent accidental triggerings of Caps Lock when inside Visual Studio.

It's a paradigm shift, but a good one, and the end result is more power with less effort.

Here's how it works...

The Basics

Once enabled, the Caps key will start working like any other modifier key.

So for example, to press Caps+A, you just press the Caps key along with the letter A.

It's that simple.

Enabling Caps Lock as a Modifier

  1. Run the CodeRush Setup Wizard.


  2. On the Caps as a Modifier setup page, check the "Enable Caps as a Modifier" checkbox:


  3. Click Finish and you're done.

New Features

Once you enable Caps as a Modifier, you'll gain access to a host of new features to make development faster and easier. The best way to learn and practice some of these features is with the Learning CodeRush solution.

After the solution loads in a new instance of Visual Studio the "StartHere.cs" file will open with buttons to take you through a guided tour.

In this blog post, we'll take a closer look at some of those new features.

Toggling Code

We have organized a number of functionally-similar refactorings that toggle code (change it from one state into another) into a single shortcut binding, Caps+Space. You can use Caps+Space to compress to or expand from:


If code can be toggled or converted between two or more states, Caps+Space is the key to use.

Removing Unnecessary Code

Remove unnecessary code with Caps+Delete. Just place the caret on any of the following and press Caps+Delete to remove it instantly:

Adding New Code

We've bound powerful code providers to Caps+Insert, for adding new code at the caret:

  • Add Missing Constructors (available when the caret is in the class name)
  • Add to Interface (available on the name of a new member inside a class that implements an interface)
  • Add Parameter (available inside a parameter list to a method declaration or an argument list on a method call)

Single-key Declarations

You can now instantly declare classes, members, and locals with a single keystroke when the caret is on an undeclared class reference, member reference, or unassigned expression:

Designed to Work Well Together

These shortcut bindings were selected to reduce ambiguity and work well together. Most of the time pressing a Caps-key binding in the right place will result in immediate execution of the refactoring. In some cases when two or more refactorings bound to the same shortcut are simultaneously available, CodeRush will present a menu so you can select the refactoring you want.

Turning Caps Lock On and Off

To toggle between actual Caps Lock and normal keyboard entry, just double-tap the Caps key (press it twice, quickly). You'll hear audible feedback and see toast in the bottom right of Visual Studio alerting you that Caps Lock is now engaged.

To disengage, simply double-tap the Caps key again. Toast will alert you that you have once again returned to the safety of normal keyboard entry.

Binding New Shortcuts

To bind a new Caps shortcut to Visual Studio or CodeRush feature, follow these steps:

  1. If you're binding to a Visual Studio command, make sure you know the exact text of the VS command before you take the next step. You can get a list of all Visual Studio commands in the VS Options dialog on the Keyboard page.
  2. Bring up the CodeRush Shortcuts options page.
  3. Create a new folder to keep your custom shortcuts organized (if you haven't done this already).
  4. Click the Add a new shortcut toolbar button.
  5. Specify the properties of the shortcut, including what keys will invoke it, the command to perform when the keys are pressed, and the context under which this binding is valid:

  6. More on creating custom shortcuts.

Your Feedback Matters

Please comment below and let us know what you think about using Caps as a Modifier and the new Learning CodeRush solution. If you have specific questions or need assistance with CodeRush, feel free to contact us through our Support Center (support@devexpress.com).

DevExpress VCL Subscription v21.2 released

$
0
0

Slightly later than expected perhaps, we’ve just released v21.2 of the DevExpress VCL Subscription product. The reason for the delay? Well, as can be seen from our previous announcement we have been working really hard on providing the Early Access Preview of the new ExpressCharts package as part of this release, currently available to active subscribers only.

For a complete list of what’s new in v21.2, please check out devexpress.com/new.

Important features, at least from my viewpoint, include:

  • The aforementioned ExpressCharts library
  • Support for Windows 11 and its rounded corners (and even in previous versions of Windows!)
  • Skinnable system message dialogs, and Open/Save Picture dialogs
  • The new Shell TreeView and Shell ListView controls (CTP)
  • Preview pane for file open/save dialogs
  • Fixed column/band modes for relevant Grid views
  • Baseline support for the Gantt Control
  • Support for interactive forms with the PDF Viewer
  • Various Image List Editor enhancements

Just to emphasize though, this list is a deliberately sparse selection of the many new enhancements we’ve done for v21.2. You really should visit the What’s New page to see the full list.

As usual, we’ve listed the Resolved Issues introduced in this release from the latest version of the previous major release (follow that link to the version history page, make sure you clear any filters that may be set, and then select VCL, as well as “Resolved Issues”). That page also enables you to review the changes we’ve made from any release to any other.

Unfortunately, for every major release, no matter how hard we try and minimize the impact, some new features and enhancements are bound to cause a few breaking changes. You can see those from that same version history page: just select “Breaking Changes” instead.

I pretty much say something like this with every major release: we would not be able to produce and release such robust and full-featured controls, features, and enhancements without the invaluable help of you, our customers. By publishing surveys, reviewing comments and support tickets, we find that we can more easily focus on providing what our customers want from our products going forward. Also, you may have noticed that we’ve been publishing relevant blog posts on what we are doing, posts detailing various tips and tricks, and posts on how we aim to move forward. My strong recommendation is to monitor our community site more than ever before.

I’d like to thank everyone who provided feedback on our products throughout this year, who used and tested the v21.2 beta we produced and provided information on the issues they found, and, of course, to all our VCL customers who use our products every day in their applications. We are confident that the new controls, features, and enhancements in this new release of the VCL Subscription will strengthen and validate your trust in our libraries. Thank you, it is much appreciated.

Blazor Scheduler - New Templates, Cell Customization, Adaptivity, and more (available in v21.2)

$
0
0

As you may already know, our most recent release (v21.2) includes several enhancements for the DevExpress Blazor Scheduler component. In this post, I'll summarize these new features and briefly describe their use.

As you may already know, our most recent release (v21.2) includes several enhancements for the DevExpress Blazor Scheduler component. In this post, I'll summarize these new features and briefly describe their use.

Templates

With v21.2, we added three new templates that allow you customize the appearance of our Blazor Scheduler:

  1. Resource Header Template
  2. Date Header Template
  3. Time Cell Template

These flexible templates allow you to add simple HTML elements (such as images) or other Blazor components.

1. Resource Header Template

You can use the new ResourceHeaderCellTemplate to customize our Blazor Scheduler's resource header area. Here's an example that uses ResourceHeaderCellTemplate to display an employee's profile image and name into the resource header region:

blazor-scheduler-resource-header-customization

Demo | Documentation

2. Date Header Template

A new DateHeaderCellTemplate will be of help when you need to display additional content in the date header cell region or if simply you want to change the header's default date format:

blazor-scheduler-set-custom-date-cell-format

Demo | Documentation

3. Time Cell Template

Use the new TimeCellTemplate to customize our Blazor Scheduler's time cells. For example, you can use this template to display the total number of appointments by day within the component's footer area:

blazor-scheduler-time-cell-template

Demo | Documentation

Responsive Layout Enhancements

Our Blazor Scheduler component's Day, Week, and Work Week Views now have compact date headers. These Views also adapt date headers and the time ruler depending on screen size.

blazor-scheduler-mobie-friendly-responsive-layout

In addition, all Scheduler Views can hide appointment captions (when space limits the component's ability to display the caption in full).

Cell Customization API

Our new HtmlCellDecoration event allows you to customize the appearance of Scheduler cells.

blazor-scheduler-cell-appearance-customization

Use this new API for scenarios such as highlighting cells within a specific interval for a specific resource, assigning different colors to different date header cells, highlighting the all-day area, etc.

The HtmlCellDecoration event also provides several data arguments to assign CSS classes and inline styles for cell customization:

PropertyDescription
CellTypeSpecifies the Scheduler cell's type.
CssClassSpecifies the name of a CSS class applied to the Scheduler cell.
IntervalsSpecifies the interval(s) to which the Scheduler cell belongs.
ResourcesSpecifies resources associated with the Scheduler cell.
StyleSpecifies the name of an HTML style attribute applied to the cell.

Other API Enhancements

The DevExpress Scheduler for Blazor (v21.1) also includes these following API enhancements:

  • All Blazor Scheduler Views now include a SnapToCellsMode property. With this property, you can enable/disable the snapping of appointments to time cells or enable automatic snapping (based on appointment time intervals). By default, appointments stretch to the nearest cell borders. You can change this behavior so that an appointment's width is proportional to its duration (SnapToCellsMode= SchedulerSnapToCellsMode.Never):

blazor-scheduler-set-appointment-duration-time

  • The AppointmentFormShowing event's arguments now include a Title property. Use it to change the Appointment Form title.

Your Feedback Matters

As always, we welcome your thoughts/feedback/suggestion. Please comment below or create a new DevExpress Support Center ticket to share feedback with us.

Happy Holidays and a Happy New Year!

Office File API & Office-Inspired Desktop UI Controls – Tips and Tricks (December 2021)

$
0
0

This post includes a series of interesting support tickets answered throughout October and November along with a handful of enhancements made to our Office-inspired product line. We hope you find the contents of this post interesting and of business value. Should you have any questions about this post, feel free to comment below.

Breaking Change in .NET 6

As you may already know, Microsoft changed DeflateStream, GZipStream, and CryptoStream behaviors in .NET 6. See the following breaking change for more information: DeflateStream, GZipStream, and CryptoStream handling of partial and zero-byte reads.

This breaking change affects our Office File API and Office-inspired UI controls (for WinForms and WPF) as we use DeflateStream to import OpenXML documents and load data from ZIP archives. If your application targets .NET 6, you may encounter the following issues:

  • Your Word (DOCX, DOTX, DOCM, or DOTM) and Excel (XLSX, XLSM, XLTX, or XLTM) documents may be loaded incorrectly.
  • The ZipItem.Extract method can throw CrcErrorArchiveItemException.

Please upgrade to v21.1.7+ or v21.2.4+ to avoid/address these issues within your .NET 6 project (see Bug Report T1047593).

Tips & Tricks

WinForms and WPF Rich Text Editors

WinForms and WPF Spreadsheet Controls

  • T1034923 - How to display a message that prompts a user to save changes before the current spreadsheet document is closed
    https://supportcenter.devexpress.com/ticket/details/t1034923

    Handle the SpreadsheetControl.DocumentClosing event and use the SpreadsheetControl.Modified property within the event handler to check whether the current document has changes. We use this method in our demos for the WinForms and WPF Spreadsheet controls. The following code snippet from our demos demonstrates how to display a prompt message before the document is closed:

    void spreadsheetControl1_DocumentClosing(object sender, CancelEventArgs e)
    {
        if (spreadsheetControl1.Modified)
        {
            string currentFileName = spreadsheetControl1.Options.Save.CurrentFileName;
            string message = !string.IsNullOrEmpty(currentFileName) ?
                $"Do you want to save the changes you made for '{currentFileName}'?" :
                "Do you want to save the changes?";
            DialogResult result = XtraMessageBox.Show(message, "Warning",
            MessageBoxButtons.YesNoCancel, MessageBoxIcon.Warning);
            if (result == DialogResult.Yes)
            {
                e.Cancel = !spreadsheetControl1.SaveDocument();
            }
            else e.Cancel = result == DialogResult.Cancel;
        }
    }
  • T1036481 - How to create total bars for a Waterfall chart via the Spreadsheet control’s UI
    https://supportcenter.devexpress.com/ticket/details/t1036481

  • T1038552 - How to exclude chart types from the Insert Chart ribbon menu in the WPF Spreadsheet control
    https://supportcenter.devexpress.com/ticket/details/t1038552

  • T1039579 - How to exclude chart types from the Change Chart Type dialog in the WPF Spreadsheet control
    https://supportcenter.devexpress.com/ticket/details/t1039579

  • T1045409 - How to keep hidden columns invisible when the AutoFitColumns method is executed
    https://supportcenter.devexpress.com/ticket/details/t1045409

    Create a union range with only visible columns and call the AutoFitColumns extension method for this range.

    private static void AutoFitVisibleColumns(Worksheet worksheet, 
        int startColumn, int endColumn)
    {
        var range = worksheet.Range.FromLTRB(startColumn, 0, endColumn, 0);
        for (int i = startColumn; i <= endColumn; i++)
        {
            if (!worksheet.Columns[i].Visible)
                range = range.Exclude(worksheet.Columns[i]);
        }
        range.AutoFitColumns();
    }
  • T1045447 - How to prevent export of filtered rows when a document is saved in XLSX or XLS format
    https://supportcenter.devexpress.com/ticket/details/t1045447

    Iterate through worksheet rows and check the Row.Visible and Row.IsFiltered properties. If a row is hidden and belongs to a filtered range, call the Worksheet.Rows.Remove method to delete this row from the worksheet.

    spreadsheetControl.BeginUpdate();
    CellRange dataRange = worksheet.GetDataRange();
    int rowCount = 0;
    int lastRowIndex = dataRange.BottomRowIndex;
    
    for (int rowIndex = lastRowIndex; rowIndex >= 0; rowIndex--)
    {
        Row row = worksheet.Rows[rowIndex];
        if (!row.Visible && row.IsFiltered)
            rowCount++;
        else
        {
            if (rowCount > 0)
                worksheet.Rows.Remove(rowIndex + 1, rowCount);
            rowCount = 0;
        }
    }
    if (rowCount > 0)
        worksheet.Rows.Remove(0, rowCount);
    spreadsheetControl.EndUpdate();
    spreadsheetControl.SaveDocument("Result.xlsx", DocumentFormat.Xlsx);

WinForms PDF Viewer

WinForms Spell Checker

Enhancements

Spreadsheet Document API and Spreadsheet Controls (for WinForms and WPF)

  • T1042763 - We implemented new API properties that allow you to link shape text to a cell
    https://supportcenter.devexpress.com/ticket/details/t1042763

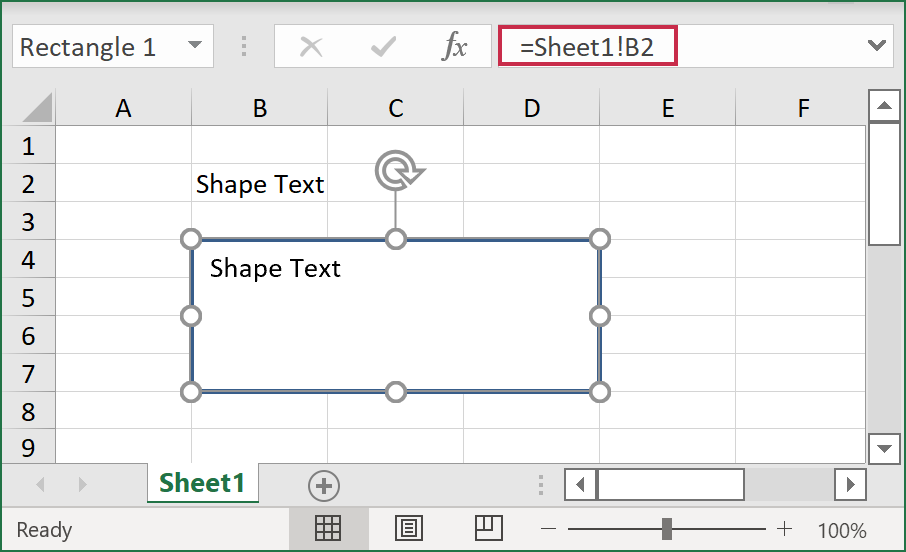
    You can now use the Shape.ShapeText.Formula property to specify a reference to the cell that contains text you want to display in your shape. Use the A1 or R1C1 cell reference type depending on reference style used in your workbook (see DocumentSettings.R1C1ReferenceStyle). External references are not supported.

    // Specify cell value.
    worksheet["B2"].Value = "Shape Text";
    // Create rectangle.
    var rectangle = worksheet.Shapes.AddShape(ShapeGeometryPreset.Rectangle,
    	worksheet["B4:D7"]);
    // Link shape text to the "B2" cell.
    rectangle.ShapeText.Formula = "=Sheet1!B2";

    The following image demonstrates the result:

    You can also use a defined name that refers to the required cell.

    // Specify cell value.
    worksheet["B2"].Value = "Shape Text";
    // Create defined name for the "B2" cell.
    worksheet.DefinedNames.Add("cellB2", "Sheet1!$B$2");
    // Create rectangle.
    var rectangle = worksheet.Shapes.AddShape(ShapeGeometryPreset.Rectangle, 
    	worksheet["B4:D7"]);
    // Use defined name to link shape text to the "B2" cell.
    rectangle.ShapeText.Formula = "=cellB2";

    The Shape.ShapeText.IsLinked property returns true if shape text is linked to a cell. Shape text is updated automatically when a value in the referenced cell changes or document formulas are recalculated.

  • T1041398 - We added a new WorksheetView.GridlineColor property to specify the color of worksheet gridlines
    https://supportcenter.devexpress.com/ticket/details/t1041398

    The following code snippet changes the gridline color to red:

    workbook.Worksheets[0].ActiveView.GridlineColor = Color.Red;

    Assign Color.Empty to the WorksheetView.GridlineColor property to restore default gridline color. Transparent or semitransparent colors are not supported.

PDF Document API

  • T1037054 - We implemented a new PdfDocumentProcessor.DataRecognitionCacheSize property that allows you to set cache size (in pages) for data recognition
    https://supportcenter.devexpress.com/ticket/details/t1037054

    Use the PdfDocumentProcessor.DataRecognitionCacheSize property to increase the number of pages with cached data. This may be useful if you need to accelerate FindText method execution on documents larger than 65 pages (the default cache size is 65 pages).

    If the DataRecognitionCacheSize property is set to 0, cache size is unlimited.

    pdfDocumentProcessor.DataRecognitionCacheSize = 100;
  • T1047842 – We added new APIs to create a form field with multiple widgets
    https://supportcenter.devexpress.com/ticket/details/t1047842

    You can now add widgets to a text box (PdfAcroFormTextBoxField), check box (PdfAcroFormCheckBoxField), and list box/combo box (the PdfAcroFormChoiceField class descendants).

    Use the following methods to manage a form field’s widgets:

    • AddWidget(PdfRectangle rectangle)

      Adds a widget to the page where the form field is located.

    • AddWidget(int pageNumber, PdfRectangle rectangle)

      Adds a widget to a specific page.

    • ClearWidgets()

      Removes existing widgets from the form field.

    We also implemented a new AddButton(string name, int pageNumber, PdfRectangle rect) method for the PdfAcroFormRadioGroupField class to append an additional radio button to a radio group field.

WinForms and WPF PDF Viewers

Note: Add the DevExpress.Docs.v21.2.dll assembly to your project to use the PDF Facade API. Please note that you need an active DevExpress Office File API Subscription or DevExpress Universal Subscription to use this assembly in production code.

New Examples: WinForms and WPF Spreadsheet Controls

We created two examples that demonstrate the use of the DevExpress Spell Checker component (to check spelling in our WinForms and WPF Spreadsheet controls). When a user enters text in a cell, the spell checker indicates misspelled words with a red wavy line. A user can right-click an underlined word and select the correct spelling from the list of suggestions or invoke the Spelling dialog.

Your Feedback Matters

As always, if you’ve come across an interesting support ticket you’d like to share with the rest of the DevExpress developer community, please comment below and include the appropriate link.


WinForms/WPF/WinUI Survey - Decide What's Coming Next to Your Desktop App

$
0
0

With 2021 nearing an end, we are preparing our 2022 roadmaps across all supported desktop platforms (WinForms, WPF, WinUI). Before we finalize our plans, we want to hear from our loyal users and learn more about your new requirements and long-term desktop development needs.

For instance - are you interested in emerging platforms like WinUI or Uno? Are you considering modernization efforts or working towards accessibility compliance? Do you have an important usage scenario that cannot be implemented with existing DevExpress desktop components? Answers to these questions (and many more) will help us refine our 2022 development strategy.

The following survey contains dynamic questions based on responses you make. The survey will take approximately 4-7 minutes to complete. If you would like discuss your requirements personally with a member of the DevExpress team, feel free to leave your contact information at the end of the survey.

XAF - New Grid List Editor, Feedback on the Main Menu Toolbar and End-User Layout Designer in Blazor UI

$
0
0

New DxGridListEditor (CTP) - Try It Out in v21.2.4+

As you may already know, XAF's Blazor UI includes a new UI element - Grid List Editor (DxGridListEditor). This new UI element is built atop the new DevExpress Blazor Grid control. Like the new Blazor Data Grid, DxGridListEditor will be updated with new features every minor release and we plan to deliver much more in our v21.2.5+ minor update in late January 2022. XAF Blazor UI users will especially appreciate Conditional Appearance support, Server Mode support (yes, we may return to DataAccessMode = Server instead of Queryable, because it supports more features like runtime calculated fields), customization form support, and much more.

This post is just a gentle reminder for early adopters/testers to explicitly enable the new DxGridListEditor in their projects (since it is a preview) and share their feedback with our development team via the DevExpress Support Center. 

Main Menu Toolbar - Your Feedback Matters

At present, XAF's Blazor main menu toolbar hides commands based on record selection within the ListView. This behavior was introduced 1.5 years ago and it differs from XAF's WinForms & ASP.NET WebForms UI. We designed this menu in this manner because it is more suitable for smaller screens (on mobile web browsers), which XAF's Blazor UI also supports.

Menu Behavior 1


Menu Behavior 2

Throughout this year, many of you have asked us to restore our WinForms & ASP.NET WebForms UI implementation - menu commands are disabled based on record selection within the ListView. 

Question 1: Which default behavior do you prefer for XAF's Blazor UI (v22.1+)? Please add "Menu Behavior 1 or 2" and, optionally, describe your use-case/reasons in the comments section below.

If we do not have many votes for the new behavior (2), we will simply retain our existing implementation and focus on more important things for the majority of users. Thanks for your feedback in advance.

Teaser 1: Detail Form Layout Customization

For our v22.1 release in May 2022, we are researching the technical possibility to implement layout customizations in XAF's Blazor UI for end-users (just like its WinForms counterpart). You can get a taste of this below - our first spike (please ignore UI design issues - it is just a wireframe to demonstrate the main idea):

If you’ve used XAF's WinForms UI, you already know that rich runtime UI customization for both developers and end-users can be a time saver - your apps can address changing business requirements without the need for redeployment.

Question 2: Would you like us to continue our research and implementation? If so, please add "+1" in the comments section below. If you have multiple XAF developers, you can certainly add "+5", "+10", "+N"😀.

This is a very serious and costly undertaking, so we want to be certain that we have sufficient support from registered customers. So - if this feature does not elicit a simple +1 comment, it is a sign that we should not pursue this feature.

Teaser 2: Custom Buttons for XAF's Blazor UI Lookup Editor Are Coming

XAF's Blazor Lookup Editor will display the "New" and "Open Related Record" buttons in v21.2.5 (January 2022).

Visual Studio 2022 Support for XAF and XPO

XPO's ORM Data Model Designer, XAF's Model Editor, and Solution Wizard support Visual Studio 2022 in v21.2.4 - please try these designers and let us know your thoughts.

Note that the Application and Module Designers for .NET Framework apps are not yet supported (track progress). As a workaround, edit the WxxApplication.xxx/WxxApplication.designer.xx and Module.xx/Module.designer.xx files in code (Add a Module in Code).

Dependency Injection Extensions for XAF Module Configuration Are Coming

As you may recall from our roadmap, we will NOT support Module and Application Designers in .NET 5+ apps (.NET Framework apps will be unaffected), because they mostly duplicate Solution Wizard functionality and are rarely used (occasional module or application configurations can be easily addressed with a few lines of code: example). To promote straightforward and consistent configurations for security and application modules across WinForms and Blazor in .NET+, XAF v22.1 will support Dependency Injection (DI) extensions like those found in ASP.NET Core Blazor Server apps.

.NET Data Processing API - First Community-Sourced Scenarios Addressed

$
0
0

As you may recall, we prioritized solutions for the most common ETL scenarios in September (Data Processing Scenarios (ETL) - Your Feedback Matters). Thanks for all the great feedback in this regard.

The good news is that we've built our first prototype (a .NET library/API) to address the most popular usage scenarios:

  • Add ETL (Extract, Transform, Load) capabilities to .NET apps.
  • Shape data (group, sort, filter, apply analytics functions) for use within the UI on any platform.

We kindly ask you for one more favor - please test our .NET Data Processing API in your environment to help us validate our design decisions before we commit to further development efforts.

The Why: The Benefits of Our API

The main benefits of our Data Processing API are as follows:

  1. Efficient in-memory data processing for unmatched performance (we reused the core of our blazing fast Pivot Grid control - learn more) .
  2. Unified interface to connect to different data sources (relational databases, web services, Excel spreadsheets, JSON data, etc).
  3. Custom .NET logic support to intercept data processing flow.
  4. High-level analytical functions for easier data flow design.
  5. Built-in debugging capabilities to quickly fine-tune results.

How to Test Our API

This .NET data processing library/API is NOT yet part of an official DevExpress package. This notwithstanding, we made it super easy for you to test our API with the following GitHub repository: DevExpress / dataprocessingapi-mvp-example. 

To get started quickly, please review our sample (ConsoleExample/Program.cs) that joins input data from two sources (a JSON file and an XLSX file), applies a set of transformations (aggregation, top-n, sorting) and generates the XLSX output file in the appropriate format.

Sample data processing workflow

For information on how to construct a data flow from scratch, please refer to the README.md file, download the example and explore its capabilities within Visual Studio.


Your Feedback Matters

If the Data Processing API we’ve introduced do not fully address your business needs or if you’d like to engage us further on this topic, please complete the survey below, leave a comment below or create a new support ticket via the DevExpress Support Center. We’ll be more than happy to follow-up.

.NET Word Processing API and UI Components - How to Use Fields to Create a Holiday Party Invitation

$
0
0

With the winter holidays upon us, some of you may be busy sending electronic greeting cards, invitations, and other mailouts to your family, friends, and business associates.

The purpose of this blog post is to illustrate the use of our word processing products to automate this document generation process and demonstrate the ease with which you can insert dynamic content into your documents. We’ll show you how to use fields to generate a holiday party invitation and also review a couple of field-related enhancements we introduced in our most recent major release (v21.2).

Add Fields to the Template

For this blog post, we’ll use the following document template:

We will use the DevExpress Word Processing Document API to replace static strings (“party date”, “time”, “response date”, and "manager”) in the document template with fields.

Note: You’ll need to call the FieldCollection.Create method to add a new field. This method allows you to convert text to a field, or insert a field at a specified document position. See the following topic for a full list of supported fields: Field Codes.

You can add code switches to define formats for numeric, text, date, and time fields. Refer to the following topic for a full list of supported field format switches: Format Switches.

The code sample below creates a DOCPROPERTY field (to insert the party date) and a TIME field with the H:mm am/pm format:

private static void CreateFields(Document document)
{
  // Create a “Party Date” custom document property
  document.CustomProperties["Party Date"] = new DateTime(2021, 12, 23); 

  // Find the “Party Date” phrase
  DocumentRange[] dateRanges = document.FindAll("Party Date", SearchOptions.WholeWord);
  DocumentPosition datePosition = dateRanges[0].End; 

  // Delete the phrase
  document.Delete(dateRanges[0]); 

  // Create a field at the phrase’s position
  document.Fields.Create(datePosition, @"DOCPROPERTY ""Party Date"""); 

  // Find the word “Time”
  DocumentRange[] timeRanges = document.FindAll("Time", SearchOptions.WholeWord);
  DocumentPosition timePosition = timeRanges[0].End; 

  // Delete the phrase
  document.Delete(timeRanges[0]);

  // Create a field at the phrase’s position
  document.Fields.Create(timePosition, @" TIME \@ ""H:mm AM/PM""");
}

DOCVARIABLE Fields

The DOCVARIABLE field allows you to insert any type of content into a document – from a simple variable to dynamic data from a database or another document. Explore our DOCVARIABLE field (dynamic content) demo to see how easy it can be to insert RSS data into a document: Dynamic Content.

Variables can be stored in a document or calculated within the CalculateDocumentVariable event. In this example, we created a Response Date variable to calculate the response deadline.

private static void CalculateResponseDate(Document document)
{
  // Obtain the Party Date property value
  DateTime date = (DateTime)document.CustomProperties["Party Date"]; 

  // Specify the interval between the response and party dates
  var responseBefore = new TimeSpan(7, 0, 0, 0); 

  // Calculate the response date
  DateTime responseDate = date.Subtract(responseBefore); 

  // Create a new document variable
  document.Variables.Add("Response Date", responseDate);
}

You can add fields to any portion of the document: main body, header, footer, text box, footnote, or endnote. The code sample below adds our “Response Date” variable and the DOCPROPERTY field (that inserts the manager’s name) to the document footer:

private static void CreateFieldsInFooter(Document document)
{
  // Start the footer update
  var footer = document.Sections[0].BeginUpdateFooter(HeaderFooterType.Primary);
  
  // Find the word “Manager”
  DocumentRange[] managerRanges = footer.FindAll("Manager", SearchOptions.WholeWord); 

  // Convert the found text to a field
  Field managerField = footer.Fields.Create(managerRanges[0]); 

  // Insert the field name 
  footer.InsertText(managerField.CodeRange.Start, "DOCPROPERTY "); 

  // Find the “Response Date” phrase
  DocumentRange[] responseRanges =
      footer.FindAll("Response Date", SearchOptions.WholeWord);
  DocumentPosition responsePosition = responseRanges[0].End; 

  // Remove the phrase 
  footer.Delete(responseRanges[0]); 

  // Create a field at the phrase’s position 
  footer.Fields.Create(responsePosition, @" DOCVARIABLE ""Response Date"""); 

 // Finalize the footer update
 document.Sections[0].EndUpdateFooter(footer);
}

A new UpdateFieldOptions.DocVariable property (implemented in v21.2) allows you to preserve DOCVARIABLE field value when the document is loaded. For example, if you need to change the party date while keeping the response date the same. Set the UpdateFieldOptions.DocVariable property to false within the BeforeImport event handler, as shown below.

using DevExpress.XtraRichEdit;
using DevExpress.XtraRichEdit.Import;

wordProcessor.BeforeImport += WordProcessor_BeforeImport; 

private static void WordProcessor_BeforeImport(object sender, BeforeImportEventArgs e)
{
  if (e.DocumentFormat == DocumentFormat.OpenXml)
  { 
    ((OpenXmlDocumentImporterOptions)e.Options).UpdateField.DocVariable = false;
  }
}

If you re-load the document now, change the party date, and save the result, you’ll see that the DOCVARIABLE field still displays the same date:

Update Fields and Save the Result

After you insert fields, update them to insert actual field data, and then save the document. In previous versions, you had to call the FieldCollection.Update method for each individual document section (header, main body, footnote, and others). In v21.2, we added the Document.UpdateAllFields method to update all document fields simultaneously.

The code sample below utilizes all methods created in previous examples, updates all document fields, and saves the result:

using DevExpress.XtraRichEdit;
using DevExpress.XtraRichEdit.API.Native;

using (var wordProcessor = new RichEditDocumentServer())
{
  // Load a document
  wordProcessor.LoadDocument(“party invitation.docx”);
  Document document = wordProcessor.Document; 

  // Create fields
  CreateFields(document);
  CalculateResponseDate(document);
  CreateFieldsInFooter(document); 

  // Update all fields
  document.UpdateAllFields(); 

  // Save the result
  wordProcessor.SaveDocument(“party invitation_docx.docx”, DocumentFormat.OpenXml);
}

Let’s switch to the Rich Text Editor for WinForms and look at our results. You can add and modify fields via the Rich Text Editor’s UI. Press CTRL+F9 to insert a field, and ALT+F9 (or click Toggle Field Codes in the context menu) to modify a field.

If the holiday skin applied to the Rich Text Editor caught your eye, check out the following blog post for information on how to add a bit of a holiday spirit to your application: WinForms — New Winter Joy Vector Skin.

If fields are no longer needed, you can replace them with their values (unlink the fields). DevExpress Word Processing products (v21.2+) ship with the following methods that can help you with this requirement:

In this example, we added a custom button that unlinks all fields and opens the Save As dialog to save the result.

using DevExpress.XtraBars;

private void unlinkButton_ItemClick(object sender, ItemClickEventArgs e)
{
  richEditControl.Document.UnlinkAllFields();
  richEditControl.SaveDocumentAs();
}

If you liked our party invitation template, you can download it here: Party Invitation. Print or export the invitation to a PDF file, or save it as a Word document.

We wish all of you the best this holiday season and in the coming year.

Your Feedback Matters

Let us know what you think about the field enhancements described in this blog post. And if you have specific questions or need assistance with the DevExpress Word Processing product line, feel free to contact us through the DevExpress Support Center (support@devexpress.com).

Happy Holidays from the DevExpress Reporting Team - Demo with Material Design Theme Inside

$
0
0

Like 2020, this was a challenging year. Here’s hoping we all turn the proverbial corner in 2022.

As in past years, we want to thank you for your continued support/business and for placing your faith in our products and services. We wish you and your family the very best.

Happy Holidays and a Happy New Year!

Greeting Card Builder 2022 in Material Design

For 2021, we used the DevExpress End-User Report Designer to create our 2021/2022 Season’s Greetings Card Builder app. Please note that this demo includes a sneak peek of the Material UI theme for the DevExpress Web Report Designer (We’d love to hear your feedback on our implementation in the comments section below).

If you are new to DevExpress Reports, you can check out the customization capabilities of the Web Report Designer in this online demo. If you choose to create your own custom card builder, be sure to share your implementation with us. We’d love to see your design!

Follow this link to launch the Greeting Card Builder application: DevExpress Season’s Greetings Card Builder.

Viewing all 2399 articles
Browse latest View live