Quantcast
Channel: Developer Express Inc.
Viewing all 2401 articles
Browse latest View live

DevExtreme React - Tips & Tricks (September - October 2020)

$
0
0

Here is a new list of React-specific support tickets we think might be of value to those of you targeting the React framework. This post also includes links to a few new demos and help topics. 

Should you have any questions about this month’s React-specific Tips & Tricks, feel free to post a comment below or open a new support ticket via the DevExpress Support Center. 

Support Tickets that Apply to React

Documentation & Demos Updates

New Examples

If you want to share your own tip or support ticket with the rest of the DevExpress React developer community, please comment below and include the appropriate link below. 

Thanks for choosing DevExtreme for React.

Your Feedback Counts


FMX Grid: future plans

$
0
0

A couple of weeks ago, we published the latest release of the DevExpress VCL Subscription, v20.2. Now that the Thanksgiving break is over, it's time to talk about what we plan for FireMonkey. I'm afraid that it's not the best of news: we have decided to put our FMX development on hold and not enhance the grid beta any further. There are several reasons for this decision.

1. After some three years of experimentation and development with FireMonkey, we have come to the conclusion that it is too slow for the depth of functionality and the type of controls for which we're recognized. Actually, this is something we've encountered before with C# and Xamarin Forms: we had to concede that the only way we could develop useful controls for that framework was to write them natively. In essence, we write them twice: once for iOS with Objective-C, and once for Android with Java, and then create a "simple" Xamarin Forms wrapper to expose their functionality to the C# developer. We found it was the only viable way we could produce the user experience and performance for our controls that our customers expect. Of course, as you can surmise, it’s over twice the usual work and effort to produce a useable control. With regard to our Delphi customer base, we and the team would rather concentrate on producing the best-in-class VCL controls – witness the newly released beta of the Gantt control as an example.

2. Another reason, perhaps less paramount, is that the FireMonkey framework, the API if you like, is still not extensive or detailed enough for the depth of functionality we and our customers assume from our 22 years of using and capitalizing on the VCL framework. We keep on running into functionality roadblocks that require us to write extensions to the base FMX library.

3. Finally, and I'd have to say this is a little disappointing, we just didn't get the level of interest or feedback from our customers that we were projecting. Perhaps this was due to the fact that the grid and editors beta we released wasn't extensive enough that people were ready to try it out and provide feedback on the functionality, or maybe there just isn't enough interest in FireMonkey for, say, MacOS, and hence our desktop viewpoint didn't match expectations. Again, this leads us to believe that our customer base would prefer more and better VCL controls rather than splitting the team into two to provide FMX controls as well.

The current beta of our FireMonkey grid suite will remain available as a free download for VCL Subscription customers from the Download Center. As of this point in time, we have no plans to add any further documentation or enhancements.

If you have feedback about this decision or wish to discuss it, do please email me at julianb@devexpress.com.

DevExtreme Vue - Tips & Tricks (September - October 2020)

$
0
0

Here is a new list of Vue-specific support tickets we think might be of value to those of you targeting the Vue framework. This post also includes links to a few new demos and help topics.

As always, we want to help. Should you have any questions about this post, feel free to post your comments below.

Support Tickets that Apply to Vue

Documentation & Demos Updates

New Examples

If you have an interesting support ticket you’d like to share with the rest of the DevExpress Vue developer community, please comment below and include the appropriate link. 

Thanks for choosing DevExtreme for Vue.

Your Feedback Counts

Scheduler for Blazor - Resources, Custom Fields, Form Customization (available in v20.2)

$
0
0

Our most recent release (v20.2), includes a series of new features/capabilities for existing DevExpress Blazor UI controls. In this post, I'll focus on the most recent enhancements to our Blazor Scheduler component.

Before I proceed, a quick word about v20.1 and our expired free Blazor UI component offer. If you downloaded v20.1 free-of-charge, you are entitled to use v20.1 as long as you wish. With our v20.2, our Blazor UI controls are no longer available free-of-charge. Should you require additional information on v20.1, please forward your comments to clientservices@devexpress.com.

Resources

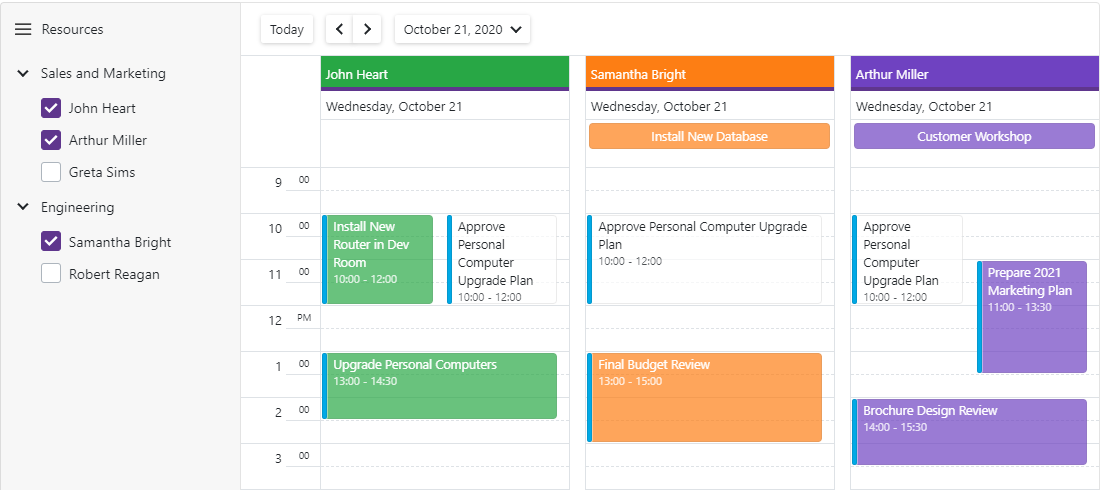
Our Blazor Scheduler now allows you to assign resources to appointments and browse multiple schedules simultaneously. You can group appointments by resources or by dates and display resources in different views:

Blazor Scheduler Resources

Demo | Documentation

We've integrated Resource Navigation into our Blazor Scheduler. Your users can show or hide calendars via our integrated Resource Navigator.

Blazor Scheduler Resource Navigation

You can also create a custom UI as needed. For instance, you can introduce a tree-like resource navigator to filter resources:

Blazor Scheduler Resource Navigation Filter

Demo | Documentation

Custom Appointment Form

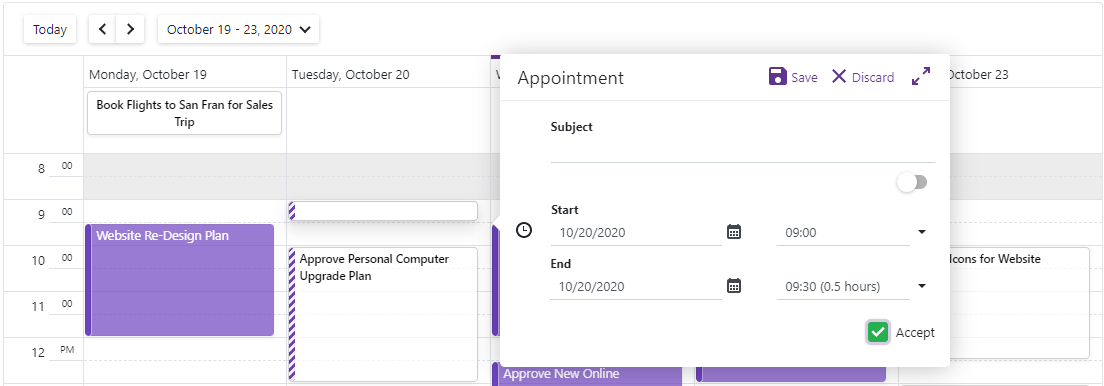
Our Blazor Scheduler has two built-in dialogs to edit appointments: compact and detailed. We've added a flexible new API to create custom layouts for these Appointment Dialogs. You can customize the forms to do the following:

  • Add your own editors and bind them to custom fields
  • Use custom editors for built-in Appointment items
  • Mix custom content with default items
  • Combine items into groups to better address your business requirements

Use the following new properties to manage these dialogs:

AppointmentCompactFormLayout - Specifies the layout of the compact form that appears when you create an appointment.

Blazor Scheduler Edit Form Customization

AppointmentFormLayout - Specifies the layout of the pop-up form that appears when you create an appointment and click the expand button, or when you edit an appointment.

Blazor Scheduler Custom Edit Form

Demo | Documentation

Appointment Templates

You can now customize appointment appearance via templates. New templates include:

Blazor Scheduler Appointment Templates

Demo | Documentation

Custom Fields

Custom fields allow you to add custom data to appointments, labels, and status fields. For example, use the AppointmentMappings.CustomFieldMappings collection to add custom fields for appointments:

DxSchedulerDataStorage DataStorage = new DxSchedulerDataStorage() {
  AppointmentsSource = AppointmentCollection.GetAppointments(),
  AppointmentMappings = new DxSchedulerAppointmentMappings() {
    ...
    CustomFieldMappings = new List<DxSchedulerCustomFieldMapping> {
      new DxSchedulerCustomFieldMapping { Name = "IsAccepted", Mapping = "Accepted" }
    }
  }
};

Demo | Documentation

New API to assign CSS classes

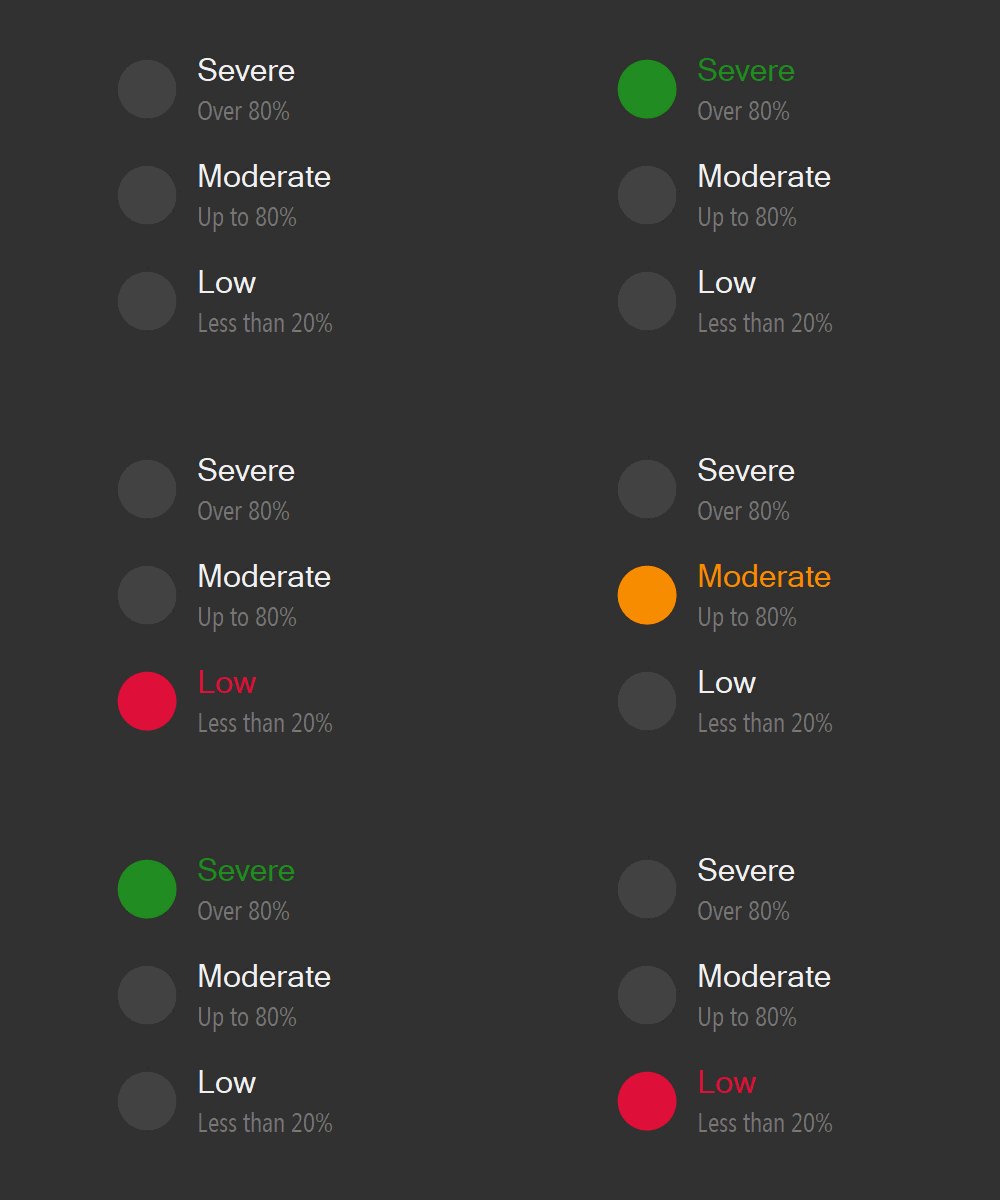
The TextCssClass and BackgroundCssClass properties allow you to assign CSS classes to appointment labels and status fields. You can also map the label's properties to the data source fields:

AppointmentLabelMappings = new DxSchedulerAppointmentLabelMappings()
{
  Id = "Id",
  Caption = "LabelName",
  Color = "LabelColor",
  TextCssClass = "TextCssClass",
  BackgroundCssClass = "BackgroundCssClass"
}

Documentation

Should you have any questions about these new features, or if you require assistance on our Blazor product line, please comment below. Please remember, that the features described in this post relate to v20.2. v20.2 is not available free-of-charge. The capabilities described in this post are available to those who own an active ASP.NET/DXperience/Universal Subscription.

Reporting - Important Change and Tips & Tricks (November 2020)

$
0
0

In this post, I will highlight an important change related to DevExpress Reports and its use within an ASP.NET Core project.

I’ll also share links to a few interesting technical support tickets we’ve received recently. I hope the information herein will be valuable to those of you using DevExpress Reports or considering it for an upcoming project. As always, should you have any questions, feel free to post your comments below.

.VSREPX - New Report File Format

Both our Visual Studio Report Designer and our End-User Report Designer generate .REPX files. While this might create the impression that these files can be used interchangeably, there are important differences between the two:

  • .REPX files generated by our Visual Studio Report Designer may include event handlers for components and report controls.
  • .REPX files created in our Visual Studio Report Designer do not automatically serialize subreport source types and report data sources.
  • .REPX files generated in our Visual Studio Report Designer must include report class definitions in order to correctly restore report layouts from these files.
  • Restoring a report from a .REPX file generated in the VS Report Designer may throw an exception at runtime.

Because of these differences, a Visual Studio-generated .REPX file may cause unexpected behavior and/or discrepancies in the generated document if opened in the End-User Report Designer or passed as an argument to the XtraReport.LoadLayout / LoadLayoutFromXml method.

To address this issue, we introduce a new XML-based .VSREPX file format. With our v20.2.4 update, this file is generated when you add a new report to a Visual Studio project instead of the former .REPX file.

To avoid breaking changes to your application, we do not prevent the runtime loading of .REPX files that were generated with older versions of DevExpress Reports. However, if you try to load a report from the new .VSREPX file format, the following InvalidOperationException is thrown:

You cannot use the LoadLayoutFromXml method to open a VS Report Designer’s internal working file. Use the Save command in the Visual Studio Report Designer to create a standard report template (REPX) file.

To eliminate the exception, convert the file to .REPX before you pass it to LoadLayoutFromXml. At design time, open the .VSREPX file in the Visual Studio Report Designer and save the report to .REPX. At runtime, call XtraReport.SaveLayoutToXml to produce a .REPX file.

Interesting Support Tickets

Reporting – Multiple Supported Platforms (WinForms, WPF, ASP.NET, .NET Core)

Reports for ASP.NET Core

Reports for ASP.NET MVC

Reports for ASP.NET Web Forms

Reports for Blazor

Reports for WPF

Your Feedback Matters

As always, we welcome your thoughts. Please comment below and let us know what you think about our new .VSREPX file format. Should you have technical questions, feel free to contact us via the DevExpress Support Center.

DevExtreme Charts - Axis Label Customization (v20.2)

$
0
0

You can now customize axis labels via custom templates for major axis tick labels. To deliver a more refined and intuitive user experience, use the power of SVG markup to define your custom label template. For instance, the screenshot below uses a custom axis label template to draw each nation’s flag alongside country name.

Configuration

To specify a custom label template, use the `valueAxis.label.template` option for the Chart’s value axis and the `argumentAxis.label.template` option for the argument axis. If you need to apply the same template to both axis simultaneously, you can use a single `commonAxisSettings.label.template` option instead.

Note, this new feature is available for all DevExtreme Chart series types.

Try It Today

Please refer to our new Chart axis label customization demo to explore this feature in greater detail.

Feedback

As always, we welcome your feedback. If you have any questions or suggestions, feel free to leave a comment below or submit a support ticket via our Support Center.

Xamarin.Forms Components – CollectionView, New Data Editors, and More (available in v20.2)

$
0
0

In this post, I'll review enhancements introduced to DevExpress UI for Xamarin.Forms (v20.2). This release includes several new Xamarin.Forms UI components, and a number of new features/capabilities for existing controls (Data Grid, Charts, and Data Form).

Should you have any questions about the Xamarin.Forms products listed below, feel free to comment below.

New Xamarin CollectionView

v20.2 includes a new component designed to display data item collections within your mobile app – CollectionView.

Our Xamarin.Forms CollectionView includes the following built-in features/capabilities:

  • Vertical and horizontal layout
  • Data sorting, filtering, and grouping support
  • Data item and group header templates
  • Item drag & drop (item reordering) support
  • Pull to refresh
  • Load more
  • Single and multiple item selection
  • Dark and light themes

New Xamarin Data Editors

We’ve extended our line of Xamarin.Forms data/field editors. It now includes the following UI controls:

  • Xamarin AutoComplete Edit– suggests values that can be entered into the edit box.
  • Xamarin Numeric Edit– displays numeric values and allows end-users to edit it as needed (enter a number in the edit box or use spin buttons to decrease/increase the value).
  • Xamarin Date Edit and Time Edit– allows a user to select time and date values via native iOS or Android date/time pickers.
  • Xamarin CheckBox Edit– a checkbox with support for indeterminate states.

Note: These new components support all base features of our Xamarin editors (animated labels, placeholders, input error indication, icons, and appearance customization).

Xamarin Data Grid

Our DataGrid for Xamarin.Forms ships with the following new features.

  • A Virtual Horizontal Scrolling option - allows you to substantially improve the performance of the grid when displaying large numbers of columns.
  • DataGridView now uses DevExpress editors to display and edit cell values. It also supports three new column types - ComboBoxColumn, AutoCompleteColum, and TimeColumn.
  • You can now use the grid’s Auto-Filter Row to incorporate search capabilities within your mobile app.
  • New properties allow you to save the grid layout to a stream or an XML string and then restore it if needed.

Xamarin Charts

Our Xamarin.Forms ChartView has also been enhanced.

  • A new Spline series type allows you to display data as a smooth curve.
  • Point and Segment colorizers allow you to color-code series points and line/area segments to enhance data readability/discoverability. You can use predefined colorizers or implement custom algorithms as needed.
  • ChartView can now automatically format DateTme and Numeric axis labels. This feature allows you to display extended information within chart axes.

Xamarin Data Form

We’ve added the following new properties to extend the capabilities of our Xamarin.Forms Data Form.

Give it a Try

To explore these new controls and features first-hand, you can download our demo app using the following links:

Before We Let You Go

Please take a moment to respond to the following survey – your feedback will help us refine/shape our Xamarin.Forms development strategy.

WinForms Step Progress Bar — v20.2 Update

$
0
0

Each time a screenshot from the recently released Dental Clinic demo appears in a WinForms-related post, we invariably receive questions regarding the following UI component...

As some of you already know, this component is our WinForms Step Progress Bar control. It was released in v20.1 release cycle. Our Step Progress Bar can be used to address a variety of use cases but I think it’s best used to visualize a chain of events and highlight progression in that chain.

If you are considering this tool for a WinForms project, please be sure to test out a couple of new features we introduced in our v20.2 release: dynamic progression and single-step selection mode.

Dynamic Progression

When the control was released, each step had only two states: selected and deselected. Once a step was completed, you would be able to select the next step. This approach is perfect in apps that do not need to track intermediate progress.

Of course, many usage scenarios do require you to visualize an on-going process and notify users about current step completion rate. To address these scenarios, we implemented a Progress property accessible from individual StepProgressBarItem elements. This property ranges from 0 to 100, where 0 corresponds to "not yet started" (the previous step was just selected), and 100 represents "step reached.” You can set this property to any integer value that falls in this range. The indicator that precedes this item will be filled proportionally to the number you've entered.

When you select an item (via the StepProgressBarItem.State or StepProgressBar.SelectedItemIndex properties), its Progress property is automatically set to 100.

Note that for the first Step Progress Bar item you should set the Progress property to either 0 or 100. Intermediate values make no sense since there is no connector that leads to this item.

Single-Step Progress Mode

Our WinForms Step Progress Bar was initially designed to visualize a series of interconnected steps. As such, a step cannot be activated (selected) until all previous steps are selected (and vice versa: when you select a Step Progress Bar item, all previous items are automatically selected).

In v20.2 we have implemented a new ProgressMode property, whose "Range" value corresponds to the behavior described above. The other value is "SingleStep". In this mode, the Step Progress Bar has a single selected item and selecting one item no longer activates all previous steps.

Tell Us More

We'd love to hear from those who’ve used the Step Progress Bar or are considering it for a project. Which events and processes do you think you’ll visualize with this control? Which feature do you wish to see in future iterations? Like the idea of click-able items? Perhaps multi-select in single-step progress mode? Or even multi-line layouts?

Please post your ideas/thoughts below.


Blazor UI Components - Grid and Stack Layout for Blazor - Responsive Page Layouts (available in v20.2)

$
0
0

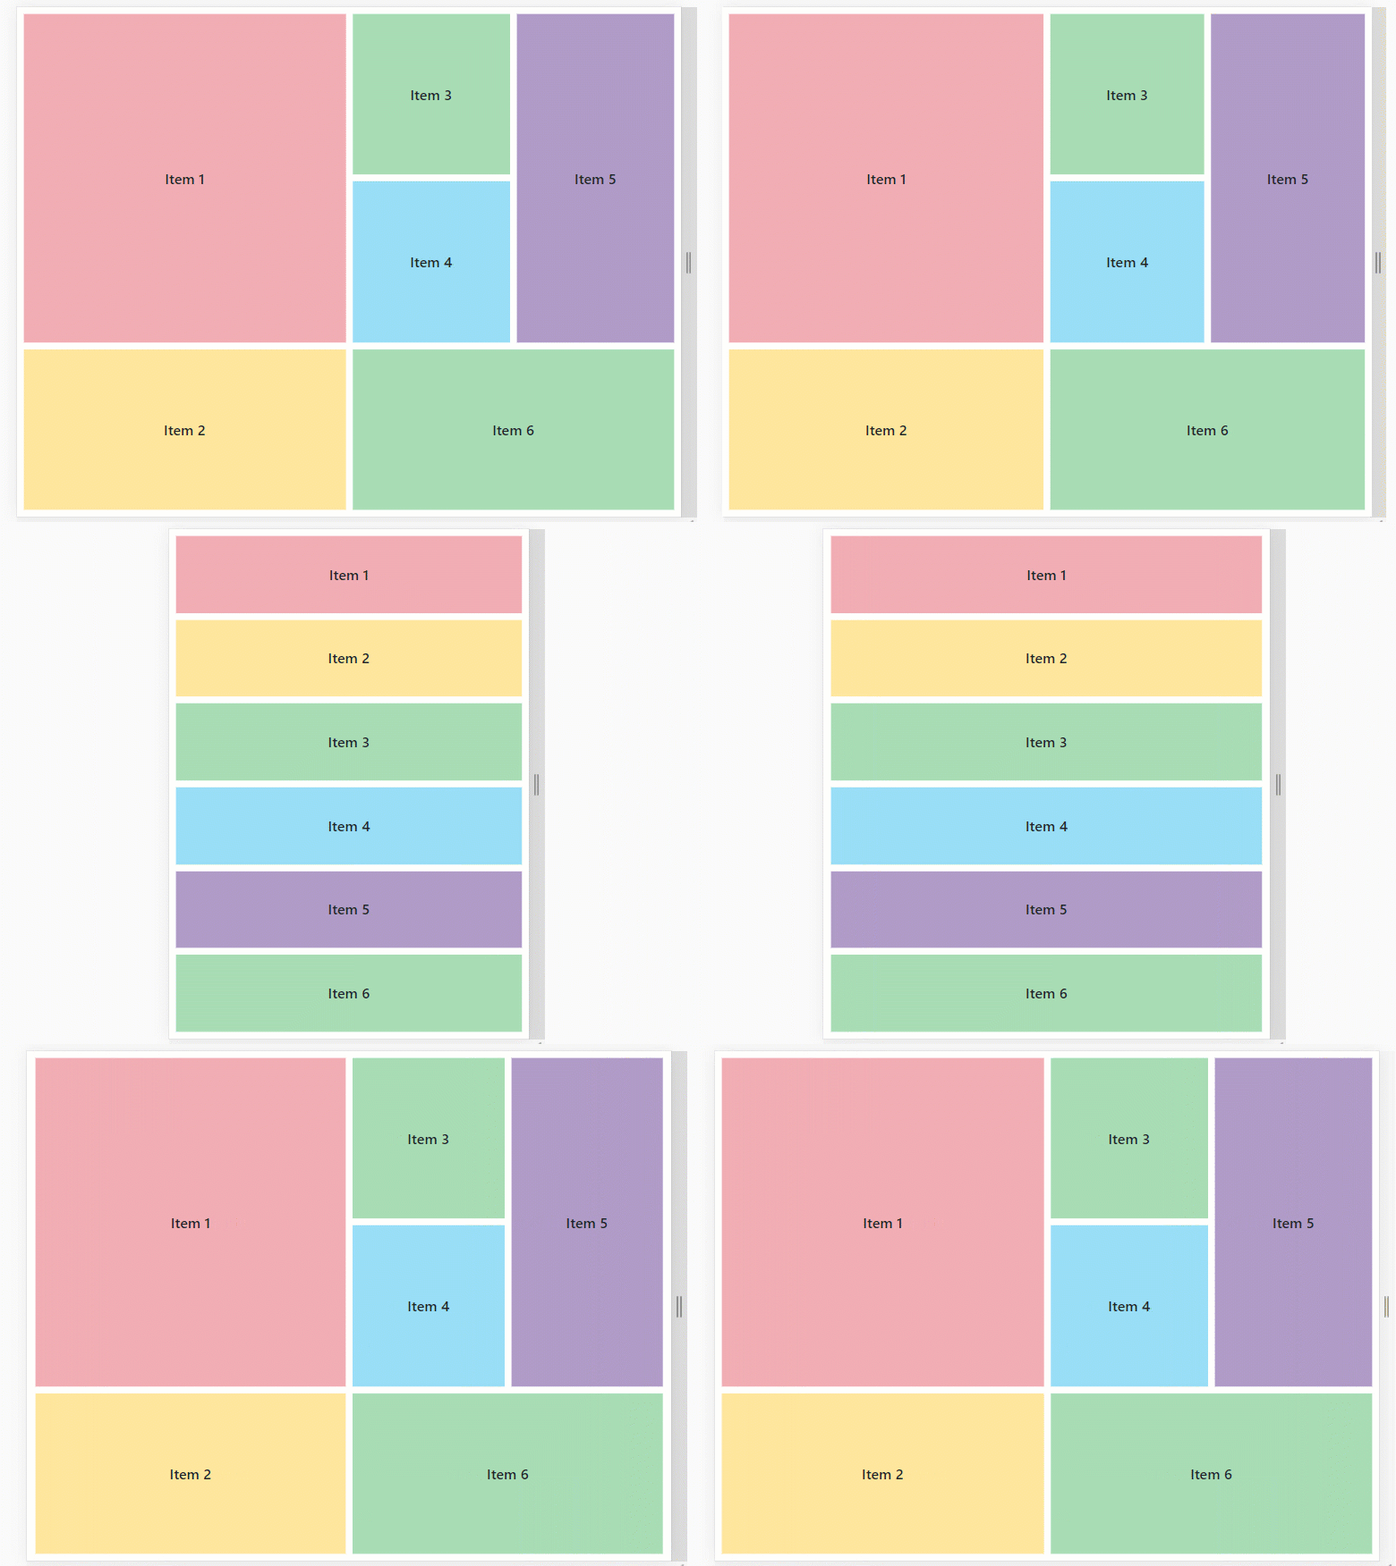
As you may already know, v20.2 includes three new Blazor components - 'Grid Layout', 'Stack Layout', and 'Layout Breakpoint'. Use the first two layout components to create custom page layouts as needed. Once complete, use our new Layout Breakpoint component to deliver responsive layouts that adapt to different screen sizes.

Before I proceed, a quick word about v20.1 and our expired free Blazor UI component offer. If you downloaded v20.1 free-of-charge, you are entitled to use v20.1 as long as you wish. With our v20.2, our Blazor UI controls are no longer available free-of-charge. Should you require additional information on v20.1, please forward your comments to clientservices@devexpress.com.

New Blazor Grid Layout

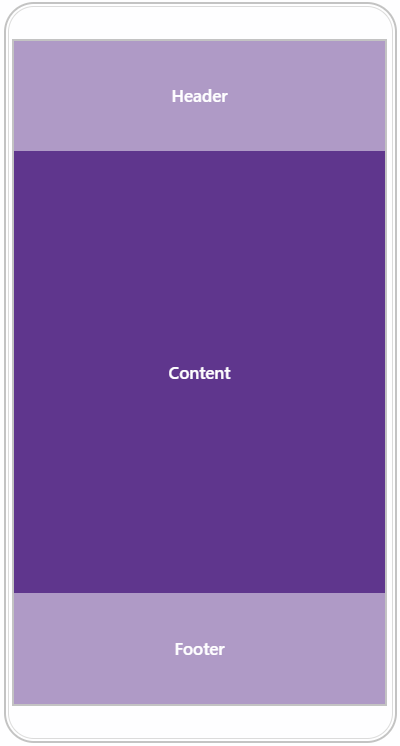
Our new Grid Layout for Blazor allows you to arrange UI elements across a page. The component is based on CSS Grid Layout. To create a layout, simply define rows and columns, specify their size (Height, Width) and distance between them (RowSpacing, ColumnSpacing). Once ready, position layout items such as our Blazor Data Grid or other Blazor component within individual cells. A single item can span multiple rows and columns:

With this new UI element, you can address a variety of use cases. In the following image we use the Grid Layout to create a Dashboard style UI:

Demo | Documentation | GitHub Example

Adaptive Blazor Apps

Use the new LayoutBreakpoint component to create a responsive grid layout.

Demo | Documentation

New Blazor Stack Layout

The new Stack Layout for Blazor allows you to organize UI elements across a one-dimensional stack.

You can stack items using a vertical or horizontal orientation. To specify the item size (auto, pixel, percentage, etc.), use the Length property.

You can also use the LayoutBreakpoint component to adapt a stack layout to different screen sizes.

Demo | Documentation

Layout Breakpoints

The new Blazor Layout Breakpoint component allows you to adapt a page layout to different screen sizes. The new Blazor Layout Breakpoint component allows you to adapt a page layout to different screen sizes. You can use breakpoints to create a responsive Grid Layout and Stack Layout (or apply to any other component as necessary).

You can set up breakpoints in two different ways: either select from predefined sizes (DeviceSize) or set custom limits for width (MinWidth / MaxWidth).

Demo | Documentation | GitHub Example

Should you have any questions about these new features, or if you require assistance on our Blazor product line, please comment below. Please remember, that the features described in this post relate to v20.2. v20.2 is not available free-of-charge. The capabilities described in this post are available to those who own an active ASP.NET/DXperience/Universal Subscription.

Word Processing: WinForms, WPF, Office File API - Layout Rendering Enhancements (v20.2)

$
0
0

As you may already know, our Word Processing File API, and our RTF controls for both WinForms and WPF now offer improved document layout accuracy (to better mirror Microsoft Word 2013 and higher). These v20.2 enhancements affect both table layout and paragraph alignment. 

Table Layout Enhancements

Table Width Calculation

In previous versions of our Word Processing Document API and Rich Text editors (WinForms and WPF), table content was aligned with a document’s main body text. This could extend table width outside page or column margins.

To address this issue, we modified our table width calculation engine to mirror that of Microsoft Word 2013 and higher. Table content is now aligned with table width and does not extend the table.

Set the CompatibilitySettings.CompatibilityMode property to Mode14 or lower to revert to our previous table width calculation engine. DevExpress Word Processing products (File API, WinForms, WPF) now use this property value when rendering documents with tables (and during print or PDF export operations).

Allow Row to Break Across Pages

The Break Across Pages option defines whether to move the entire table row to the next page. You can now specify this option in code and via the control’s user interface:

Keep with Next and Widow/Orphan Control

Our Word Processing Document API and Rich Text Editor for WinForms and WPF now apply the following options when they display, print, and export (to PDF) documents with table paragraphs:

Keep with Next

Keeps multiple paragraphs together so that they remain on the same page. This option should be enabled for the first paragraph in the table cell.

Widow/Orphan Control

Prevents the first or last paragraph line from appearing at the bottom or top of a page.

Justify Paragraph Alignment

When a word does not fit on a line and hyphenation is disabled, the entire word is moved to the next line. In previous versions, the Rich Text Editor and Word Processing Document API expanded space in the original line to populate empty space.

Our Rich Text Editor and Word Processing Document API (v20.2) now tries to decrease space in the line to leave the last word in place.

Set the CompatibilitySettings.CompatibilityMode property to Mode14 or lower to revert to previous behavior. Please note that our line length calculation differs from Microsoft Word. As such, you may encounter paragraph alignment differences.

Your Feedback Matters

As always, we welcome your thoughts. Please comment below and let us know what you think about these layout rendering enhancements. Should you have technical questions, feel free to contact us via the DevExpress Support Center.

DevExpress and The Big Bear DCC Model Rail Controller: A Case Study

eXpressApp Framework - Tips & Tricks (November 2020)

$
0
0

A new month brings with it an edition of XAF Tips & Tricks. We certainly hope the information contained herein will be of value as you explore and leverage the capabilities of the eXpressApp Framework.

New to XAF or considering it for the first time? Please visit XAF’s product page for introductory information on its built-in capabilities: devexpress.com/xaf.

As always, if you’ve come across helpful XAF-related support tickets, do share links in the comment section below. Thank you for your continued commitment to XAF!

Interesting Support Tickets

New and Updated KB Articles

Resolved Issues

Documentation Updates

Blazor UI

Asynchronous Data Loading

Load data asynchronously into XAF's WinForms Chart List Editor and PivotGrid List Editor (new in v20.2.4): Asynchronous Data Loading.

Security System

Enable and customize Security Permissions Caching.

Happy Holidays

$
0
0

It would be an understatement to say that 2020 was a difficult year. Here’s hoping we turn the tide in our battle against COVID-19 in 2021.

As always, thank you for placing your faith in our products and services. We wish you and your family the very best.

Happy Holidays and a Happy New Year.

Greeting Card Builder

Just like last year, we used the DevExpress End-User Report Designer to create a "Season's Greetings Card Builder" app. If you are new to DevExpress Reports, be sure to check it out and explore what’s possible with DevExpress Reports. If you choose to create your own custom card, be sure to share it with us (support@devexpress). We’d love to see what you design.

DevExpress Season’s Greetings Card Builder

Happy holidays and Happy 2021 from the DevExpress Team

Blazor UI Components - Tips & Tricks (October – December 2020)

$
0
0

We hope you are all doing well. Our best wishes to you, your team, and your family this holiday season.

This post includes links to a few interesting Blazor-related support tickets, along with a few help topics and technical videos published over the last three months. We hope you’ll find this info useful as you explore and integrate the DevExpress Blazor UI library within your Blazor app. Should you have any suggestions, feel free to leave a comment below.

Interesting Support Tickets

Updated Help Topics

We extended our Blazor Gettting Started section with the following:

We added new helpful articles: 

  • Two-Way Binding - Explains how to use two-way binding for DevExpress Blazor components.
  • Validate Input - Describes how to use Blazor’s standard EditForm component to validate user input in DevExpress Data Editors, Form Layout, and Data Grid’s edit form.

Support for .NET 5.0

Note that Microsoft updated Blazor browser support in .NET 5.0. Refer to supported browsers and supported frameworks for details.

Troubleshooting

We documented common issues and described solutions in our Troubleshooting section:

New YouTube Videos

Over the last three months, we recorded and published the following new videos:

This playlist includes all videos related to our DevExpress Blazor UI Components.

DevExtreme Pivot Grid - New Excel Export API (RTM in v20.2)

$
0
0

Our improved Excel Export API (first available for the DevExtreme DataGrid) is now part of our PivotGrid component - and available for Angular, Vue, React, and jQuery.

What’s New

As you may already know, our new Excel Export API is based on the open source ExcelJS library. This library allows you to customize exported Excel documents as your business requirements dictate. Let’s take a closer look at what you can expect with our new PivotGrid Excel Export API.

Exported UI Configuration Options

The new PivotGrid Export to Excel API (for Angular, Vue, React, jQuery) can now automatically apply an expanded list of PivotGrid UI configuration options for the exported Excel document. This set includes the following:

  • Column band settings (multi-level column headers);
  • Column width settings;
  • Cell formatting.

Excel Cell Customization

The new customizeCell callback gives you total control over exported cell values, display format and associated pivot table appearance within Excel. Though most will opt for WYSIWYG export, our API allows you to customize the exported document as needed.

Headers and Footers

Headers and footers are an essential part of many business documents. With our new Excel Export API, you are not limited to what can be displayed withing headers and footers. Our new implementation calculates the cell range occupied by the exported PivotGrid and passes it to you in a callback function. You can use this range to position your custom header or footer within the document at a location relative to specific PivotGrid data cells.

Export Progress Indication

If you’ve exported large datasets, you already know that some web browser may ‘freeze’ until the export process is complete. To indicate that export is in progress, our Pivot Grid for Angular, Vue, React and jQuery automatically displays a Load Panel. You can use the loadPanel option to customize its display characteristics as needed.

Advanced Document Generation

Since we offer you full control over the exported Excel workbook, a few important use cases can now be implemented within your web app (v20.2):

  • Create additional worksheets or modify exported worksheets.
  • Place the exported PivotGrid at any position within the target Excel Worksheet using the new topLeftCell option.
  • Export as many PivotGrids to a single Excel workbook or worksheet as required.
  • Export your PivotGrids side-by-side with DataGrids.
  • Export any custom content such as images or text.

This new Excel Export API offers tons of lexibility – we certainly hope it meets all your business requirements. Should you have a specific use-case it does not address, feel free to comment below.

How It Works

To export a PivotGrid, use the new ExportPivotGrid method (it accepts an object with the following fields):

  • component: PivotGrid, // A PivotGrid instance;
  • worksheet: Object, // The Excel worksheet into which the PivotGrid will be exported;
  • customizeCell: Function, // A callback to customize an Excel cell during export;
  • topLeftCell: Object | String, // An Excel cell that defines initial position for export;
  • loadPanel: Object // A Load Panel configuration object;
  • keepColumnWidths: Boolean // An option to retain column width in the exported Excel document.

Below is a simple example and a short explanation of how this all works:

Angular:

<dx-pivot-grid (onExporting)="onExporting($event)" ...>... </dx-pivot-grid>

React:

<PivotGrid onExporting={onExporting} ...>...</PivotGrid>

Vue

<DxPivotGrid @exporting="onExporting" ...>...</DxPivotGrid>

JQuery

$("#pivotgrid").dxPivotGrid({ onExporting: onExporting, ...});

A standard event handler:

onExporting: (e) => { 
  var workbook = new ExcelJS.Workbook(); 
  var worksheet = workbook.addWorksheet('Sheet name'); 
  
  DevExpress.excelExporter 
     .exportPivotGrid({ 
       worksheet: worksheet, 
       component: e.component 
     }) 
     .then(function() { 
       workbook.xlsx.writeBuffer().then(function(buffer) { 
         saveAs( 
           new Blob([buffer], { type: 'application/octet-stream' }), 
           'PivotGrid.xlsx' 
         ); 
       }); 
     }); 

   e.cancel = true; 
};

In this example we execute the following steps:

  • Subscribe to the PivotGrid’s onExporting event and provide a handler function. This event is raised when a user clicks PivotGrid’s built-in Export button.
  • Prevent use of our old built-in Export by setting ‘e.cancel’ to ‘true’ (our old PivotGrid export engine was preserved for backward compatibility only).
  • Use ExcelJS to create a new workbook with a single worksheet.
  • Call the ‘excelExporter.exportPivotGrid’ method to initiate PivotGrid export to the newly generated worksheet.
  • Use the ‘saveAs’ function from FileSaver.js to download the exported Excel document.

Try It

To try the new Excel Export API, please follow our step-by-step guide. You can also explore our new technical demos: Export To Excel.

Feedback

As always, we welcome your feedback. Please comment below and let us know what you think of our new PivotGrid export feature.

Before we let you go - please respond to the following question and help us prioritize future development plans as they relate to Excel:


WPF - Tips & Tricks (November - December 2020)

$
0
0

We compiled a series of WPF-related support tickets we hope you’ll find useful as you explore and use our WPF product line. As always, if you have questions about the content below, feel free to share your feedback in the comments section. We’ll happily follow up.

WPF Data Grid

WPF Editors

WPF Scheduler

WPF Maps

WPF Charting

WPF Ribbon

WPF Property Grid

Other controls


If you’ve come across a WPF-related support ticket that you’d like to share with the rest of the DevExpress community, feel free to share the link in the comments section.

eXpressApp Framework - Tips & Tricks (December 2020)

$
0
0

This is the last edition of XAF Tips & Tricks in 2020. We certainly hope the information we published during the course of the year was of value/benefit to you. If you’d like us to improve these tips & tricks posts in 2021, feel free and post your thoughts below.

Happy New Year – our best wishes for a healthy and prosperous new year.

New to XAF or considering it for the first time? Please visit XAF’s product page for introductory information on its built-in capabilities: devexpress.com/xaf.

Documentation Updates

  • In the following topic, we demonstrate how to use XAF's role-based access control API in a  Xamarin Forms app. Remember, our security API can be used in any .NET app, not just XAF-powered apps. If you have colleagues in need of a robust .NET security API, please share this post.  
  • We published a one hour video about the best ways to access and manipulate data in XAF/XPO-powered apps. This video should be of great help to those who are new to XAF. Thanks to our MVPs, Jose Columbie and Joche Ojeda for their assistance in producing this video.

  • We updated the following KB article FAQ: XAF ASP.NET Core Blazor Server UI with additional examples of custom XAF property editors. These examples demonstrate XAF’s broad UI customization capabilities. For instance, the articles includes use of new editors for color and file attachment properties (based on DevExpress Blazor and DevExtreme JavaScript components).
  • In this topic, we show you how to access standard ASP.NET Core services from XAF's View Controllers in Blazor UI through ((BlazorApplication)Application).ServiceProvider.GetRequiredService<YourService>()
       - IConfiguration - to read configuration keys like connection strings from appsettings.json (XAF integration example);
       - NavigationManager - to navigate to a required URL or download a file programmatically (XAF integration example);
       - IJSRuntime - to call JavaScript methods from .NET code - for instance,  in  custom editors (XAF integration example).
  • If you are new to XAF's Blazor UI, please be sure to check out our getting started tutorials and demos:  In-Depth XAF Blazor UI Tutorial (Main Demo)  |  Basic Blazor Tutorial (Simple Project Manager Demo)  |  Online Demo.
  • If you search XAF's Blazor documentation at https://docs.devexpress.com/eXpressAppFramework/, be sure to select .NET Standard or .NET Core using the top left selector (certain APIs and topics are not available under the default .NET Framework selector).


  • When you create a new XAF ticket in the DevExpress Support Center and select XAF under the Platform/Product field, you will see a panel with useful help links at the bottom. These links will offer guidance on how to collect callstacks, logs and other important information about any .NET error. With this information in hand, you’ll get faster and more accurate responses from our support team.


  • Did you know that you can place the cursor on a DevExpress API in the Visual Studio code editor and hit F1 to view relevant help topics directly within your web browser? For instance, go to one of your View Controllers, find and focus `CreateListView` or 'FindObject' and press F1. Many help topics include code examples that you can copy - a potential time saver. This DevExpress feature is already a part of the product installation - it does not require a separate installation of our offline docs.

    What do you think about this F1 capability? What are your habits with regard to API reference search in 2021? For instance, do you use search.devexpress.comhttps://docs.devexpress.com/search/?query=findobject&project=eXpressAppFramework or always google by default?

Spreadsheet Document API - How to Create a Loan Amortization Schedule within Your .NET 5 Blazor Server App

$
0
0

.NET 5 is officially here and as you may already know, our Office File API library v20.2 is fully compatible with .NET 5. In this post, we’ll explain how you can create a Blazor Server application that targets .NET 5 and leverages the capabilities of our Spreadsheet Document API to build a loan amortization schedule.

This is the final post in our blog series dedicated to the use of our Office File API within server-side Blazor apps. If you are new to this series, feel free to review our previous posts using the following links:

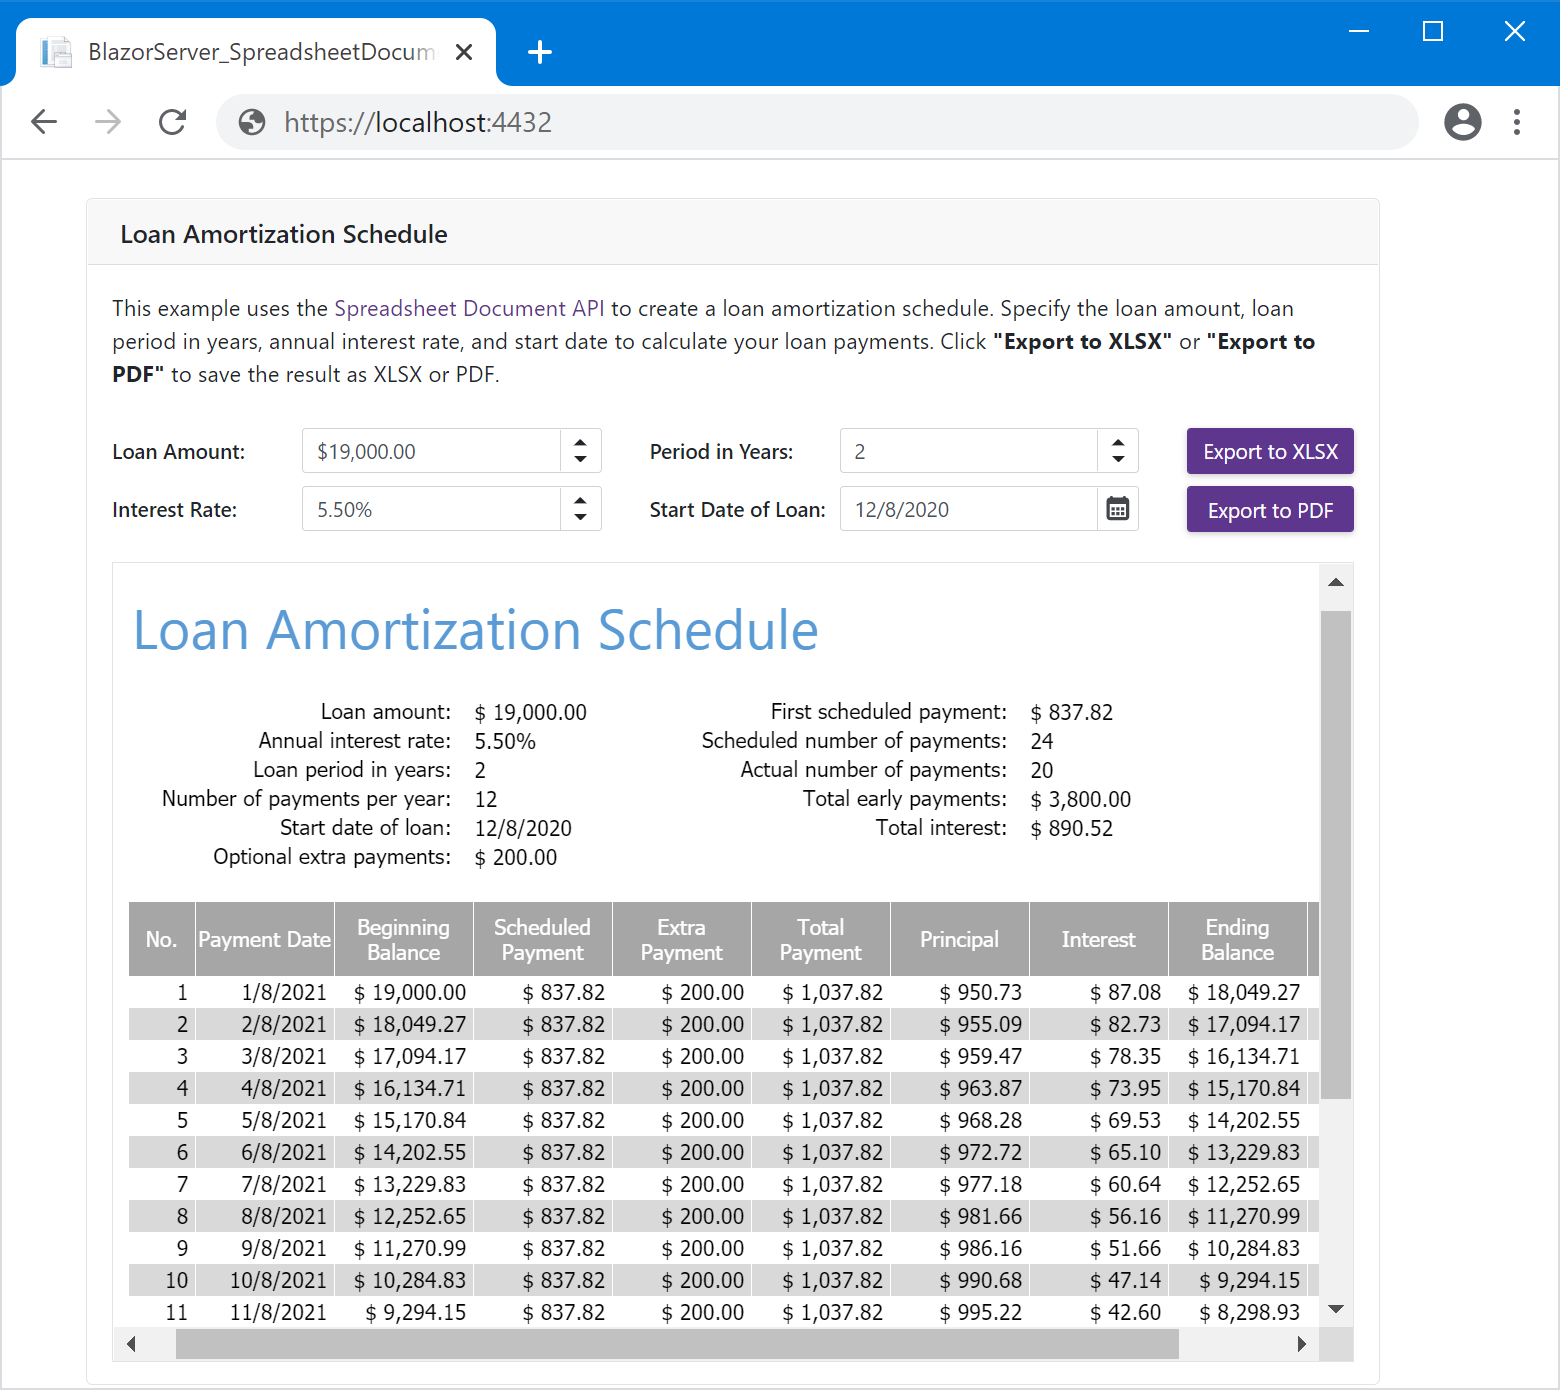
This sample application allows users to enter loan information (loan amount, repayment period in years, annual interest rate, and start date). Once data is entered, the Spreadsheet immediately recalculates loan payments and updates data on the application page. Users can export the result to XLSX or PDF as needed.

Prerequisites

Source Code

You can download a complete sample project from the following GitHub repository:

Spreadsheet Document API - How to Create a Loan Amortization Schedule within Your .NET 5 Blazor Server App

Step 1: Create a Blazor Server App

Create a new project in Visual Studio and select the Blazor App template.

Specify project name and location. In the next window, set the target framework to .NET 5.0 and select Blazor Server App as a project template. Click Create.

Step 2: Install DevExpress NuGet Packages

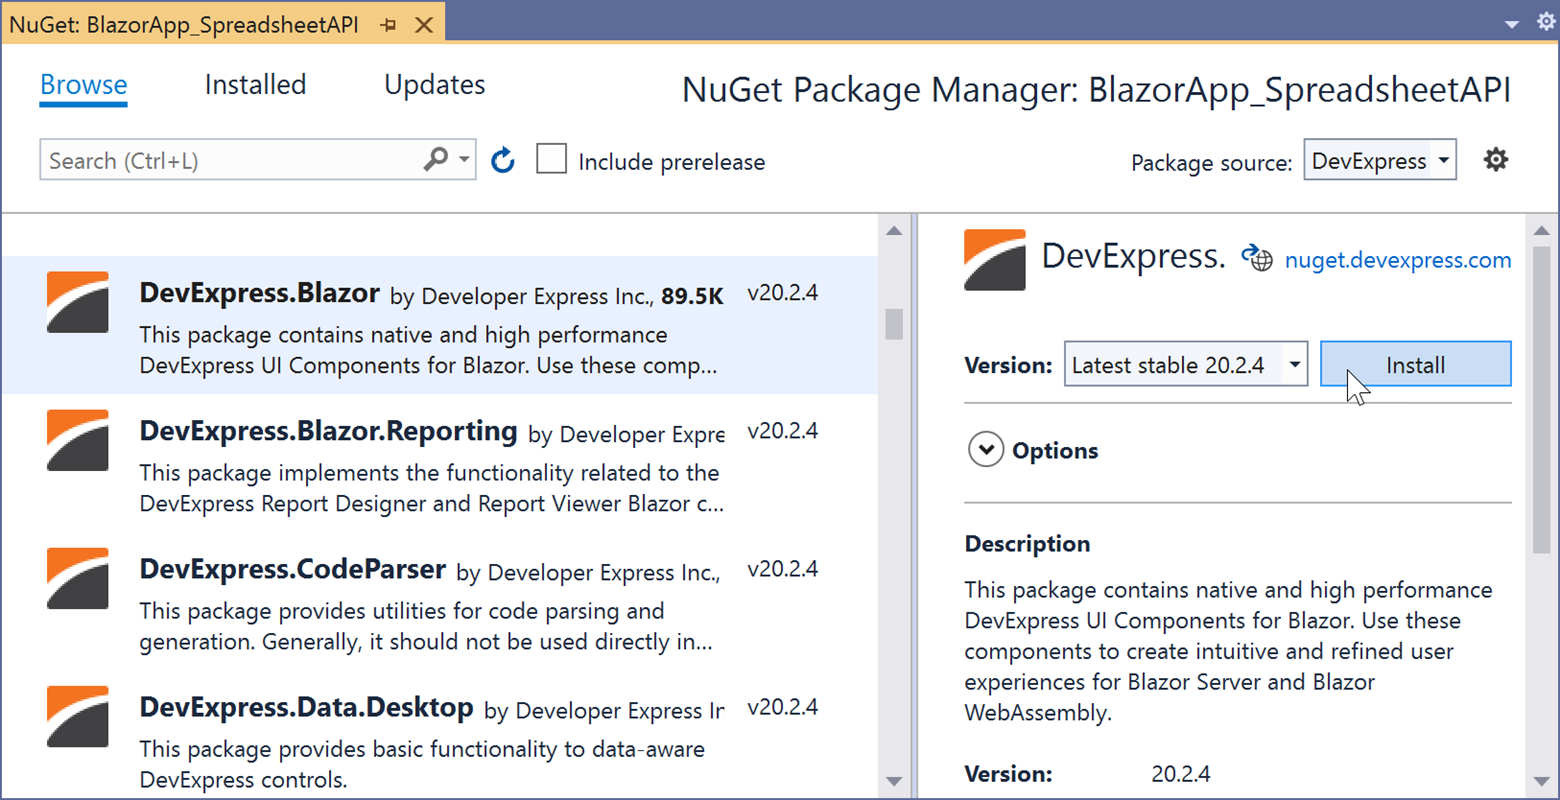
Visit nuget.devexpress.com to obtain the DevExpress NuGet feed URL. Register your feed URL as a package source in the NuGet Package Manager and install the following packages.

DevExpress.Document.Processor

This package contains the DevExpress Office File API components. Please remember that you’ll need an active license for the DevExpress Office File API Subscription or the DevExpress Universal Subscription to use this package in production code/websites. If you don’t have an active subscription, you can evaluate the API for 30 days.

DevExpress.Blazor

Contains all DevExpress Blazor UI components. This product line is available as part of the DevExpress Universal, DXperience, or ASP.NET Subscription. Like our Office File API, you’ll need an active subscription to use this package in production code/websites.

If you are new to NuGet Packages, please refer to the following installation guide for assistance: Install DevExpress Components Using NuGet Packages.

Step 3: Design the Application UI

  1. Add the following line to the HEAD section of the Pages/_Host.cshtml file to register DevExpress resources:

    <head>
        <!--...-->
        <link href="_content/DevExpress.Blazor/dx-blazor.css" rel="stylesheet" />
    </head>
  2. Open the _Imports.razor file and add the following namespace:

    @using DevExpress.Blazor
  3. Apply the DevExpress Blazing Berry theme to the app as described in this help topic: Apply a DevExpress Bootstrap Theme.

  4. Add the following DevExpress Blazor UI components to the application:

    • DxFormLayout - Form Layout component - allows you to construct responsive and auto-aligned edit forms.
    • DxSpinEdit - A Spin Edit component. Our application contains four editors. Use the Value property with the @bind attribute to bind editor values to the properties that store loan information. MinValue and MaxValue properties limit the minimum and maximum values for Spin Edit components. The Increment option specifies the step by which a value in the editor changes when a user clicks the up or down arrow.
    • DxButton - A button. Use the Text property to define the button's text. Create two buttons to export our loan amortization schedule to XLSX and PDF.

    We'll also use an inline frame (defined by the <iframe> tag) to display the generated loan amortization schedule on the page.

    Open the Index.razor file and change its code as follows:

    @page "/"
    
    <div class="container">
        <DxFormLayout>
            <DxFormLayoutGroup Caption="Loan Amortization Schedule" ColSpanMd="11">
                <DxFormLayoutItem ColSpanMd="12">
                    <Template>
                        <p>
                            This example uses the Spreadsheet Document API
                            to create a loan amortization schedule.
                            Specify the loan amount, loan period in years,
                            annual interest rate, and start date to calculate
                            your loan payments. Click <b>"Export to XLSX"</b>
                            or <b>"Export to PDF"</b> to save the result as XLSX or PDF.
                        </p>
                    </Template>
                </DxFormLayoutItem>
    
                <DxFormLayoutItem Caption="Loan Amount:" ColSpanMd="5">
                    <Template>
                        <DxSpinEdit @bind-Value="LoanAmount" 
                                    DisplayFormat="c" 
                                    Increment="100" 
                                    MinValue="100" 
                                    MaxValue="1000000" />
                    </Template>
                </DxFormLayoutItem>
    
                <DxFormLayoutItem Caption="Period in Years:" ColSpanMd="5">
                    <Template>
                        <DxSpinEdit @bind-Value="PeriodInYears" 
                                    Increment="1" 
                                    MinValue="1" 
                                    MaxValue="100" />
                    </Template>
                </DxFormLayoutItem>
    
                <DxFormLayoutItem ColSpanMd="2">
                    <Template>
                        <DxButton CssClass="btn-block" Text="Export to XLSX" />
                    </Template>
                </DxFormLayoutItem>
    
                <DxFormLayoutItem Caption="Interest Rate:" ColSpanMd="5">
                    <Template>
                        <DxSpinEdit @bind-Value="InterestRate" 
                                    DisplayFormat="p" 
                                    Increment="0.01" 
                                    MinValue="0.001" 
                                    MaxValue="100" />
                    </Template>
                </DxFormLayoutItem>
    
                <DxFormLayoutItem Caption="Start Date of Loan:" ColSpanMd="5">
                    <Template>
                        <DxDateEdit @bind-Date="StartDate"></DxDateEdit>
                    </Template>
                </DxFormLayoutItem>
    
                <DxFormLayoutItem ColSpanMd="2">
                    <Template>
                        <DxButton CssClass="btn-block" Text="Export to PDF" />
                    </Template>
                </DxFormLayoutItem>
    
                <DxFormLayoutItem ColSpanMd="12">
                    <Template>
                        <iframe class="col p-0 preview" height="500" />
                    </Template>
                </DxFormLayoutItem>
            </DxFormLayoutGroup>
        </DxFormLayout>
    </div>
    @code{ double loanAmount = 19000;
        int periodInYears = 2;
        double interestRate = 0.055d;
        DateTime startDate = DateTime.Now;
    
        double LoanAmount
        {
            get => loanAmount;
            set { loanAmount = value; UpdateValue(); }
        }
        int PeriodInYears
        {
            get => periodInYears;
            set { periodInYears = value; UpdateValue(); }
        }
        double InterestRate
        {
            get => interestRate;
            set { interestRate = value; UpdateValue(); }
        }
        DateTime StartDate
        {
            get => startDate;
            set { startDate = value; UpdateValue(); }
        }
    
        protected override async Task OnInitializedAsync()
        {
            await base.OnInitializedAsync();
        }
    
        void UpdateValue() =>
            InvokeAsync(StateHasChanged);
    }

Step 4: Generate a Loan Amortization Schedule Based on a Document Template

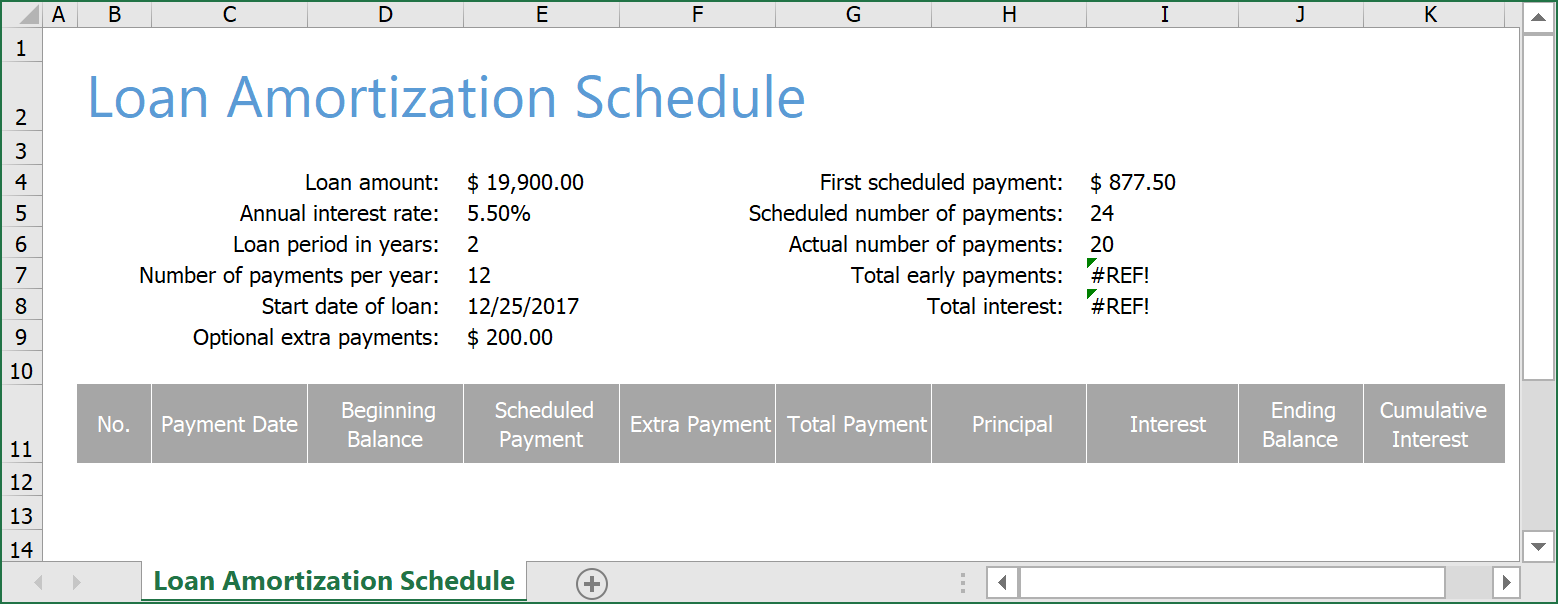
  1. Create a Loan Amortization Schedule template.

    Feel free to download the following document template to proceed: LoanAmortizationScheduleTemplate.xltx. Add this file to the Data folder of the project.

  2. Add a new Code folder to the project and create a DocumentGenerator.cs file within the folder.

  3. Implement a LoanAmortizationScheduleGenerator class. This class calculates loan payments based on the specified loan information (loan amount, repayment period in years, annual interest rate, and start date) and generates an amortization table.

    We use the following built-in Spreadsheet functions to create a loan payment schedule:

    • PMT - Returns the periodic payment on a loan.
    • PPMT - Returns the principal paid on a loan for a given period.
    • IPMT - Returns the interest paid on a loan for a given period.

    View our LoanAmortizationScheduleGenerator implementation.

  4. Add a new DocumentService.cs class file to the Code folder. This class will contain asynchronous methods used to generate a document and export it to various file formats (XLSX, HTML, and PDF).

    Use the app's Startup.ConfigureServices method to register our service implementation. Call the AddSingleton method to create a service instance and add it to the app's service collection. This instance will be available throughout the application for all requests.

    using BlazorApp_SpreadsheetAPI.Code;
    // ...
    
    public class Startup
    {
        public void ConfigureServices(IServiceCollection services)
        {
    		// ...
            services.AddSingleton<DocumentService>();
        }
    }
  5. Implement the following method within the DocumentService.cs class to asynchronously generate a loan amortization schedule based on the document template and loan information entered by users:

    public class DocumentService
    {
        async Task<Workbook> GenerateDocumentAsync(double loanAmount, 
        	int periodInYears, double interestRate, DateTime loanStartDate)
        {
            var workbook = new Workbook();
            // Load document template.
            await workbook.LoadDocumentAsync("Data/LoanAmortizationScheduleTemplate.xltx");
            // Generate a loan amortization schedule
            // based on the template and specified loan information.
            new LoanAmortizationScheduleGenerator(workbook)
                .GenerateDocument(loanAmount, periodInYears, 
                	interestRate, loanStartDate);
            return workbook;
        }
    }

Step 5: Preview the Loan Amortization Schedule in the App

To display the generated document within our application, we need to convert it to HTML.

  1. Add the following method to the DocumentService.cs class. This method builds an amortization schedule using the DocumentService.GenerateDocumentAsync method and then exports the document to HTML.

    public async Task<byte[]> GetHtmlDocumentAsync(double loanAmount, 
    	int periodInYears, double interestRate, DateTime startDateOfLoan)
    {
        // Generate a workbook 
        // that contains an amortization schedule.
        using var workbook = await GenerateDocumentAsync(loanAmount, periodInYears,
        	interestRate, startDateOfLoan);
        // Export the document to HTML.
        using var ms = new MemoryStream();
        await workbook.ExportToHtmlAsync(ms, workbook.Worksheets[0]);
        return ms.ToArray();
    }
  2. Open the Index.razor page. Inject an instance of the DocumentService object into the page.

    @page "/"
    @inject DocumentService DocumentService
  3. Implement the UpdatePreview method. It calls the DocumentService.GetHtmlDocumentAsync method to generate an HTML preview of the amortization schedule and displays the result on the page using the <iframe> element. This method is called each time a user updates loan information via the application's UI.

    <DxFormLayoutItem ColSpanMd="12">
        <Template>
            <iframe class="col p-0 preview" height="500" src="@content"/>
        </Template>
    </DxFormLayoutItem>
    @code{ 
        string content;
        
        // ...
        protected override async Task OnInitializedAsync()
        {
            await UpdatePreview();
            await base.OnInitializedAsync();
        }
    
        void UpdateValue() =>
            InvokeAsync(async () =>
            {
                await UpdatePreview();
                StateHasChanged();
            });
    
        async Task UpdatePreview()
        {
            var document = await DocumentService.GetHtmlDocumentAsync(loanAmount, 
            	periodInYears, interestRate, startDate);
            content = "data:text/html;base64," + Convert.ToBase64String(document);
        }
    }

Step 6: Download the Loan Amortization Schedule in XLSX and PDF File Formats to the Browser

In our example, we will use a web API to download the calculated amortization schedule in XLSX and PDF file formats on the client side.

  1. Open the DocumentService.cs class and add the following methods to generate and export a loan amortization schedule to XLSX and PDF.

  2. public async Task<byte[]> GetXlsxDocumentAsync(double loanAmount, 
        	int periodInYears, double interestRate, DateTime startDateOfLoan)
    {
        // Generate workbook 
        // that contains an amortization schedule.
        using var workbook = await GenerateDocumentAsync(loanAmount, periodInYears, 
        	interestRate, startDateOfLoan);
        // Save document as XLSX.
        return await workbook.SaveDocumentAsync(DocumentFormat.Xlsx);
    }
    
    public async Task<byte[]> GetPdfDocumentAsync(double loanAmount, 
    	int periodInYears, double interestRate, DateTime startDateOfLoan)
    {
        // Generate workbook 
        // that contains an amortization schedule.
        using var workbook = await GenerateDocumentAsync(loanAmount, periodInYears, 
        	interestRate, startDateOfLoan);
        // Export document to HTML.
        using var ms = new MemoryStream();
        await workbook.ExportToPdfAsync(ms);
        return ms.ToArray();
    }
  3. Implement a web API controller. Add a new Controllers folder to the project and create an ExportController.cs class within the folder. This class contains action methods that handle HTTP GET requests and return files in XLSX and PDF formats.

    using BlazorApp_SpreadsheetAPI.Code;
    using Microsoft.AspNetCore.Mvc;
    using System;
    using System.Threading.Tasks;
    
    namespace BlazorApp_SpreadsheetAPI.Controllers
    {
        [Route("api/[controller]")]
        [ApiController]
        public class ExportController : ControllerBase
        {
            readonly DocumentService documentService;
    
            public ExportController(DocumentService documentService)
            {
                this.documentService = documentService;
            }
    
            [HttpGet]
            [Route("[action]")]
            public async Task<IActionResult> Xlsx([FromQuery] double loanAmount, 
            	[FromQuery] int periodInYears, [FromQuery] double interestRate, 
                [FromQuery] DateTime loanStartDate)
            {
                var document = await documentService.GetXlsxDocumentAsync(loanAmount, 
                	periodInYears, interestRate, loanStartDate);
                return File(document, 
                	"application/vnd.openxmlformats-officedocument.spreadsheetml.sheet", 
                    "output.xlsx");
            }
    
            [HttpGet]
            [Route("[action]")]
            public async Task<IActionResult> Pdf([FromQuery] double loanAmount, 
            	[FromQuery] int periodInYears, [FromQuery] double interestRate, 
                [FromQuery] DateTime loanStartDate)
            {
                var document = await documentService.GetPdfDocumentAsync(loanAmount, 
                	periodInYears, interestRate, loanStartDate);
                return File(document, "application/pdf", "output.pdf");
            }
        }
    }
  4. Open the Startup.cs file. Call the MapControllers method within app.UseEndpoints to map incoming HTTP requests to the controller's action methods.

    public class Startup
    {
    	// ...
        app.UseEndpoints(endpoints =>
        {
        	// Add endpoints for controller actions.
            endpoints.MapControllers();
    		// ...
        });
    }
  5. Open the _Imports.razor file and add the following namespaces:

    @using Microsoft.AspNetCore.WebUtilities
    @using System.Globalization
  6. Open the Index.razor page and inject an instance of the IJSRuntime object into the page.

    @inject IJSRuntime JS
  7. Handle the Click events of the Export to XLSX and Export to PDF buttons. These buttons should call the following methods:

    • ExportToXlsx - Sends a request to download a loan amortization schedule in XLSX format. The request executes the controller's Xlsx action method.
    • ExportToPdf - Sends a request to download a loan amortization schedule in PDF format. The request executes the controller's Pdf action method.
    <DxFormLayoutItem ColSpanMd="2">
        <Template>
            <DxButton Click="ExportToXlsx" CssClass="btn-block" Text="Export to XLSX" />
        </Template>
    </DxFormLayoutItem>
    
    <!---------------->
    
    <DxFormLayoutItem ColSpanMd="2">
        <Template>
            <DxButton Click="ExportToPdf" CssClass="btn-block" Text="Export to PDF" />
         </Template>
    </DxFormLayoutItem>
    @code{
        void ExportToXlsx(MouseEventArgs args) => JS.InvokeAsync<object>("open", 
        	GetQueryString("api/Export/Xlsx"), "_self");
    
        void ExportToPdf(MouseEventArgs args) => JS.InvokeAsync<object>("open", 
        	GetQueryString("api/Export/Pdf"), "_self");
    
        string GetQueryString(string uri)
        {
            var queryParams = new Dictionary<string, string>() {
                { "loanAmount", loanAmount.ToString() },
                { "periodInYears", periodInYears.ToString() },
                { "interestRate", interestRate.ToString(CultureInfo.InvariantCulture) },
                { "loanStartDate", startDate.ToString("O") },
            };
            return QueryHelpers.AddQueryString(uri, queryParams);
        }
    }

Try It Now

Our application is now ready. Run the app in your favorite browser and enter your loan information to generate your loan amortization schedule. You can download the amortization table in XLSX and PDF formats.

Your Feedback Matters

Should you have any questions about this example, feel free to comment below. As always, we thank you for choosing DevExpress for your software development needs.

PDF Document API - PAdES - BES (LT and LTA levels) Signatures

$
0
0

As you may already know, our PDF Document API v20.1 offers digital signature support. For background information on our implementation, please review the following blog posts:

Our PDF Document API (v20.2) fully supports PAdES signatures at B-LT and B-LTA levels. The PAdES B-LT (PAdES T- with added Long Term Validation information) level indicates that a document signature can be validated even if the signing environment (e.g., signing Certification Authority) is no longer available. This level is recommended for Advanced Electronic Signatures.

The PAdES B-LTA (PAdES LT- with added authoritative document timestamp signature) level may help validate a signature beyond any event that may limit its validity. This level is recommended for Qualified Electronic Signatures.

Both levels require that you add verification related information (VRI) (for B-LTA level – a timestamp’s VRI) to a Document Security Store (DSS) - an optional dictionary in a document. The VRI includes Online Certificate Status Protocol responses, Certificate Revocation Lists, and a chain of trust certificates (including the root certificate).

Call the PdfDocumentSigner.AddToDss method and pass a signed signature field as the method parameter to add signature information to the DSS. To provide certificates used to build a chain, you can specify a list of certificates, use a CertificateStoreProvider class, or create your own ICertificateStoreProvider interface implementation.

The code sample below retrieves the name of the first signature field, adds signature information to the DSS, and applies a timestamp to a document:

using (var signer = new PdfDocumentSigner(@"signed.pdf"))
{
  ITsaClient tsaClient = new TsaClient(new Uri(@"https://freetsa.org/tsr"), HashAlgorithmType.SHA256);
  string signatureName = signer.GetSignatureFieldNames(false)[0]; 

  //Create a provider that retrieves certificates from a store:
  using (var certificateStoreProvider = new CertificateStoreProvider(new X509Store(StoreLocation.CurrentUser), true))
  {
    //Add signature to the security store
    //And specify the CrlClient and OcspClient objects
    //Used to check status of the certificates' revocation
    signer.AddToDss(signatureName, new CrlClient(), new OcspClient(), certificateStoreProvider);
  }

  signer.SaveDocument(@"signedLTV.pdf", new PdfSignatureBuilder(new PdfTimeStamp(tsaClient)));

}

Your Feedback Matters

As always, we welcome your thoughts. Please comment below and let us know what you think about these signature-related PDF API features. Should you have technical questions, feel free to contact us via the DevExpress Support Center.

ASP.NET Tips & Tricks (December 2020)

$
0
0

Here’s this month’s edition of Tips & Tricks for our WebForms/MVC/.NET Core product line. As always, we hope these examples will be of value you as you explore our product line and incorporate our controls in your next ASP.NET project.

First things first – we recently published an article that describes how to use third-party tools with our Rich Text Editor for ASP.NET Core. Specifically, we demonstrate how to add spell checking functionality in v20.2

Rich Text Editor for ASP.NET Core - Spell Checking (Concept)

New Examples

The following new example demonstrates how to edit Diagram data using a separate custom form:

Diagram - How to edit data using a separate form (View on GitHub)

Here are examples of two popular usage scenarios for our Rich Text Editor for ASP.NET Core:

Rich Text Editor for ASP.NET Core - How to load/save documents from/to a database (View on GitHub)

Rich Text Editor for ASP.NET Core - How to submit document content with other values (View on GitHub)

And finally, here are a couple of examples related to our ASP.NET Web Forms Gantt control:

Gantt for Web Forms - A simple example with editing capabilities (View on GitHub)

Gantt for Web Forms - How to implement a custom "Task details" dialog (View on GitHub)

Remember, you can explore all DevExpress ASP.NET examples by navigating to our GitHub repository.

Interesting Technical Support Tickets

Common to All Platorms (ASP.NET MVC and Web Forms)

Grid View - How to restore all Batch Edit modifications on the client if certain rows do not pass server-side validation

ASP.NET Web Forms

Grid View - How to show values for a password column in the Edit Form with the ability to show/hide a password value

Grid View - How to apply the same layout settings to several grids

Splitter - How to make the splitter responsive and expand/collapse its panes automatically based on screen size

ComboBox - How to show a hint for each ComboBox item

ASPxScheduler - How to highlight the headers of TimeLine View scales based on a currently selected interval

ASPxScheduler - How to specify different appearance settings for different TimeLine scales

ASPxScheduler - How to limit the working time interval in a TimeLine View without using custom scales

ASPxScheduler - How to display a custom tooltip for appointment images generated in the InitAppointmentImages event handler

ASPxScheduler - How to automatically invoke the Appointment Dialog for editing a specific appointment

ASP.NET MVC

Grid View for MVC - DateRangePicker Header Filter doesn't evaluate the end-user's local time zone

Grid View for MVC - How to distinguish between Copy and Edit operations when saving data if operations were executed using different FAB items

Grid View for MVC - How to restore visible column indexes after visibility of specific columns was changed using Customization Window

ComboBox for MVC - How to change column caption style

Rich Text Editor for MVC - How to remove the "Ctrl + Click to follow link" text from hyperlink tooltip

Feedback

As always, we welcome your comments and feedback. If you’ve come across a useful Support Center ticket, feel free to share it with the DevExpress developer community here.

Viewing all 2401 articles
Browse latest View live