Quantcast
Channel: Developer Express Inc.
Viewing all 2402 articles
Browse latest View live

Download v16.1.5 and Try DevExtreme MVC Wrappers for ASP.NET Core

$
0
0

The DevExtreme v16.1.5 minor release is now available and included in this minor release is the DevExtreme ASP.NET MVC Wrappers (CTP) for ASP.NET Core:

To learn more about DevExtreme and ASP.NET Core, check out my recent webinar:

What's included?

By installing this minor release, you'll get:

A File-New getting started experience:

All the DevExtreme Widgets available directly through Razor syntax:

Try it today!

Download DevExtreme v16.1.5 and let me know your thoughts about ASP.NET Core in the comments below. Thanks!


Your Next Great .NET App Starts Here

Year after year, .NET developers such as yourself consistently vote DevExpress products #1.

Experience the DevExpress difference for yourself and download a free 30-day trial of all our products today: DevExpress.com/trial (free support is included during your evaluation).


DevExtreme: New client-side export for Charts and Data Visualization

$
0
0

DevExtreme comes with some really powerful Charting and other data visualization controls like Maps, Gauges and Range widgets. One of the issues faced in the pre-v16.1 versions of our suite was that exporting such a widget to e.g. PNG, JPG or PDF was a bit of a tedious job.

You would need the specific widget bound to a dxExporter widget on the client, and a specially customized PhantomJS instance configured on the server:

clip_image002

Besides the fact that you would need this extra server, you can imagine that this process takes some time to configure and test.

Exporting in v16.1

In our v16.1 release we have added export functionality to all the widgets. This means that there is no need for this custom PhantomJS server, and that it will work pretty much out of the box.

clip_image002

How does it work?

If you want to enable export functionality for a specific widget, the only thing you need to specify in the configuration object of the widget is:

options = {
    export: {
        enabled: true
    },
    ...
} 

What about customization?

Just like the older releases, v16.1 supports exporting as well as printing to JPG, PNG, GIF, PDF and SVG.

clip_image002[6]

You can even specify a default filename of the export – even without extension – by specifying the fileName property. We’ll add the extension to the filename automatically depending on the chosen format.

options = {
    export: {
        fileName: "Sales2016ByMonth"
    },
    ...
}

In the v16.1 release, we added a number of additional features such as specifying the background color for an exported chart:

options = {
    export: {
        backgroundColor: "#282828"
    },
    ...
}

This is great for creating a uniform look or complying with your corporate identity.

clip_image002[8]

Menu enhancements

In previous versions, the export menu was provided by the dxExporter class. To add this menu to your widget, you would add a reference to that visualization widget in the dxExporter configuration object. To specify a custom menu or to call exporting/printing via custom events on your page, you would have to use the dxExporter API.

clip_image002[10]

We have made this way easier with v16.1. Since all the widgets have the export functionality included, they also include a default export menu. This menu will be shown automatically if exporting of the widget is enabled.

image

Because this menu is now part of the widget, we make sure that it is perfectly aligned and positioned inside the widget.

All this out-of-the-box behavior is part of the exporting API which comes with the visualization widgets. This gives you the possibility to customize and fine-tune several exporting options according to your needs.

chartInstance.exportTo("myExample", "pdf");

Conclusion

The new client-side exporting features in v16.1 are easier and faster to setup. They also allow you to change several aspects of the default export behavior.

Let me know what you think of this!

How to display DevExpress Reports in Client-Side Web Apps

$
0
0

DevExpress ASP.NET Reporting is a great solution for your reporting needs. However, it's a server-side (ASP.NET) solution which means you cannot just plug it into a client-side app. So how do you display your XtraReports in a client-side app?

bower install xtrareportsjs

XtraReports has added a client-side report viewer and designer in recent releases. We've taken the core set of necessary files (JavaScript, CSS, etc.) and packaged them into a convenient bower package.

To display reports on the client-side:

  1. First, you'll need a web service to deliver the reports.
  2. Then, install this bower package in your client-side app.
  3. Finally, you'll need to setup your client-side app so the XtraReports client-side viewer can display the reports.

Ok, so that's the overview of the steps. To see all the gory details, watch my recent webinar video.

Webinar Video

In the webinar video, I discuss and demonstrate the how you can display DevExpress ASP.NET Reports in client-side apps.

T370591 Sample

There's also a fully contained sample that you can download and run on your local machine: T370591 - How to use HTML5 Document Viewer within a DevExtreme application

I'd love for you to watch the video and then try the sample too.

What do you think about sample? You can email me, drop me a comment below, or even tweet me.

Thanks!


Your Next Great .NET App Starts Here

Year after year, .NET developers such as yourself consistently vote DevExpress products #1.

Experience the DevExpress difference for yourself and download a free 30-day trial of all our products today: DevExpress.com/trial (free support is included during your evaluation).

CodeRush for Roslyn 16.1.6 - Official Release

$
0
0

It’s Here

Team CodeRush has worked for over a year building CodeRush for Roslyn, and we’ve dedicated ourselves to creating the fastest, lightest, most powerful add-in for Roslyn. Here are a few of our accomplishments:

  • CodeRush loads in about three seconds or less.
  • CodeRush consumes significantly less memory than competing tools with similar functionality (about 200MB less for most projects).
  • CodeRush still appears to have the world’s fastest test runner.
  • We continue to approach a maximally efficient code writing experience.

This past year the team obsessed over performance, working to create a tool that maximizes productivity without getting in your way. I think we did that, and I’m interested to see if you agree.

Killer Features that made it into this release:

Differences Between CodeRush for Roslyn and CodeRush Classic

Here’s an overview of the major differences between CodeRush for Roslyn and CodeRush Classic:

CRR vs CRC

So if you’re working in C# or VB in Visual Studio 2015 or higher, then CodeRush for Roslyn will make sense for you.

If you’re working in older versions of Visual Studio, or if most of your work is in JS, HTML, or XAML, CodeRush Classic may right be for you.

Pricing

There are two ways to purchase CodeRush for Roslyn. If you need first-class DevExpress support, or if you also need CodeRush classic, then you’ll want to purchase CodeRush Ultimate.

If support from the community is all you need and you’re working in VS 2015 and up, then get CodeRush for Roslyn, Community Support Edition.

Both options are summarized below:

CRR vs CRU

Note that regardless of which option you purchase, that purchase price entitles you to one year’s worth of free product updates. And speaking of updates…

Release Schedule

If you followed the CodeRush for Roslyn pre-release, you know that Team CodeRush pushed out updates every 45 days. And we plan to continue that 45-day sprint cycle, so you can expect to get the latest features, refactorings, updates, and every 45 days. Eight times a year.

What’s New

Here’s what’s new in the 16.1.6 release:

Code Analysis

  • You can now run Code Analysis for the active project or file separately.
  • The Code Analysis report now includes information about source files.
  • You can now reconfigure Code Analysis without restarting Visual Studio.
  • We have added the ability to check naming conventions continuously in background.
  • Performance has been improved.

Navigation

  • ‘The new Jump to Everything navigation provider allows you to jump to any file and symbol in the solution.

JumpToEverything

Refactorings and Code Providers

  • Convert to System Type/Built-in Type lets you easily switch between CLR types and their keyword aliases.
  • Split String divides a string into two at the caret position. You can also divide one string into three concatenated strings - just select the portion you want to break out before applying this refactoring.
  • Reorder Parameters changes method parameter order, without any dialogs to slow you down. The method signature and all references are updated. This is the fastest, most effortless way to reorder parameters.
  • Visual Studio's Rename refactoring is now accessible from the refactoring menu. 
  • We have added the ability to sort Light Bulb menu items (refactorings and code providers) based on their most recent usage in the given context.
  • You can now optionally hide redundant Light Bulb menu items provided by Visual Studio if these features overlap more efficient CodeRush functionality. For example, if this option is selected, when CodeRush's "Declare Method" is available, Visual Studio's "Generate method stub" menu item will be hidden.

Test Runner

In this release, we are introducing beta support for .NET Core tests. Now you can run and debug .NET Core tests, created with NUnit, xUnit or MSTest frameworks.

  • Test Runner output in Visual Studio's Output window now shows the filter applied to the test run:
    TestFilter
  • You can now optionally show or hide the Test Runner and Code Coverage items appearing in Visual Studio context menus.
  • Visual Studio's status bar now displays the currently running test.
  • Testing results in Visual Studio's Output window are now grouped by project.
  • Tests can now be grouped by file path.
  • A number of minor usability issues were corrected/improved.

Other Improvements

  • If you have new and old versions of CodeRush for Roslyn installed, the Extension Cleaner will detect this and offer to clean up the older versions.
  • The Code Cleanup options page has been redesigned, showing before & after code samples, so you can more easily see what each option performs.
  • Member Icons are now in vector format, so they look sharp and clear regardless of the color scheme, display resolution or editor window scale.

    VectorMemborIcons

Give It a Try

Download the CodeRush for Roslyn from the Visual Studio Gallery and let us know what you think.

ASP.NET AJAX Control Toolkit - v16.1.1 - The Power of Continuous Integration

$
0
0

Good news, we've just released version 16.1.1 of the ASP.NET AJAX Control Toolkit today. This release includes new features and several bug fixes.

Continuous Integration - AppVeyor


In the last release, we moved this open source project from CodePlex to GitHub: ASP.NET AJAX Control Toolkit - New Release v16.1 and GitHub Hosted!

Hosting ASP.NET AJAX Control Toolkit on GitHub now provides us new benefits. One of the major improvements is AppVeyor CI integration which allows to:

That last statement means that you no longer have to wait for NuGet packages or build hotfix by yourself. Simply download the latest build from AppVeyor and update your project.

v16.1.1 - Major Changes

Tabs Custom CSS Fix

We've fixed a major issue with Tabs regression by introducing a new property: CssTheme.
If you set the CssClass attribute to the TabContainer then please make sure the CssTheme attribute is set to None. By default, it is set to XP, so no further actions are required if you run Tabs with default style settings.

AjaxFileUpload New Setting: Temp Folder Path

A new setting was added to AjaxFileUpload that allows specifying temporary folder path. This setting is configured via Web.config:

<ajaxControlToolkit>
  ...
   tempFolder="~/Temp"/>

This parameter allows AjaxFileUpload to operate in a Medium trust environment, if set to an application (sub)folder. You can run the AjaxFileUpload control in a Web farm too just make sure that this path is set to a network folder.

HtmlEditor Deprecated

Starting with this v16.1.1 release, we have deprecated the HtmlEditor in favor of HtmlEditorExtender. To avoid breaking changes we will still included the HtmlEditor control in the release.

However, the HtmlEditorExtender is a much better option and we recommend that you use it instead of the deprecated HtmlEditor. For example, the HtmlEditorExtender:

  • has improved security because it sanitizes user input
  • is smaller in size
  • and has a customizable toolbar

Please read this blog post to learn more about HtmlEditorExtender.

ValidatorCalloutExtender is Compatible with Unobtrusive Validation

Unobtrusive validation was introduced in .NET Famework 4.5 release. This validation uses HTML5 data-* attributes instead of JavaScript code emitted to a page.

The ValidatorCalloutExtender can now work with the latest versions of the full .NET framework (.NET 4.5+).

Helpful links

Helpful documentation articles are available here:

Download v16.1.1

You can download the latest release here:

ASP.NET AJAX Control Toolkit v16.1.1

Click the download button above and the get the latest bits.

Or use the Nuget package: ASP.NET AJAX Control Toolkit Nuget package

Or download the installer and/or source from GitHub:

Try DevExpress ASP.NET

We’d like to thank you for installing the DevExpress Edition of the AJAX Control Toolkit and look forward to your feedback as you begin using it.

When we took over the fabulous ASP.NET AJAX Control Toolkit, our goal was to reach those web developers who want to use great web user interface controls for their web projects and DevExpress ASP.NET provides that and much more.

Try the free DevExpress 30 day trial.

Email: mharry@devexpress.com

Twitter: @mehulharry


Your Next Great .NET App Starts Here

Year after year, .NET developers such as yourself consistently vote DevExpress products #1.

Experience the DevExpress difference for yourself and download a free 30-day trial of all our products today: DevExpress.com/trial (free support is included during your evaluation).

CodeRush for Roslyn: Running Tests

$
0
0

CodeRush for Roslyn is RTM!

That’s right CodeRush for Roslyn is out of preview and available. With it we are shipping the best ever version of our test runner.

It’s the fastest, it’s the simplest, and it supports all the major testing frameworks (NUnit, XUnit, MSpec and VSUnit) out of the box.

Inline Tests

This test runner really is the simplest. With CodeRush you can run your tests direct from the editor.

  • Locate any Test

CRRTestingExampleTest

  • Place your caret within it.
  • Run your test with Ctrl+T, Ctrl+R. (Test –> Run)

When Run, this test passes and changes its icon to reflect its new state.

CRRTestingExampleTest

Naturally enough some tests do not pass. When a test fails, its Test Icon changes to indicate this, and the failing assertion is accentuated with a red background.

CRRTestRunnerFailingTest

More information can be found about the nature of the error if you hover the mouse over the Test Icon

CRRTestRunnerFailingTestWithHover

You can of course run multiple tests at once.

The keystrokes you use depend on the breadth of tests you wish to run.

For all tests in the Current File, use Ctrl+T, Ctrl+F. (Test –> File)
For all tests in the Current Class, use Ctrl+T, Ctrl+C. (Test –> Class)
For all tests in the Current Project, use Ctrl+T, Ctrl+P. (Test –> Project)
For all tests in the Solution, use Ctrl+T, Ctrl+S. (Test –> Solution)

Debugging a Test

Sometimes running a test is not enough. In some cases it can be very useful to debug directly into a test.

In this case you should:

  • Locate the Test
  • Place your caret within it
  • Press  Ctrl+T, Ctrl+D. (Test –> Debug)
When invoked this way, the Test will be run with the debugger attached. You’ll be able to stop on break points and use watch windows in all the usual ways. This allows you to setup a test for a particular situation and then observe exactly how your code behaves in that scenario. Literally your code under lab conditions.

Alternatively you can click the Test Icon to reveal the test context menu.

CRRTestingInlineMenu

Naturally you can Run test and Debug test from this menu. You can also locate the Go to runner to locate the current test within the Test Runner (see the next section for details on the Test Runner) or Run Test with Coverage.

A full description of Code Coverage is a topic for another post, but the short version is that CodeRush will track which lines of your code are executed when a test is run. This can give you a quick estimate of which parts of your code might require additional testing.

The last item is Add to Session. I’ll leave that one for a minute or two whilst we discuss the Test Runner.

Test Runner

This is the CodeRush TestRunner. Shown here with some of the Unit Tests within NancyFX

CRRTestRunnerNancyTests

You can launch the Test Runner in 3 ways.

  • From the Context menu of a test or test fixture. (Go to runner)
  • From the Main CodeRush menu (CodeRush | Test | Test Runner)
  • Using the universal Test Runner Shortcut (Ctrl + T, Ctrl+T)

The default view of the Test Runner will show you all the projects containing tests and the counts of tests within those projects.

All the standard options are available from within the Test Runner. From left to right we have ‘Run Selected Tests’, ‘Run All Tests’, ‘Debug Selected Tests’. Naturally enough we follow that with the ability to ‘Run Selected Tests with Coverage’ and ‘Run All Tests with Coverage

When you run your tests, the number in the brackets of each node expands to show not just the total, but the number of passing and failing tests within that node.

CRRTestRunnerNancyTestsRun

If you turn on the ‘Show Duration’ option CRRTestRunnerToolbarShowDuration you can also see how long any given node (single test or group) took to execute.

CRRTestRunnerNancyTestsRunDuration

At all times the status bar will track the number of the total number of tests, how many of them are currently Pass or Fail and how many are currently designated Ignored or Explicit.

CRRTestRunnerStatusBarNancyFX

Grouping and Filtering

Your tests can be grouped by Project, Namespace, Category, File Path or just as a Flat List.

CRRTestRunnerGroupingDropdown

You can show any combination of Not Run, Passed, Failed, Ignored or Explicit tests using the toolbar toggles.

CRRTestRunnerFilterToggles

Having determined the selection of tests you’re interested in, you can run any of those remaining visible through the use of the right click menu or the previously mentioned icons on the toolbar. This context menu is as for an individual test in the editor, but will now apply to all nodes within the one you right-click. This allows you run all tests in a namespace, project or category at the click of a button.

If you’re looking for a particular test, but aren’t sure where it is, than the test search box is your friend. As you might expect, enter some search text, hit enter and CodeRush will find any test that matches all your criteria (Filter Toggles, and Search)

CRRTestRunnerToolbarSearch


How Fast is the CodeRush Test Runner?

So the single simplest test is to instruct CodeRush to run all the tests in the Solution. Since I had the NancyFX solution loaded, I simply hit Ctrl+T, Ctrl+S and CodeRush located and ran the 2410 tests present.

Obviously I needed something to compare this with, so I also took a well known Brand ‘X’ test runner for a spin and these are the results I got.

Test RunnerTest Execution Time
Brand ‘X’ 182s
CodeRush (Default settings)143s
CodeRush (All Cores) 128s

So just using the default settings, CodeRush’s test runner is 39 seconds (22.5%) faster than the Brand ‘X’ test runner.

But you’ll notice that there is another entry for CodeRush. When CodeRush is allowed to use all my processor’s cores, it gets even quicker, eventually toping out (on my machine) at a little over 54 seconds (30%) faster than the Brand ‘X’ test runner.

Sessions

So you’ll recall a few sections back I hinted at a new CodeRush test runner feature.

The CodeRush test runner, like all other test runners has long supported the idea of running either a single test or a set of tests defined by a class, file, project or indeed the entire solution.

However you don’t always, especially in legacy projects, have the convenience of having all appropriate tests in a single namespace or project where you need them. This wouldn’t necessarily be an issue if there weren’t those strange group of tests written in a dark corner which take an excessively long time to run. Then there’s that other set that you’ve been told not to run because no-one is quite sure that they don’t have side effects.

Then there are the tests that you really do want to run. They should all exist in the same place, but for some unearthly reason they have been defined in a number of strange disparate locations in several different projects. You will of course bring these tests together in some carefully crafted namespaces in just one or 2 projects in good time, but right now is not the time. They work well. they are essential to the stability of the project. But they are disparate and a pain to use.

Enter ‘CodeRush Testing Sessions’

A CodeRush Testing Session is a very simple thing. (Well all the best things are aren’t they.) A Session is a named ad-hoc selection of tests. Nothing more. No need to alter code to add categories. Just pick the tests you care about, and start to work with them. Of course the real key with sessions is in how you use them.

To create a new session…

Just visit the context menu of any test (or group of tests) and choose Add to Session | Create New Session. Your chosen tests are added to a new session with the name “Session 1” or similar. The Test runner has a new Tab named for the Session you’ve created, containing only those tests that you added. Feel free to add more tests to the Session. As many (or as few) as you want.

To name a session

Simply double-click the name of the session, and you’ll be able to name it whatever you like. I like to use ‘WIP’ (Work in Progress) to house those tests that are useful to me in my current situation.

To add more tests to a session

Pick Add to Session | Add to WIP Session from the Test (or Test Fixture) context menu, either from an appropriate node in the Test Runner, or from within the editor itself.

To use a session…

Simply use the same standard buttons as you do when there are no active session. ‘Run All Tests’ and ‘Run All Tests with Coverage’ now run within the confines of your active Session. Naturally because the Test Runner hides tests (and fixtures) which aren’t in your current session, it’s far simpler to find the results you’re after.

To switch between sessions…

It shouldn’t really come as much of a surprise, that you can have multiple sessions on the go at the same time. Each time you create one, a new tab is added to represent the tests you added to it.

You can have Sessions for:

  • Those tests you need to run every few minutes, to check you’re not breaking some part of the subsystem you’re working on.
  • All the tests in your solution except those few slow tests you try to avoid running unless absolutely necessary.
  • Those slow tests you’ve been avoiding, but which need to run every now and again, because slow or not, you do need them.

There are no rules. You could pick 3 tests from one project, all the tests from a 2nd project and 6 tests from 6 different test fixtures in a 3rd project.

This is a great feature for use when you know you have a need to run 2 or 3 tests (or sets of tests) which are related by something other than the standard mechanisms. I personally like to create 3 sessions ‘WIP’ (Work in Progress), ‘All but Slow’ and ‘Slow Tests’, but feel free to use sessions for anything you like.

So how do you switch between session? Simple: Just select the tab which represents the session when you want to work with.

Oh and one last thing: CodeRush Test Sessions will persist between VS sessions. Which means they will survive the closing and re-opening of both your solution and studio, allowing you to setup exactly the sessions you need, safe in the knowledge that you won’t have to rebuild them in your next coding session.

Testing is fast, fun and easy again. So go out there and build some rock solid and fully tested code.

CodeRush for Roslyn – Free to try. Only $49 to buy! (Includes a year of free updates)

Faster Dashboards with the “Data Extract” Source

$
0
0

Building on Improvements Introduced in v15.2

Back in v15.2 we introduced a new In-Memory Data Processing engine that enabled a tremendous performance and memory usage boost on large datasets with up to tens of millions of rows. You can refer to the blog post we published at that time to learn about the changes and to see the metrics. Improvements included data manipulation on application startup – indexing, sorting, and compression – so it could be faster accessed and would require less memory at runtime. Although it does help while the application is running, there was an opportunity for further optimization, namely how and when this compressed data is prepared.

You see, the preparation phase happened every time the dashboard was opened, which meant slower initial loading time on every application start-up. Web applications suffered from that same slowdown, but for every user session, which also heavily impacted the server’s CPU resources and memory consumption.

Dashboard Data Preparation - before Data Extract sources

Dashboard v16.1 allows you to run data preparation in advance and store the results on a disk in a so-called "data extract" file, which can even be shared between user sessions in a multi-user environment. Technically, you create a new data source – the "Data Extract" source, which can be built on top of any data source type, with the exception of OLAP data binding mode where that kind of optimization would be redundant anyway.

Dashboard Data Preparation using Data Extract sources

If you’re curious about how data gets compressed, here’s a quick overview. First, all unique column values are indexed and stored in a dictionary. Indexes replace original values and we make sure they take up as few bits as possible. The dictionary and columns with compressed data are then written into the extract source file.

New Metrics: Data Extract Source versus On-Demand Data Preparation

To plot the graphs below, we built a dashboard bound to the Contoso MSSQL Database to display the breakdown of Groups between Categories. In simpler terms, the control needed to group and aggregate about 12 million data rows.

Initial loading time

As you can see below, the initial dashboard loading time in our test environment went down from 48 seconds to only 10 seconds after binding to the Data Extract source.

Dashboard Data Extract Source - Time Metrics

Memory consumption in web environment

With the Data Extract source, you’ll see an almost entirely flat memory usage graph regardless of the number of users, compared to the regular in-memory data processing where consumption grows proportionally depending on session count.

Dashboard Data Extract Source - Memory Metrics

Create a Data Extract Source with v16.1

To take advantage of these performance benefits, the first step is to run the New Data Source wizard and select Data Extract on the first wizard screen.

Dashboard Data Extract - Create New Data Source

The entire path through the wizard is described in the documentation. When setting up, you have a couple of ways to fine-tune the data source according to your requirements:

  • During the initial data source configuration, you can filter out unnecessary data by building custom criteria or by using your data source's parameters.
  • You can also adjust the size of the Least Recently Used memory cache, thus balancing memory consumption and frequency of disk reading operations.

Let Us Know What You Think

As always, we'd love to hear from you in the comments section - whether you have questions about this new functionality or feedback on how these improvements worked in your projects.

Check Out Two New Mobile Themes to Improve your ASP.NET Websites

$
0
0

In the June release of DXperience v16.1, we introduced two new mobile themes:

1. Material Theme

The first new theme is called Material and it's based on Google's Material design. And it looks great:

You can see from the video above that this theme has touch animations. Therefore, when you click or touch certain elements, you'll see a brief animation.

The Material design theme has larger touch targets when compared to other DevExpress ASP.NET themes. So it's probably best to use it for mobile scenarios. But don't let me stop you from using it for your desktop scenarios too; after all, we all have touch screens, right?

2. iOS 9 Theme

The new iOS 9 theme replaces our older iOS theme. This new iOS 9 theme is inspired by Apple's iOS 9 design.

The new iOS 9 theme also provides larger touch targets so that your end-users can use their fingers as touch inputs on mobile devices (similar to the Material theme).

Check out this short video to see it in action:

16.1 What's New Webinar

In case you missed it, check out the v16.1: What's New for ASP.NET Webforms and MVC extensions

In the webinar, I discuss the new themes and other new items that we introduced in the v16.1 release.

Customizable

Both of these new themes are customizable. You can change the base font or base color easily using the DevExpress ASP.NET Theme Builder tool. Learn more here:

Download v16.1 today and try one of the new mobile-friendly ASP.NET themes!

Which theme is your favorite? Drop me a line below, thanks!


Your Next Great .NET App Starts Here

Year after year, .NET developers such as yourself consistently vote DevExpress products #1.

Experience the DevExpress difference for yourself and download a free 30-day trial of all our products today: DevExpress.com/trial (free support is included during your evaluation).


Creating Desktop Apps for Windows, Mac OS and Linux with DevExtreme

$
0
0

Last week I did a webinar on creating desktop applications with DevExtreme and Electron. In case you missed it, it is available on our YouTube Channel

image

This was also one of the first webinars where a swift introduction on DevExtreme with Visual Studio Code, Git, Node/NPM (Node Package Manager) and the Command-Line was performed. In case you have heard the term NPM, but don’t know exactly what it is; NPM is for Node what Nuget is for dotNet.

For all of you wanting to redo the demo project on your own – a simple ToDo app – I have written down the steps that where performed in the webinar.

Prerequisites

Before opening a command prompt, make sure you have the latest versions installed of the following:

With these tools setup, you can fire up a command prompt and create a folder which will hold the project and navigate into it.

Make sure you use some short folder structure like C:\Src\App1, since the MAX_PATH value in Windows is reached fairly quickly when using NPM and node modules!

C:\cd \Src
C:\Src>md App1
C:\Src>cd App1

No project template?

Because Visual Studio Code doesn’t support Project templates out of the box, I decided to use a GitHub repo as project template by cloning it.

The repo can be found at: https://github.com/donwibier/DXDevExtremeKnockoutTemplate, and we can clone it to our App1 folder with the following command at the command prompt:

C:\Src\App1>git clone https://github.com/donwibier/DXDevExtremeKnockoutTemplate . 
(don’t forget the dot at the end)

image

Once the cloning is finished, we can start VSCode like:

C:\Src\App1>code .
(mind the dot)

The package.json already includes the required NPM packages but if you’re new to NPM, it might be worth taking a look at it. You could e.g. change the application name and version number.

image

If you’re used to the full Visual Studio experience and have used the project template which comes with DevExtreme, you might recognize the folder structure as well as several files provided with this clone.

One thing which is slightly different, is the lack of JavaScript files in the /js folder and the references in the index.html. This is because we will use NPM to get all dependencies for this project.

Because we made a fresh clone, we need to get all those dependencies through NPM. This is done by the following command:

C:\Src\App1>npm install

image

After some time – depending on your internet speed – NPM finishes. In our case it comes with a couple of warnings which we can safely ignore. This project will not use Angular, Globalize or Webpack.

Now, we can start the project in our browser by issuing the command:

C:\Src\App1>npm start

The package.json will be checked for the scripts / start setting which will execute the lite-server and show a browser with our SPA (Single Page Application).

image

Lite-server is a small web-server – much like IIS Express for ASP.NET development – to test SPA web-based apps. It is written in Node by John Papa and Christopher Martin. It is specified as dev-dependency in the package.json, so it was downloaded and configured during our npm install command. It has a couple of convenient features like browser-sync. This feature monitors the source folder for changed files and automatically refreshes the browser used for testing.

We will not be using this since we’re going to create a desktop app. Let’s hit Ctrl+C in our terminal window to exit the lite-server.

Getting Electron in the project

So, let’s turn this into a Desktop app by adding the Electron package to the project. This is done by entering the following command:

C:\Src\App1>npm install electron-prebuilt –save

This will download the Electron package and stores the dependency in our package.json file so it will look like this:

image

The npm install only caused step 1 to be added to the package.json file because of the –save option. Since we’re not using the lite-server anymore, we could either remove the lite-server dev-dependency manually from the package.json file or we could issue the command:

C:\Src\App1>npm remove lite-server –save-dev

If we want the electron runtime to boot up when we issue the npm start command, we need to change the scripts / start option manually to electron main.js as mentioned in step 3.

Initializing the Electron app

So now everything is almost setup to run our JavaScript SPA as a desktop application. If you look closely to the start configuration and next to your project folder, you might notice that one file is missing – main.js.

The main.js file is a JavaScript file containing the bootstrap code for initializing the main process of the desktop application. It initializes the bare chromium browser window and determines what to do when certain thing concerning that window are happening – like minimizing / maximizing and closing the window.

The content of this file is pretty much the same as found on the Quick start guide available at the http://electron.atom.io/.

const electron = require('electron');
// Module to control application life.
const app = electron.app;
// Module to create native browser window.
const BrowserWindow = electron.BrowserWindow;

global.settings = {
    databaseFolder : app.getPath("documents")
}
// Keep a global reference of the window object, if you don't, the window will
// be closed automatically when the JavaScript object is garbage collected.
let mainWnd;

function createWindow() {
    // Create the browser window.
    mainWnd = new BrowserWindow({ width: 1200, height: 700 });
    // and load the index.html of the app.
    mainWnd.loadURL(`file://${__dirname}/index.html`);
    // Open the DevTools.
    //mainWnd.webContents.openDevTools();
    // Emitted when the window is closed.
    mainWnd.on('closed', () => {
        // Dereference the window object, usually you would store windows
        // in an array if your app supports multi windows, this is the time
        // when you should delete the corresponding element.
        mainWnd = null;
    });
}
// This method will be called when Electron has finished
// initialization and is ready to create browser windows.
// Some APIs can only be used after this event occurs.
app.on('ready', createWindow);
// Quit when all windows are closed.
app.on('window-all-closed', () => {
    // On macOS it is common for applications and their menu bar
    // to stay active until the user quits explicitly with Cmd + Q
    if (process.platform !== 'darwin') {
        app.quit();
    }
});
app.on('activate', () => {
    // On macOS it's common to re-create a window in the app when the
    // dock icon is clicked and there are no other windows open.
    if (mainWnd === null) {
        createWindow();
    }
});

The code inside the main.js file is actually being executed in the Node context of an Electron application. One of the nice things in Node is the use or the require(…) construct to include npm packages.

A nice side-effect is that we can also use the require method inside our render process(es) to include npm packages. Render processes are basically the rendering of our SPA app – html/CSS/JavaScript assets inside the Chromium window.

The reason that we can use require(..) in our render process is because Electron adds a couple methods to the JavaScript Window object, which also allows us to exchange data between the main and render processes and to facilitate the Electron API to access local resources and O.S. specific features.

JQuery comment

Those extra methods mentioned before are causing JQuery to fail while initializing inside an Electron window for various reasons. This can be fixed easily by changing the index.html script sections at the bottom of the page. Let’s also make use of the require construct:

Original code in index.html:
<body><div class="dx-viewport"></div><script src="./node_modules/jquery/dist/jquery.js"></script><script src="./node_modules/knockout/build/output/knockout-latest.js"></script><script src="./node_modules/devextreme/dist/js/dx.all.js"></script><script src="./js/db.js"></script><script src="./index.js"></script><script src="./layouts/Desktop/DesktopLayout.js"></script><!-- ViewModels --><script type="text/javascript" src="./views/home.js"></script></body>
Electron changes in index.html:
<body><div class="dx-viewport"></div><script>
        //because of electron, we need to include jQuery slightly differentwindow.$ = window.jQuery = require("jquery");
        window.ko = require("knockout");
        var dxapp = dxapp || {};

        require("./node_modules/devextreme/dist/js/dx.all.js");
        require("./layouts/Desktop/DesktopLayout.js");
        require("./js/db.js");
        require("./index.js");
        require("./views/tasks.js");</script></body>

With these modifications in place, we're ready to boot up our desktop app by entering the command:

C:\Src\App1\npm start

Final comments on the webinar project

In the webinar, I showed how to use a local SQLite database to store the ToDo items. For this I replaced the /js/db.js file with the one hosted on github. I also added the npm package sqlite-sync to the project with:

npm install sqlite-sync –save

This script also requires the app.json file to be present in the root folder of our project and it shows you how to work with configuration settings in an Electron app.

The db.js script shows you a way on how to create a DevExtreme Datasource with a custom store which supports paged results, sorting and filtering. This functionality is used in the /views/tasks.js file to create a proper viewmodel for the view /views/tasks.html file. Here I added a dxDataGrid widget.

The entire project created during the webinar is also available on github and can be tested with the following commands in your terminal window:

C:\Src>md app2
C:\Src>cd app2
C:\Src\app2>git clone https://github.com/donwibier/DXDevExtremeElectron .
C:\Src\app2>npm install && npm start

In case you want to know more on Electron, please check their documentation at http://electron.atom.io/docs/ . This also contains information about packaging you application for the specific platforms, best practices and things to consider when building a cross-platform app.

Don’t forget to test it on a Linux machine as well as a Mac and do let me know what you have created with DevExtreme and Electron!

CodeRush for Roslyn: The Fastest .Net Test Runner

$
0
0

Once again it's time to benchmark the CodeRush Test Runner with the competition.

So my last post on “CodeRush for Roslyn: Running Tests” sparked a few questions

Like ‘Is the CodeRush test runner really that fast?’ and ‘How do other test runners stack up against CodeRush for Roslyn?’

Test Conditions

To reproduce this benchmark scenario, you will need:

Software

  • 1 copy of Visual Studio 2015– Update 3
  • 1 copy of the Nancy FX Solution, which includes 2,410 unit tests.
  • Latest versions of each test runner (I used the latest test runners available in August 2016).

Hardware

  • I used my laptop –> Intel® Core™ i5 M 520 with 8Gb RAM.

Test Procedure

  • Close any open instances of Visual Studio.
  • Start a fresh instance of Visual Studio with the test runner you want to benchmark already installed. Allow time to settle – see notes below.
  • Load the NancyFX solution. Allow time to settle – see notes below.
  • With the test runner you want to benchmark:
    • Run all tests. Note raw time as ‘Run 1’
    • Run all tests. Note raw time as ‘Run 2’
    • Run all tests. Note raw time as ‘Run 3’
    • Average the times from the three test runs. Enter the data in the table.
    • Make note of the number of tests detected by the test runner.
  • Close Visual Studio.
Repeat these steps for each test runner you want to evaluate.

Results

We've changed competing product names so we don't unduly upset anybody.

Here are the total times for each Test Runner on the Nancy FX Solution (lower is better):


Here's our test run data, in table format:

Notes:

  1. The "Test/Sec" column is calculated by taking the total number of tests (e.g., 2,410) divided by the test run time for each test runner. 
  2. The "CodeRush Is Faster By" shows how much faster CodeRush is than the competing tool. Values in this column are calculated by taking the CodeRush Test/Sec rate (e.g., 20.1) and dividing that by the Test/Sec rate for each competing product.
  3. The "JC" product tested failed to find 263 out of all 2,410 tests, so it's not doing as much work as the other test runners. Once this issue is fixed, the benchmark numbers for the "JC" product are likely to change.
  4. We realized the "RS" product we tested was incorrectly reporting total time to run all tests (erroneously reporting that it took much more time to run the tests than it actually did). So to be fair we used a stopwatch operated by a human to time the results for this product. Results manually timed like this might be off by as much as 1-2 seconds.
  5. Both the MS product and the JC product seem to have a "discovery" phase that runs every time before a test run actually gets started. During the discovery phase, test runner UI is blocked but the IDE remains responsive. We found this discovery phase for both products took two additional minutes to discover all the tests in the Nancy FX solution. We did not include those extra two minutes in calculating the total test run time for the MS and JC products, even though you could easily argue they are part of the test run. Note that the top three test runners (CodeRush, RS & TD) do not have a discovery phase, which means these three products are able to instantly start your test run.
In the category of number of Tests Run Per Second, CodeRush is the clear winner with an average of over 20 tests (in the Nancy FX solution) run per second:
The next closest competitor, RS, is only able to run 13.3 tests per second in the Nancy FX solution.

No competitor comes close to the speed and efficiency of the CodeRush test runner.

    Summary

    Not all runners are created equally. Some are better than others.

    Features to look for in a good test runner:

    • Finds & runs 100% of your tests. At least one of the test runners we evaluated failed to find all the tests.
    • Finds your tests quickly. Two of the test runners we evaluated locked up test runner for an apparent "discovery phase" that lasted almost two minutes before the tests were actually run.
    • Collect test results as quickly as possible.

    No matter how you slice those numbers, CodeRush for Roslyn is still the Fastest Test runner for .NET development.

    Not convinced? Try it yourself. Download CodeRush for Roslyn and see just how much faster CodeRush is than your current test runner.

    And one last thing…. Check out the price. CodeRush for Roslyn can be yours for only $49, and CodeRush is so much more than just a test runner.

    VB.NET now supported in DevExtreme ASP.NET MVC Wrappers

    $
    0
    0

    When we announced the new DevExtreme ASP.NET MVC Wrappers (CTP) a few weeks ago, someone asked if Visual Basic (VB.NET) would be supported.

    VB.NET support for DevExtreme ASP.NET MVC Wrappers is now available in the v16.1.5 release.

    Project Template

    There's a new VB.NET project template to help you get started:

    When you select this project type, a new, ready-to-run, VB.NET project is created for you:

    DevExtreme ASP.NET MVC Wrappers - VB.NET File New Getting Started

    This project contains code and examples of:

    • WebAPI Service
    • DevExtreme MVC Grid Wrapper (connected to WebAPI service)

    Watch, Download, and Build

    Watch the webinar to learn more about DevExtreme MVC Wrappers:

    Download v16.1.5 and try DevExtreme MVC Wrappers today.

    Then give us your feedback. You can email me, drop me a comment below, or even tweet me.

    Thanks!


    Your Next Great .NET App Starts Here

    Year after year, .NET developers such as yourself consistently vote DevExpress products #1.

    Experience the DevExpress difference for yourself and download a free 30-day trial of all our products today: DevExpress.com/trial (free support is included during your evaluation).

    Webinar: Using DevExpress MVVM Magic with WPF

    $
    0
    0

    This week, I presented a webinar about our MVVM framework which ships with our WPF control suite. In case you missed it, you can watch it here.

    image

    What is MVVM and why?

    MVVM stands for Model-View-ViewModel and it is a design pattern which requires you to make some architectural choices before you start on a project. I will only spend a little time on the ‘why’ since there are tons of great articles out there doing a way more detailed job.

    image

    The most important advantages in my opinion are:

    Seperation of concerns

    In this case, the View (U.I.) does not have any direct relation with the DataLayer (Models). The ViewModel provides all the presentation logic and accesses the DataLayer if needed.

    In most applications, data is stored in a relational database. The structure of your database is in most cases optimized to select and/or update information as quickly as possible. Also in most cases, this is not the most optimal way for presentation purposes. The ViewModel gives us the possibility to transform the data coming out of the DataLayer into an optimized (different) structure for presentation purposes.

    By using this approach, we can use one of the very powerful features of the WPF platform – databinding. The View databinds certain elements in the U.I. to properties or commands exposed by the ViewModel. As a result, in most cases there is no code-behind in a View.

    UnitTestable

    Another cool side effect of this pattern is that – because the ViewModel doesn’t care what is bound to it – we can replace the View with a UnitTest. Since all presentation logic is coded in the ViewModel, this means that we can UnitTest the presentation logic.

    Why did we build such a framework?

    While WPF is designed to support a lot of aspects of the MVVM design pattern, some things do require some coding in the ViewModels. To give you an example: A ViewModel is unable to interact directly with the UI, but what happens when some validation code in the ViewModel needs to raise a confirmation on the UI?

    This is implemented through Services and Behaviors and is something available out of the box through our framework. There are a couple more difficulties in this loosely coupled architecture which are managed easily through the framework.

    We also provide you with some really awesome design-time support built in to easily bind all kinds of things to the ViewModel. This support is provided with all DevExpress WPF controls.

    This all results in less code in your ViewModels which keeps things nice and clean.

    An introduction of the Framework

    The MVVM framework is convention based. This means that there are certain guidelines you need to follow and by doing so, you’ll be able to build applications in less time.

    In the webinar I created a ViewModel based on a number of those conventions. The bare minimum code for a ViewModel looks as follows:

    [POCOViewModel]
    public class TrackViewModel
    {
        public virtual TrackInfo Track { get; set; }
    
        [ServiceProperty(SearchMode = ServiceSearchMode.PreferParents)]
        protected virtual IMessageBoxService MessageBoxService { get { return null; } }
    
        protected TrackViewModel()
        {
            // for test purposes only !!
            Track = new TrackList()[15];
        }
        public static TrackViewModel Create()
        {
            return ViewModelSource.Create(() = > new TrackViewModel());
        }
    
        public bool CanResetName()
        {
            return Track != null & amp; & !String.IsNullOrEmpty(Track.Name);
        }
        public void ResetName()
        {
            if (Track != null)
            {
                Track.Name = "";
            }
        }
    }

    In the code there are a couple of interesting points.

    • The class is decorated with the [POCOViewModel]
    • Properties (for binding purposes) are marked virtual
    • The constructor is marked protected which means that we cannot instantiate such a ViewModel directly
    • There is a public static Create method which instantiates a new instance of this ViewModel through the ViewModelSource factory
    • The method bool CanResetName has a relation with method ResetName

    The creation of an instance of this class through that factory is essential for the magic to happen. What happens under the hood is that the framework creates a new ViewModel class which is derived from our ViewModel. In this derived class, we add all kinds framework related things to the ViewModel. For instance, we create Commands for public methods, we set constraints depending on the results of those bool Can… methods.

    Also the IMessageBoxService MessageBoxService property - which just returns null - will have changed behavior in the derived class.

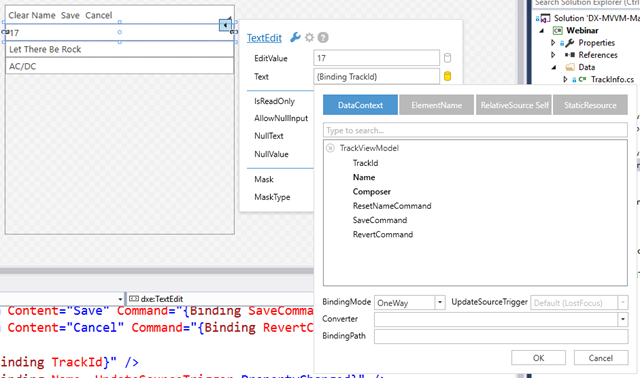
    Once we have set everything up according to those conventions (and did a build), we’re able to switch to the View. Through the Task Menu of any of the controls, we’ll be able to use those design-time features which come with the framework.

    image

    During the webinar I introduced a second View + ViewModel and I demonstrate how one ViewModel activates another and synchronize some data. I also show how easy it is to map events (from the grid) to commands in the ViewModel by binding expressions.

    UnitTesting

    If you want to perform a test on one of the ViewModels, you can setup a test like:

    [TestFixture]
    class TrackViewModelTests
    {
        const string INITIAL_TRACKNAME = "My Test Track";
        const string MODIFIED_TRACKNAME = "My Modified Test Track";
    
        [SetUp]
        protected void SetUp()
        {
            // initialize your test here
        }
    
        [Test]
        public void TestResetNameCommandNo()
        {
    
            var vm = TrackViewModel.Create(new TrackInfo() { Name = INITIAL_TRACKNAME });
            var serviceContainer = (vm as ISupportServices).ServiceContainer;
    
            IMessageBoxService msgSvc = new DummyServiceForMessageBox(MessageResult.No);
            serviceContainer.RegisterService(msgSvc);
    
            //Testing the ResetName behaviour while clicking No on the confirmation dialog...
            vm.ResetName();
            Assert.That(vm.Name, Is.EqualTo(INITIAL_TRACKNAME));
        }
    }
    

    Do note that the DummyServiceForMessageBox can be a simple class which looks like:

    internal class DummyServiceForMessageBox : IMessageBoxService
    {
        private readonly MessageResult resultToTest;
        public DummyServiceForMessageBox(MessageResult resultToTest)
        {
            this.resultToTest = resultToTest;
        }
        MessageResult IMessageBoxService.Show(string messageBoxText, string caption,
            MessageButton button, MessageIcon icon, MessageResult defaultResult)
        {
            return this.resultToTest;
        }
    }

    Because these services are interfaced based, we can simple change the implementation of this DummyServiceForMessageBox from showing the dialog to an immediate Yes or No.

    The Demo Project

    The project I have created during the webinar is available on github at: https://github.com/donwibier/DXWPF-MVVM-Magic.git

    I have also included an NUnit test project to demonstrate how to test one of those ViewModels.

    Let me know what you think of the framework and if you are ready for a deep-dive webinar!

    DevExtreme and Modularity: Bundles, RequireJS, and WebPack

    $
    0
    0

    Good news, the DevExtreme widgets are now available as separate modules in the v16.1 release! Modules provide benefits and are key components in Modularity:

    Modular programming is a software design technique that emphasizes separating the functionality of a program into independent, interchangeable modules, such that each contains everything necessary to execute only one aspect of the desired functionality. Wikipedia

    Separate DevExtreme widget modules can help you create a smaller bundle of necessary scripts that need to be loaded for your project.

    However, there is a big warning with modules: You are now responsible for making sure to include the necessary DevExtreme modules that are referenced in your project. If you do not include the necessary modules then your project will have website errors.

    I demonstrate and discuss these points in the webinar below.

    Watch the webinar

    Watch my recent webinar to learn how to use DevExtreme Modules with RequireJS and WebPack:

    Links to helpful items

    Here are several helpful links that were mentioned in the webinar:

    DevExtreme links:
    - DevExtreme examples on GitHub - These are the main DevExtreme module samples
    - DevExtreme Basics: Add a wiget

    RequireJS:
    - RequireJS - Why
    - RequireJS - Why AMD

    WebPack:
    - WebPack - Getting Started
    - Webpack: When To Use And Why

    Other links:
    - Hanselman's blog post on NPM
    - RequireJS optimization
    - Bower packer manager

    I'd love for you to watch the video, try the GitHub DevExtreme examples, and then give us your feedback. You can email me, drop me a comment below, or even tweet me.

    Thanks!


    Your Next Great .NET App Starts Here

    Year after year, .NET developers such as yourself consistently vote DevExpress products #1.

    Experience the DevExpress difference for yourself and download a free 30-day trial of all our products today: DevExpress.com/trial (free support is included during your evaluation).

    PDF/A Export

    $
    0
    0

    We recently discovered some issues when exporting a PDF/A-2b type document in relation to the ISO 19005-2 standard.

    • The document is not PDF/A compatible if it contains fonts without embedded font programs. 
    • The document is converted to PDF/A-3b if any attachments are present. 
    • The document is not PDF/A compatible if it is encrypted.

    The team worked hard to address these bugs and I am pleased to announce, starting with version 16.2, the following changes have been made:

    • The PdfACompatibility enumeration has been expanded. It now contains “PdfA1b”, “PdfA2b” and “PdfA3b” values, which conform to restrictions imposed by PDF/A-1b (ISO 19005-1), PDF/A-2b (ISO 19005-2) and PDF/A-3b (ISO 19005-3) standards.  In addition, the enumeration contains the “None” value which conforms to ISO 32000-1 standard without any restrictions. 
    • The PDF Export Settings dialog no longer allows you to specify incorrect options. 
    • PdfExportOptions are validated before export. This may result in an exception because some of the options are mutually exclusive. 
    • A new Validate() method has been added to check the validity of PdfExportOptions. It returns a list of any detected inconsistencies.

    The sample below illustrates how to use this new method:

    [C#]

    using (XtraReport report = new XtraReport()) {
        PdfExportOptions options = new PdfExportOptions();
        options.PdfACompatibility = PdfACompatibility.PdfA1b;
        options.PasswordSecurityOptions.PermissionsPassword = "pwd";
        options.ShowPrintDialogOnOpen = true;
        IList<string> result = options.Validate();
        if (result.Count > 0)
            Console.WriteLine(String.Join(Environment.NewLine, result));
        else
            report.ExportToPdf("Result.pdf", options);
    }

    [VB.NET]

    Using report As New XtraReport()
        Dim options As New PdfExportOptions()
        options.PdfACompatibility = PdfACompatibility.PdfA1b
        options.PasswordSecurityOptions.PermissionsPassword = "pwd"
        options.ShowPrintDialogOnOpen = True
        Dim result As IList(Of String) = options.Validate()
        If result.Count > 0 Then
            Console.WriteLine([String].Join(Environment.NewLine, result))
        Else
            report.ExportToPdf("Result.pdf", options)
        End If
    End Using

    Version 16.2 will also allow you to create documents conforming to the following standards which will require you to validate all export options.

    • PDF (ISO 32000-1) 
    • PDF/A-1b (ISO19005 - 1) 
    • PDF /A-2b (ISO19005 - 2) 
    • PDF/ A-3b (ISO19005 - 3)

    For the current versions of the library, you need to consider the following restrictions associated with PDF/A compatibility:

    • All PDF/A versions implicitly prohibit encryption. 
    • All fonts that are used in PDF/A documents should be embedded. 
    • The PDF/A-1b and PDF/A-2b standards do not support attachments. 
    • The PDF/A-1b standard does not support transparency and the alpha channel in images will be ignored.


    It is great to see the PDF library being used in so many scenarios. Please feel free to provide any feedback directly to me, or via the support centre here.

    ASP.NET HTML Editor - Import, Export, and Pasting

    $
    0
    0

    Did you know that the DevExpress ASP.NET HTML Editor control has three major features to help you work with Microsoft Word and different document formats? Let's explore these three major features:

    • Import
    • Export
    • Paste (from Word and paste options)

    Watch this video to learn how importing, exporting, and pasting with the DevExpress ASP.NET HTML Editor:

    Below are several of the links to demos and documentation mentioned in the video.

    Import

    The DevExpress ASP.NET HTML Editor can import several different formats:

    • Rich Text (.rtf)
    • Office Open XML (.docx)
    • MIME HTML (.mht)
    • Open Document (.odt)
    • Plain Text (.txt)

    When importing, the DevExpress ASP.NET HTML Editor will read the source format and convert it to HTML. The control's Importmethod provides you several overloads to make importing easier.

    See it in action by testing the Import demo.

    Export

    The DevExpress ASP.NET HTML Editor can export several different formats:

    • Rich Text (.rtf)
    • Office Open XML (.docx)
    • MIME HTML (.mht)
    • Open Document (.odt)
    • Plain Text (.txt)
    • Portable Document (.pdf). Available for export only.

    Your end-users can export directly from the HTML Editor control's toolbar:

    Toolbar Export

    Watch the video to learn how to easily add an export button to your DevExpress ASP.NET HTML Editor toolbar.

    You can also programmatically export using the export method from the ASP.NET server-side or client-side.

    Test the HTML Editor's toolbar export capabilities now.

    Paste

    Your end-users have two great ways to paste:

    1. Paste from Word Dialog

    The Paste from Word dialog allows end-users to paste the text from a Word document using the clipboard. Pasting the text using this dialog preserves text formatting and font settings. End-users can opt not to preserve the text's font family.

    Paste from Word

    2. Paste formatting

    The DevExpress ASP.NET HTML Editor control provides the capability to automatically format pasted HTML content based on the PasteMode property, which can be set in one of the following values:

    • SourceFormatting - The formatting of the pasted content is retained. A style definition that is associated with the copied text is copied to the destination document.
    • MergeFormatting - The formatting of the pasted content is mostly discarded. However, emphasis formatting, such as bold and italic text, is retained. The content takes on the style characteristics of the paragraph where it is pasted. The content also takes on any direct formatting or style properties of the element that immediately precedes the cursor when the content is pasted.
    • PlainText - The formatting of the pasted content and non-text elements, such as pictures or tables, is discarded. The text takes on the style characteristics of the paragraph where it is pasted and takes on any direct formatting or character style properties of text that immediately precedes the cursor when the text is pasted. Graphical elements are discarded, and tables are converted to a series of paragraphs.

    End-users can change the formatting of the pasted HTML content using paste options bar buttons, which appear in the top right corner of the design area after the content is pasted. By default, this functionality is disabled.

    See it in action by testing the Paste Formatting demo now.


    Your Next Great .NET App Starts Here

    Year after year, .NET developers such as yourself consistently vote DevExpress products #1.

    Experience the DevExpress difference for yourself and download a free 30-day trial of all our products today: DevExpress.com/trial (free support is included during your evaluation).


    CodeRush for Roslyn, v16.1.7

    $
    0
    0

    Today CodeRush for Roslyn v16.1.7 is available. Team CodeRush continues its 45-day sprint & release cycle.

    This release adds a few new features, and addresses a number of customer-reported issues.

    My favorite new feature in this release is the availability of Reorder Parameters. This extremely efficient refactoring is now available at method calls, multi-dimensional indexed property references, and object creation expressions. So you can be anywhere in your code, and see a method call with arguments in non-intuitive places, and reorder that call’s parameters immediately, and CodeRush for Roslyn will update the declaration and all references automatically.

    ReorderParametersCallingSite


    Another nice addition is the return of being able to use the Spacebar to expand/collapse regions:

    SpaceExpand


    And we improved the performance of the IntelliRush experience.


    We also discovered three undocumented features we added to the Debug Visualizer back in version 1.0.12, which you may have already experienced.

    1. Array contentspreview at debug time:

    ShowArrayContents


    2. Color swatchpreview at debug time:

    ShowColorSwatches


    3. Font preview at debug time:

    ShowFontFamily


    Download CodeRush for Roslyn from the Visual Studio Gallery, and let us know what you think.

    Updates every 45 days.

    WPF: Asynchronous server mode for lookup editors (new in v16.1)

    $
    0
    0

    In our v16.1 release we have introduced a very nice feature to improve the U.I experience on the LookUpEdit, ComboBoxEdit and ListBoxEdit.

    We call it asynchronous server mode and it means that we use our server mode functionality for the data being shown in the dropdown pane.

    Server mode is a very clever way of selecting small chunks of data to populate the visible area of the control. All data-aware operations like sorting, filtering and grouping are being performed in a background thread. This results in an instant feedback U.I. experience for the end-user as the editor and application will always remain responsive for user actions.

    When such an operation is in progress, we provide visual feedback in the form of an animation to indicate the status of the operation.

    When editors operate in server mode they also support auto complete when the dropdown is closed.

    ASP.NET: New Bootstrap Template Wizard - v16.1

    $
    0
    0

    In the v16.1 release, we included a new project template for DevExpress ASP.NET controls: Bootstrapped Web Application.

    Bootstrapped Web Application
    (click an image to see larger version)

    Bootstrap is one of the most popular responsive web frameworks. Our new project template allows you to now create a new web application that uses the Bootstrap framework elements (CSS templates and UI components) with DevExpress ASP.NET controls.

    Clarification

    The Bootstrap project template that I'm discussing in this blog post relates to the current set of (100+) DevExpress ASP.NET and MVC controls. We're also working on a new of ASP.NET controls that will better support Bootstrap themes. Please read this blog post for more information on that project.

    The benefit of this new Bootstrap project template is that you get a responsive layout using Bootstrap is very useful. However, there is one caveat, the themes from DevExpress controls and Bootstrap are not compatible. That is why this Bootstrap template can help you because it uses the DevExpress ASP.NET Moderno theme which works well with Bootstrap.

    Project template

    The Bootstrap project template wizard provides a complete (sample) web application. The project includes all the necessary files for Bootstrap and DevExpress controls to work together:

    Blog sample

    The new Bootstrap project template creates a sample Blog website. The website use the default layout of a typical Bootstrap website with a banner image and menu on the front page. The DevExpress ASP.NET Menu and Image Slider controls are used here and work well within Bootstrap:

    When the browser width is reduced, the menu and image adapt to the new layout:

    There's also a blog page that uses the DevExpress ASP.NET GridView:

    This page also adapts when the browser width changes:

    What do you think about the new DevExpress ASP.NET Bootstrap project template?

    Leave me a comment below or email me: mharry@devexpress.com

    Twitter: @mehulharry


    Your Next Great .NET App Starts Here

    Year after year, .NET developers such as yourself consistently vote DevExpress products #1.

    Experience the DevExpress difference for yourself and download a free 30-day trial of all our products today: DevExpress.com/trial (free support is included during your evaluation).

    DevExpress at BASTA! Fall 2016

    $
    0
    0

    This week DevExpress is proud to be Gold Sponsor at the BASTA! conference in Mainz, Germany. John, Oliver and I are there with our awesome booth and lots of give-aways.

    image

    Oliver and I are both speaking at the conference. More info about our sessions can be found at https://basta.net/speaker/oliver-sturm/ and https://basta.net/speaker/don-wibier.

    We will be doing daily raffles where you can win a nice gadget like this can-racer or a platform subscription of choice!

    image

    Tonight we will be sponsoring the Pit-Stop event. The person who takes the least amount of time changing the tire, walks off with this nice RC racing car.

    image

    Make sure to visit our booth at Basta!

    ASP.NET Identity - Login with Microsoft Account, Facebook, Twitter, and Google - v16.1

    $
    0
    0

    Good news! We've added support for Microsoft's ASP.NET Identity membership system. What is ASP.NET Identity? Pranav, the Microsoft PM, describes it best here:

    ASP.NET Identity allows you to add login features to your application and makes it easy to customize data about the logged in user. - Pranav Rastogi

    ASP.NET Identity membership system replaces and improves on several of the older ASP.NET membership systems. And this new system brings with it several benefits:

    • One ASP.NET Identity System
    • Ease of plugging in profile data
    • Role provider
    • Claims based
    • Social login providers
    • Azure Active Directory
    • and more!

    I recommend reading the "Introduction to ASP.NET Identity" blog post.

    In all fairness, ASP.NET Identity has been around for a couple of years now. So I'm happy that we're providing support for it from DevExpress Project templates too.

    DevExpress ASP.NET Project Wizard Integration

    When you use the DevExpress ASP.NET Project Wizard with v16.1 or above, under the 'Site Configuration' tab, you'll see a dropdown that allows you to choose the authentication model.

    The default will be the new 'ASP.NET Identity' model because most of the Microsoft project templates default to this improved authentication model. You can change it and select one of the older ones or none.

    However, one of the key benefits of providing Microsoft ASP.NET Identity support through the DevExpress Project templates is that your web project can also use the excellent DevExpress ASP.NET controls for login purposes. This allows you to use any one of the excellent DevExpress ASP.NET themes and maintain a beautiful site.

    Therefore, after the project is created, the DevExpress project wizard will have created all the necessary pages for you for login purposes. And these pages will use the necessary DevExpress ASP.NET controls:

    Learn more about ASP.NET Identity

    The DevExpress project templates are exposing the Microsoft ASP.NET Identity system for you. Therefore, to learn more about ASP.NET Identity's customization, implementation, etc.; I recommend you watch this video:

    Or watch these other helpful Channel 9 videos.

    Do you use the ASP.NET Identity system with DevExpress ASP.NET controls?

    Leave me a comment below or email me: mharry@devexpress.com

    Twitter: @mehulharry


    Your Next Great .NET App Starts Here

    Year after year, .NET developers such as yourself consistently vote DevExpress products #1.

    Experience the DevExpress difference for yourself and download a free 30-day trial of all our products today: DevExpress.com/trial (free support is included during your evaluation).

    Viewing all 2402 articles
    Browse latest View live