CodeRush 13.1 includes a number of new features to make working with XAML easier.
Navigation Support
The Declaration navigation provider is available in XAML code now. You can use it to navigate to:
- Control declarations
- Types
- Properties
- Resource keys
- Named controls
- xmlns aliases
Image may be NSFW.
Clik here to view.
Code Completion
With CodeRush 13.1 installed, Visual Studio’s XAML Intellisense is smarter and more capable. CodeRush suggestions are integrated with the Intellisense window, and include:
- Available continuations for Binding path expressions and TemplateBinding arguments
- Binding.ElementName, Setter.TargetName, and Trigger.SourceName values
- Resource key completions for StaticResource and DynamicResource markup extensions.
Image may be NSFW.
Clik here to view.
New Code Cleanup Rules for XAML
The following XAML specific code cleanup rules are new for 13.1:
Remove All Comments– removes all XAML comments.
Remove Default Values– removes control attributes initialized to default values.
Code Providers
Declare XAML Namespace Reference
This CodeProvider declares a new XAML namespace reference for the active qualifier.
Image may be NSFW.
Clik here to view.
If the type resolves to multiple locations, a submenu will appear allowing you to select the namespace to declare.
Image may be NSFW.
Clik here to view.
Declare All XAML Namespace References
This CodeProvider declares multiple namespace references for every qualified control that can resolve to a single declaration. This refactoring can be useful after pasting XAML fragments from another source.
Image may be NSFW.
Clik here to view.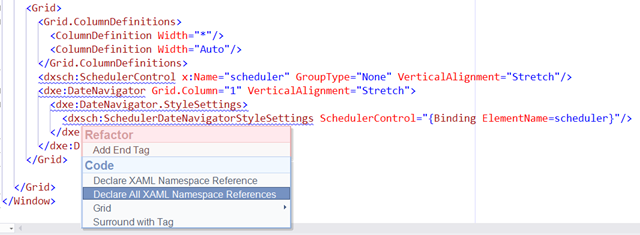
Seven New Grid CodeProviders
CodeRush 13.1 includes seven new Grid CodeProviders, which makes it much easier to work with controls inside XAML Grids.
Insert Columns/Rows
These CodeProviders insert the specified number of columns or rows at the specified location, shifting control position as needed. This CodeProvider can save a huge amount of time if you need to add a column or row to an existing grid. In the example below, we effortlessly add two rows to an already complex grid, shifting 50 control positions down automatically.
Image may be NSFW.
Clik here to view.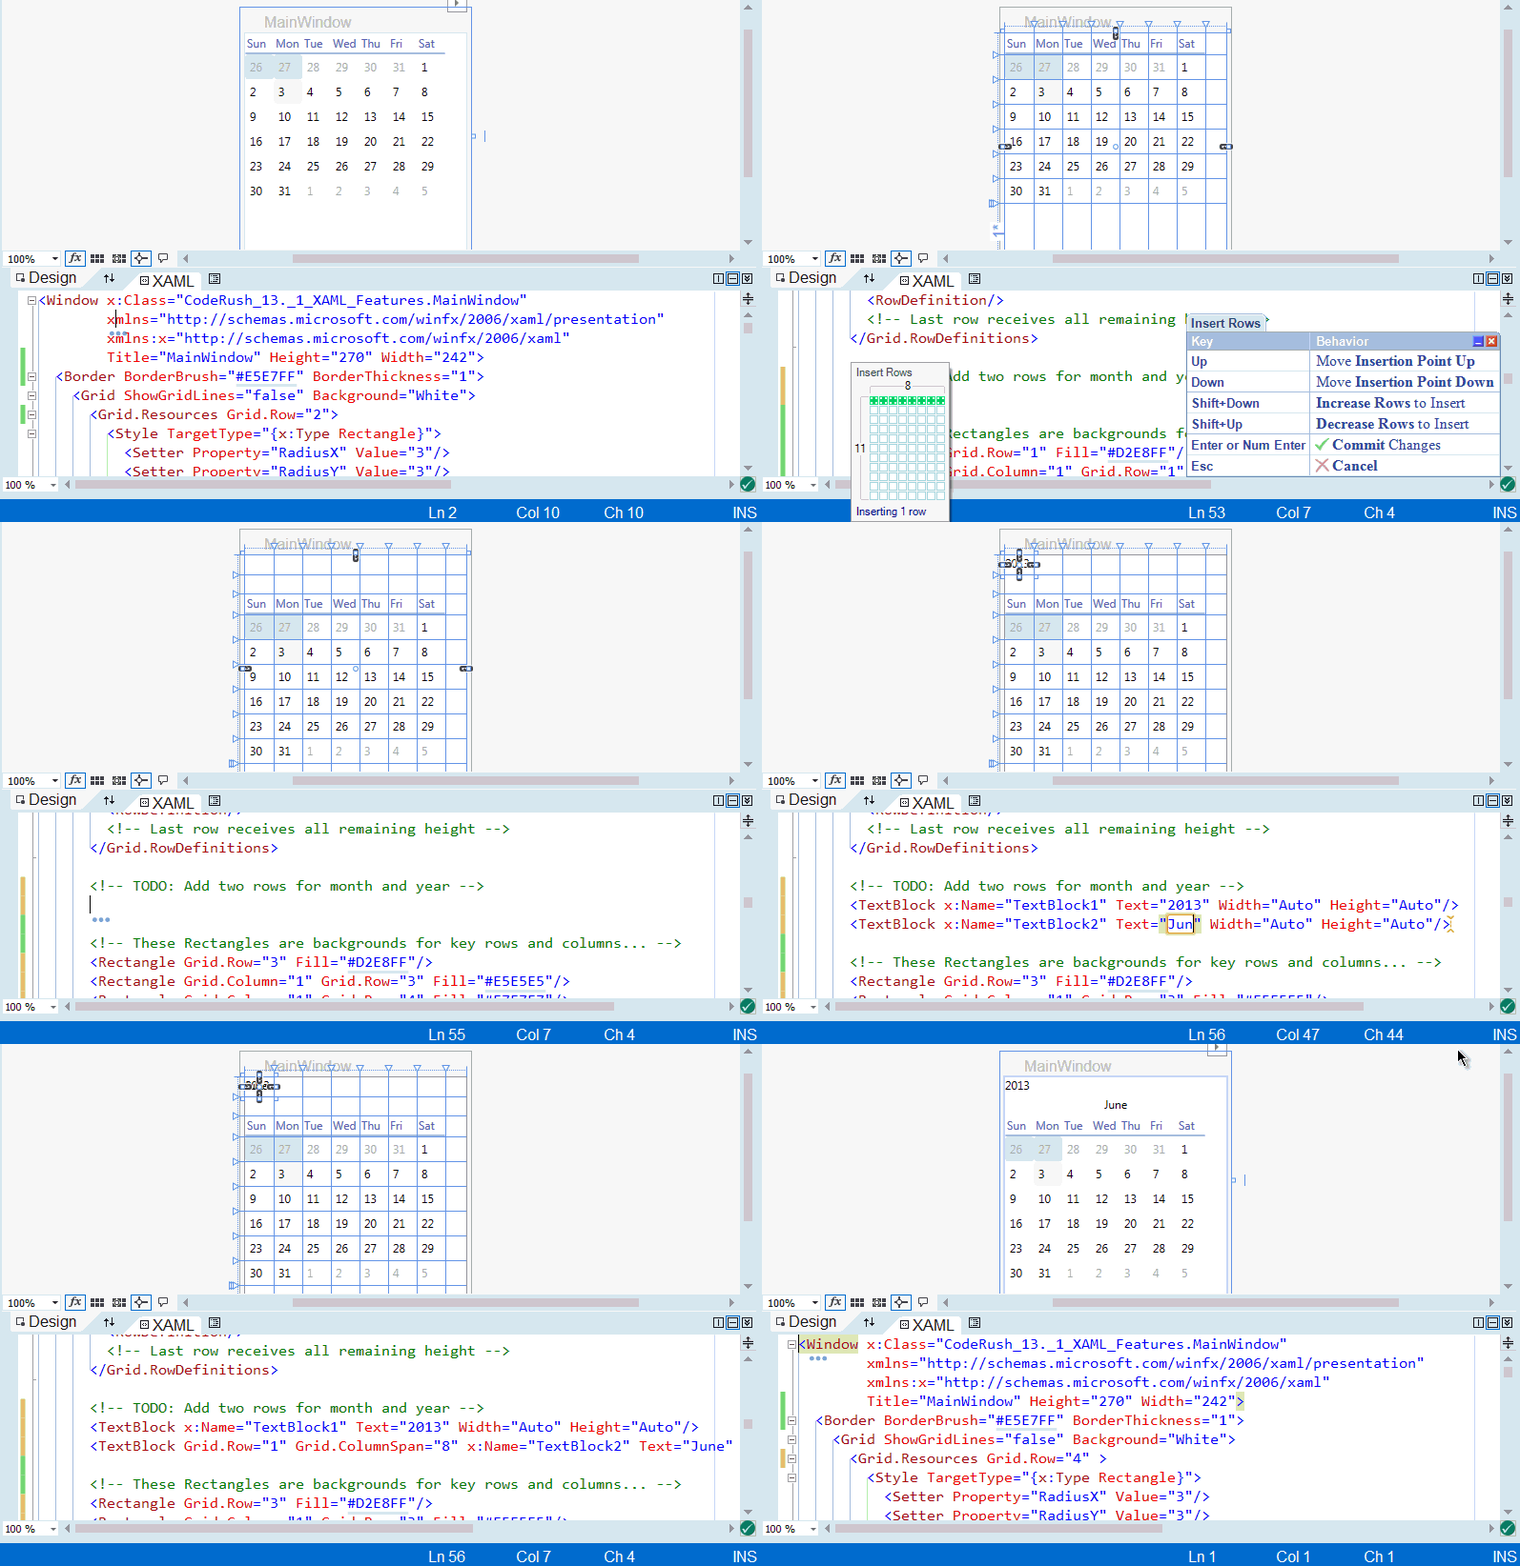
Position Control
This provider allows you to visually position a control inside the parent grid without reaching for the mouse or risking unintended changes (such as span and margins being set by the Visual Studio designer due to less-than-precise mouse operations).
Image may be NSFW.
Clik here to view.
Delete Columns/Rows
These CodeProviders remove the specified number of columns or rows at the specified location, shifting control position and span as needed. Controls contained entirely inside the deleted range will be removed unless the “(keep controls)” variation of this provider is applied.
Image may be NSFW.
Clik here to view.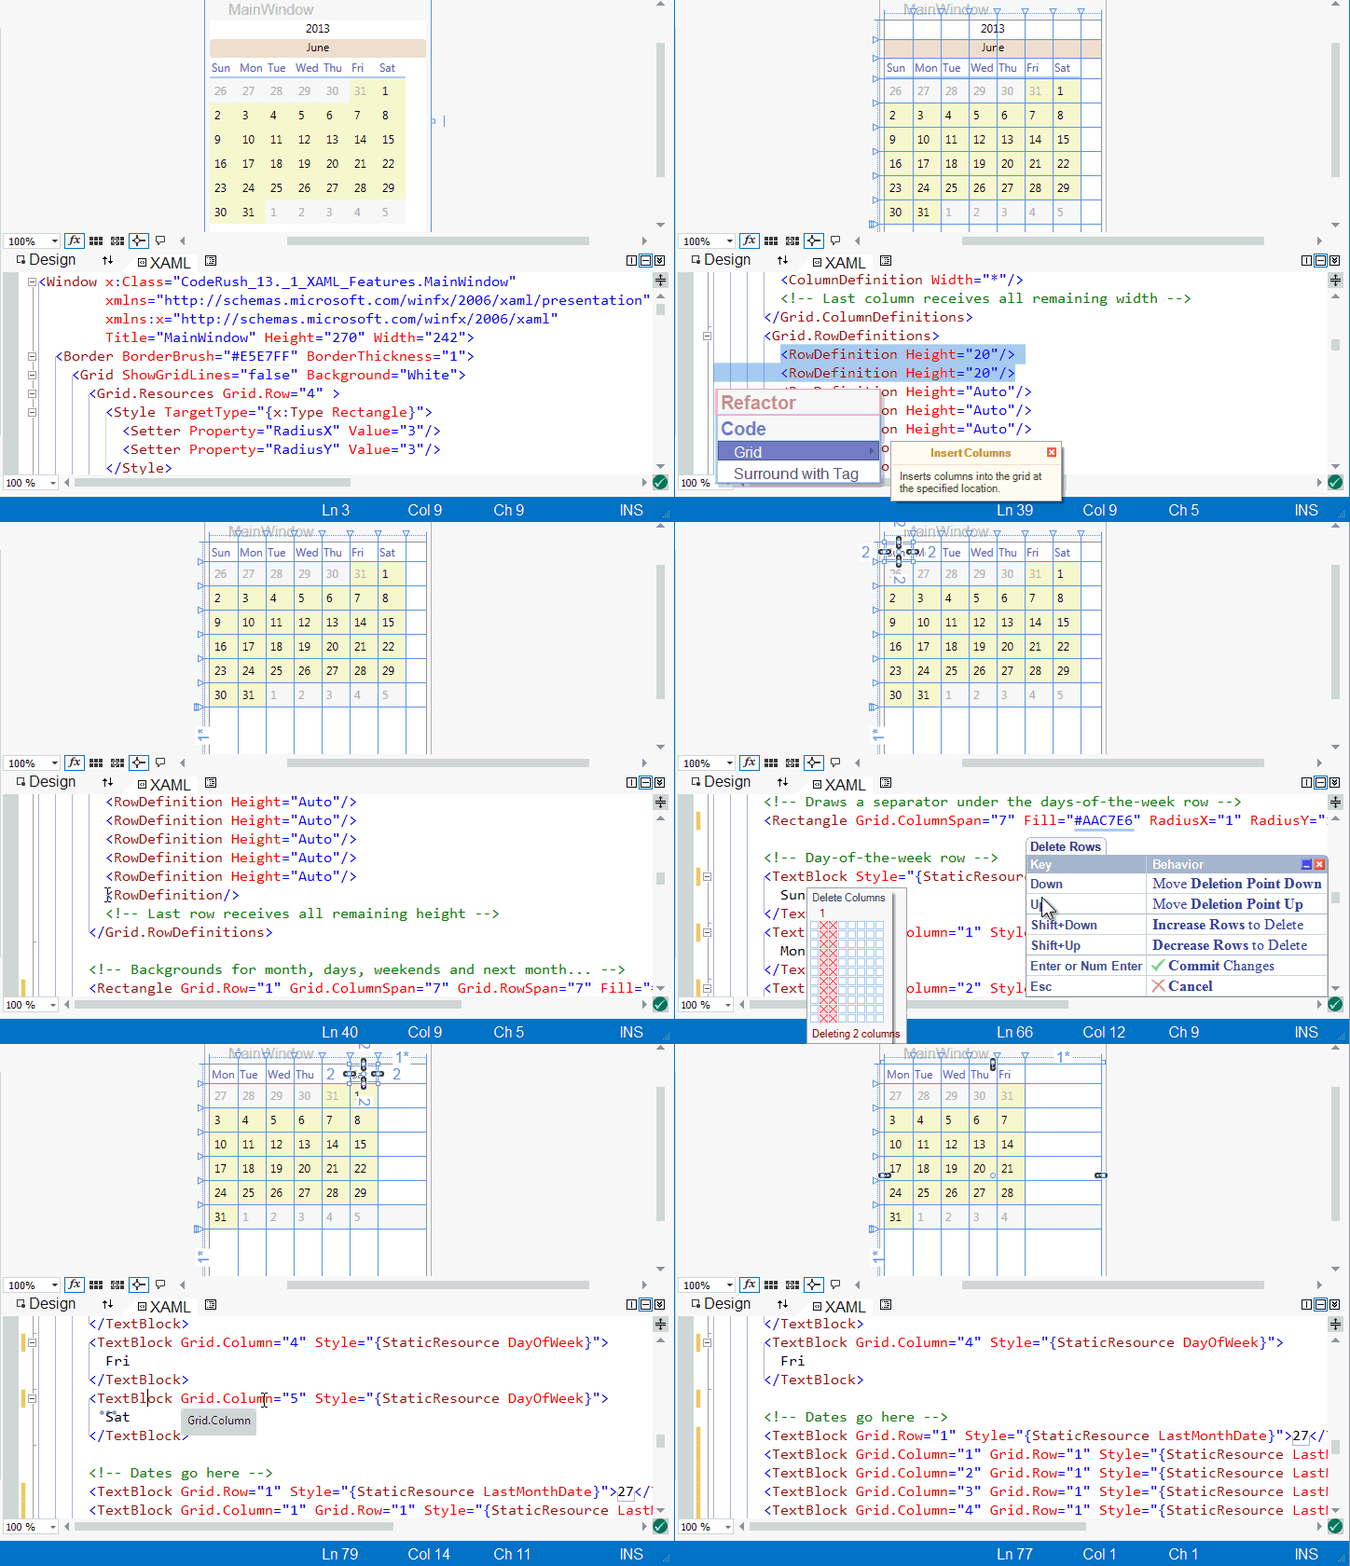
All grid manipulation operations are intelligently performed so undo is simple:
Image may be NSFW.
Clik here to view.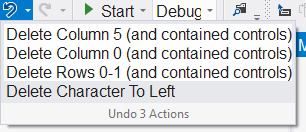
Note: the first 13.1 release omitted the delete column/row providers. The subsequent minor update (and daily builds) include this feature.
New Templates
Setting Numeric Properties
Now setting common numeric properties is fast and easy. Here are your shortcuts:
Shortcut | Property |
h | Height |
m | Margin |
p | Padding |
w | Width |
Just follow these with a number (1-4 digits) and press the template expansion key. For example, the h149 template, when expanded inside a control’s tag, produces the following:
Height="149"
Creating Controls
CodeRush 13.1 includes a new set of dynamic code templates for creating common XAML layouts. New shortcuts for common controls:
Shortcut | Control |
b | Button |
bd | Border |
cb | ComboBox |
l | Label |
lb | ListBox |
rb | RadioButton |
sl | Slider |
sp | StackPanel |
tb | TextBlock |
tbx | TextBox |
tc | TabControl |
ti | TabItem |
vb | ViewBox |
The shortcuts above work anywhere a control is valid inside XAML. These templates will expand with a unique name. For example, pressing “b” followed by the Space or Tab key will produce the following:
Image may be NSFW.
Clik here to view.
I should emphasize the name is unique, which is useful when you’re quickly prototyping or presenting to other developers.
If you want to omit the name from the expansion, just follow the template with a comma (the comma is used throughout the CodeRush template library to produce shorter versions of many templates). So if you want a nameless border, just expand the “bd,” template.
Image may be NSFW.
Clik here to view.
If you’re expanding one of these controls inside a grid, you can optionally specify the location using one of these modifiers:
r{RowNumber}c{ColumnNumber}
c{ColumnNumber}r{RowNumber}
r{RowNumber}
c{ColumnNumber}
So to place a TextBlock inside row 1, column 2 of the parent grid, you can expand this template:
tbr1c2
This template will do the same thing:
tbc2r1
To omit the name, just follow the template with the comma.
Modifying templates with grid position like we’ve seen above is optional. And as you might expect, with CodeRush, there is more than one way to get the job done…
Positioning Controls inside a Grid
The row and column modifiers seen above also work as stand-alone templates inside the main/start tag of a control. That means you can use any of these templates to set a control’s position within a grid:
r{RowNumber}c{ColumnNumber}
c{ColumnNumber}r{RowNumber}
r{RowNumber}
c{ColumnNumber}
Also, don’t forget the Grid | Position Control provider shown above if you prefer a more visual approach.
Creating Grids
Need a grid that’s 3x3? Use the g3x3 template.
Need a grid that’s 2x5? You guessed it – use the g2x5 template. Creating grids is easy. Just use this format:
g{ColumnCount}x{RowCount}
This animation shows how quickly you can set up a grid with the templates:
Image may be NSFW.
Clik here to view.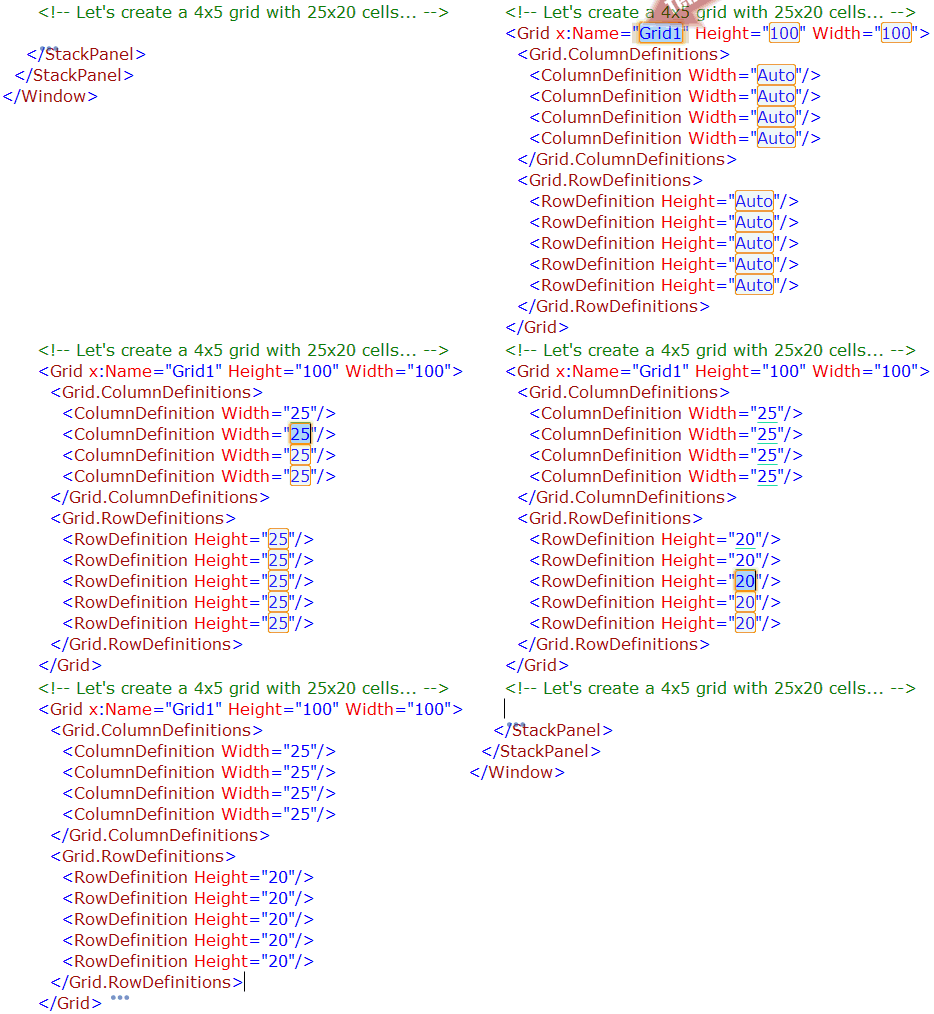
Note: the initial 13.1 release of this template limits row and column counts to 9x9. Subsequent releases will increase this to 20x20.
What’s that you say? You’re more of a visual person? Typing g2x5 is too much work for you? It gets easier. Here’s your new template:
g
That’s right kids. You need a Grid of any size? Just hit the letter g followed by the template expansion key (typically Space or Tab, depending on your settings). Here’s what you’ll get:
Image may be NSFW.
Clik here to view.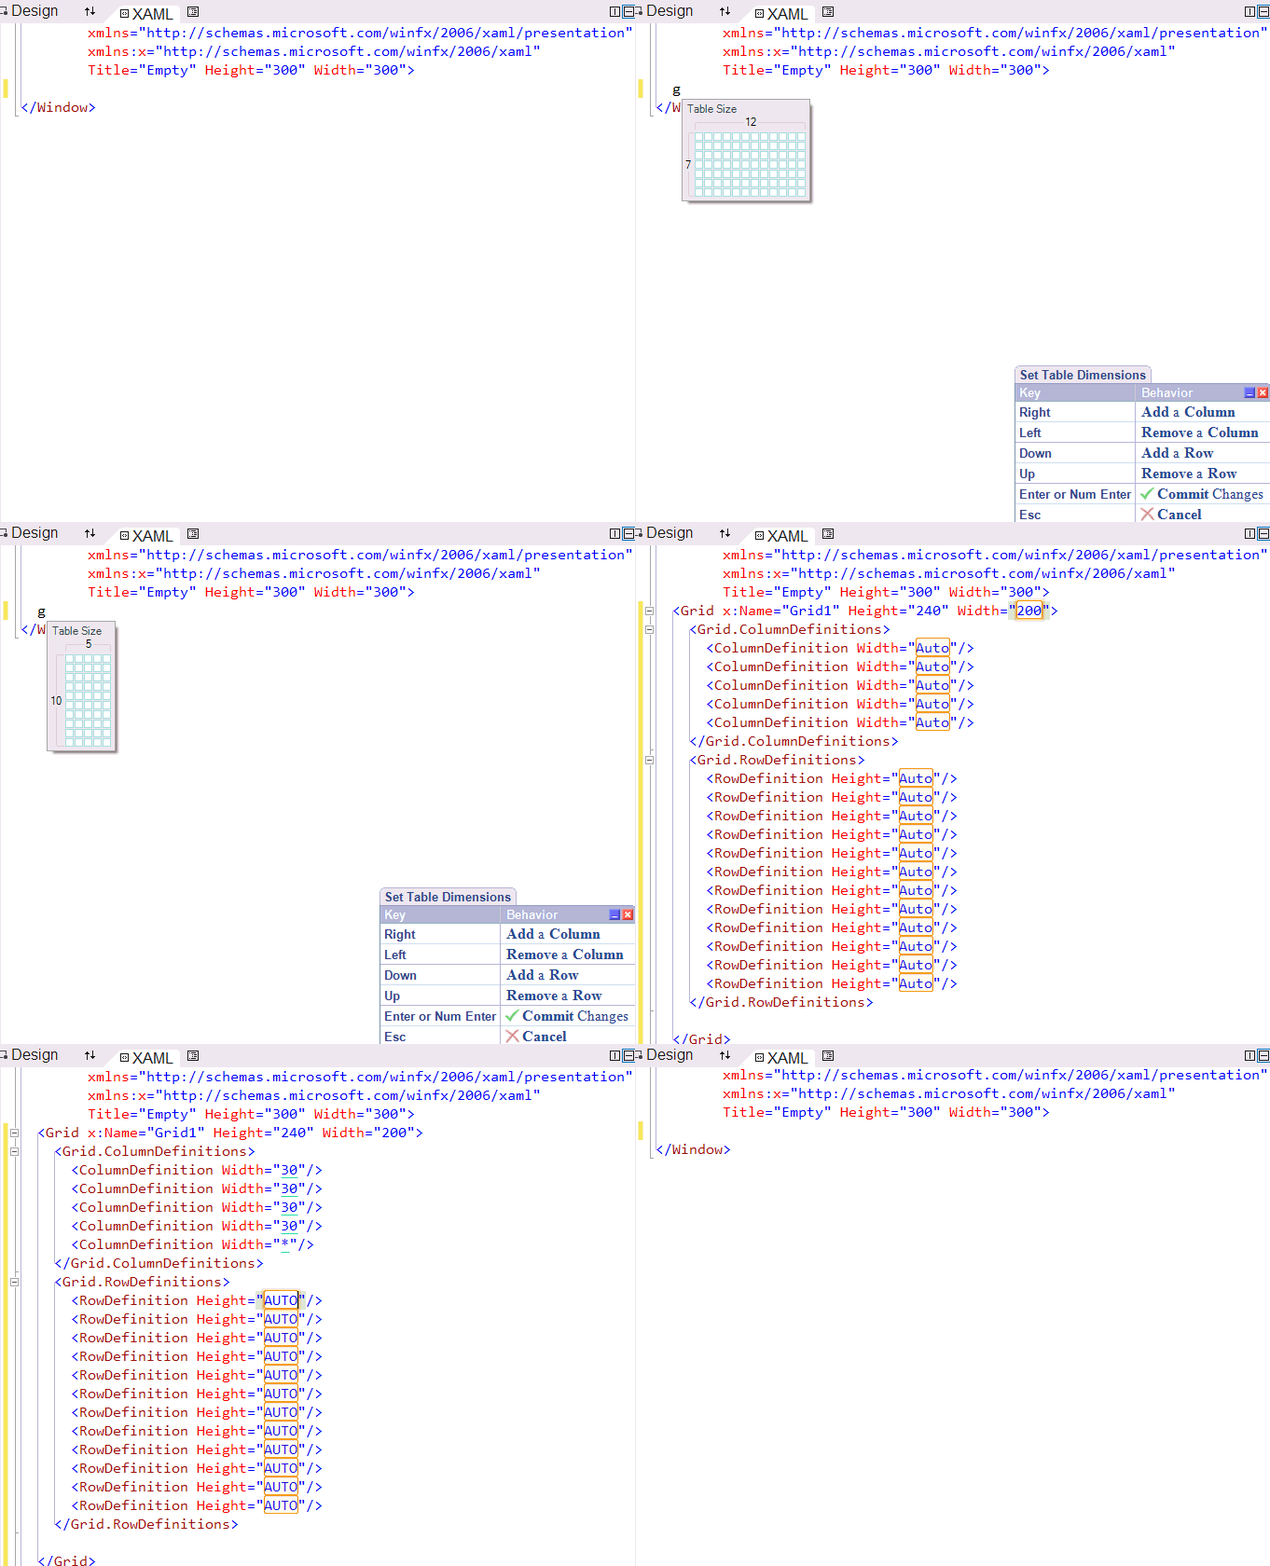
Exciting, isn’t it? On Monday I’ll show the cool new features we’ve added to the Debug Visualizer.
Image may be NSFW.Clik here to view.