In the first part of this post series, I described how to set up a Svelte Kit project to load data from the DevExpress Web API service. The second part described how I queried metadata from the service, in order to display captions customized in the Application Model. Part 3 covered sorting and filtering of data, as examples of data retrieval customized dynamically by the user at runtime. In Part 4 I added editing functionality to the demo app, including validation. Part 5 added user authentication and authorization functionality to the demo app.
You can find source code for each stage of the demo in the GitHub repository. There are now six branches, with stage 6 representing this post.
- Stage 1 — getting started, first data loading
- Stage 2 — Model-based caption customization
- Stage 3 — sort and filter data
- Stage 4 — editing and validation
- Stage 5 — authenticate users
- Stage 6 — Reports
Note: in addition to the changes required for the Report features, the Stage 6 branch also includes an update to DevExpress libraries for version 23.2.1, currently available as a pre-release. If you are following along, we recommend you consider similar updates for your own project. Some details of the startup and configuration code have changed since the 22.2 based project versions discussed in previous parts of this series.
Note that the Web API functionality described in this post requires a Universal Subscription license, or you will need a license for DevExpress Reports if you want to use reporting features with the free Web API and you don’t use any XAF modules.
Enable Reports on the Module level
Starting at the bottom of the architecture, add one new reference to the project file XAFApp.Module/XAFApp.Module.csproj:
<ItemGroup>
  <PackageReference Include="DevExpress.ExpressApp" Version="23.2.1-*"/>
  <PackageReference Include="DevExpress.ExpressApp.CodeAnalysis" Version="23.2.1-*"/>
  <PackageReference Include="DevExpress.ExpressApp.EFCore" Version="23.2.1-*"/>
  <PackageReference Include="DevExpress.ExpressApp.Objects" Version="23.2.1-*"/>
  <PackageReference Include="DevExpress.ExpressApp.Validation" Version="23.2.1-*"/>
  <PackageReference Include="DevExpress.ExpressApp.ReportsV2" Version="23.2.1-*"/>
  <PackageReference Include="DevExpress.Persistent.Base" Version="23.2.1-*"/>
...
Edit the file Module.cs in the project and add the following line to include the Reports module in the
list of required modules:
...
RequiredModuleTypes.Add(typeof(DevExpress.ExpressApp.SystemModule.SystemModule));
RequiredModuleTypes.Add(typeof(DevExpress.ExpressApp.Security.SecurityModule));
RequiredModuleTypes.Add(typeof(DevExpress.ExpressApp.Objects.BusinessClassLibraryCustomizationModule));
RequiredModuleTypes.Add(typeof(DevExpress.ExpressApp.Validation.ValidationModule));
RequiredModuleTypes.Add(typeof(DevExpress.ExpressApp.ReportsV2.ReportsModuleV2));
...
Modify the file Model.DesignedDiffs.xafml to include a view configuration for the new data type ReportDataV2.
You can see the complete file at this URL in the repository, with the new block highlighted.
Enable Reports for the Blazor Server App
In this example, only the Blazor Server App will be able to edit reports. Technically it would be possible to add editing features to a separate app as well, and there is a section in our documentation which covers the integration of report viewer and designer components in JavaScript client apps.
To activate Reports for the Blazor app, only two steps are required. First, add the required dependencies to the
project file in XAFApp/XAFApp.Blazor.Server/XAFApp.Blazor.Server.csproj:
<ItemGroup>
  <PackageReference Include="DevExpress.Drawing.Skia" Version="23.2.1-*"/>
  <PackageReference Include="DevExpress.ExpressApp.Blazor" Version="23.2.1-*"/>
  <PackageReference Include="DevExpress.ExpressApp.CodeAnalysis" Version="23.2.1-*"/>
  <PackageReference Include="DevExpress.ExpressApp.ReportsV2.Blazor" Version="23.2.1-*"/>
  <PackageReference Include="DevExpress.ExpressApp.Validation.Blazor" Version="23.2.1-*"/>
  <PackageReference Include="StringTemplate4" Version="4.0.8"/>
</ItemGroup>
Second, call AddReports during the configuration step in Startup.cs:
...
services.AddXaf(Configuration, builder => {
  builder.UseApplication<XAFAppBlazorApplication>();
  builder.Modules
    .AddReports(options => {
      options.EnableInplaceReports = true;
      options.ReportDataType = typeof(DevExpress.Persistent.BaseImpl.EF.ReportDataV2);
      options.ReportStoreMode = DevExpress.ExpressApp.ReportsV2.ReportStoreModes.XML;
    })
    .Add<XAFApp.Module.XAFAppModule>()
    .Add<XAFAppBlazorModule>();
...
Note that this initialization can be included in your Blazor app automatically, if you choose Reports as a feature when you set up your application in the Visual Studio wizard. The changes are described here as part of the walkthrough only.
The type ReportDataV2 is used here, for the first time in this demo. It is a persistent type that is
used
to store report definitions in the database, either using an EF Core or an XPO backend supported by XAF. Technically
you can use your own type instead if you prefer, but the standard type is very convenient and works out of the box
with the XAF designer.
Create a report using the Blazor designer
Now you can log in to the Blazor app — the demo credentials are “admin” and “admin” — and create a report using the designer.
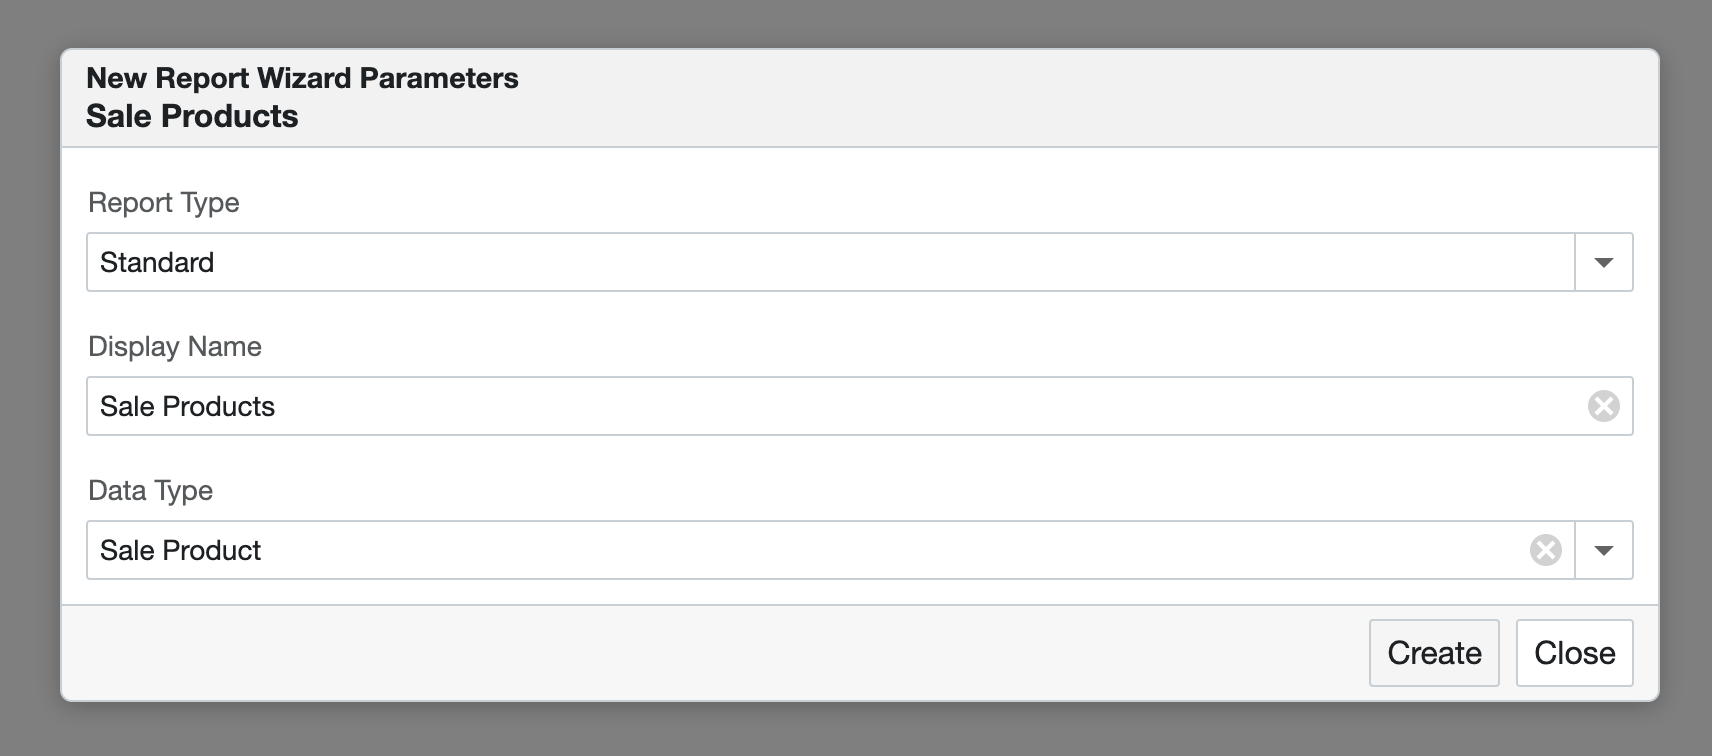
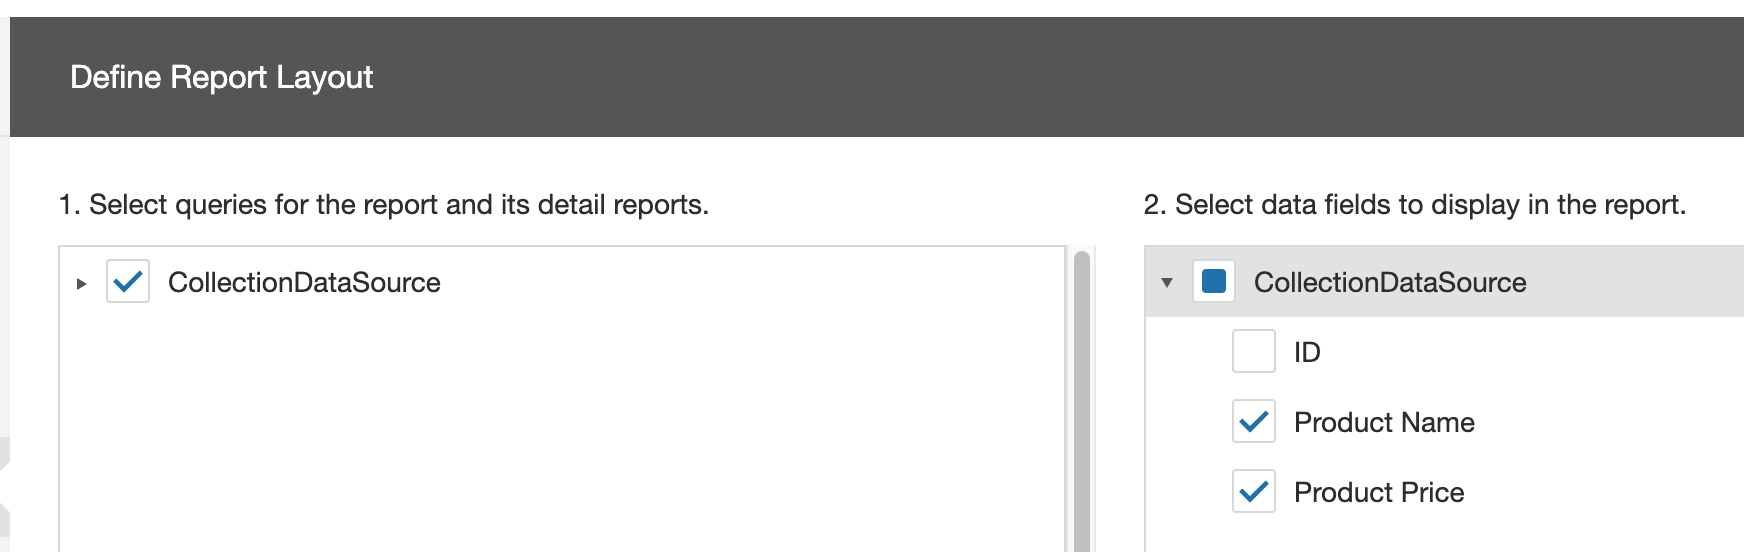
For a simple test report, auto-create a table layout by selecting the columns and accepting standard properties for all the options.
Click the Save button in the designer and exit to the list view. The report now appears in the Blazor XAF app, and a single click on the row displays it as a preview.

Enable Reports for the Backend Web API
Enabling Reports for the Web API project is only marginally more complicated than for the Blazor app, and the difference is largely due to the greater flexibility you have, as a developer, when publishing reports from an independent service.
The first two steps are the same as for the Blazor app. Begin by adding the required references to the project file:
<ItemGroup>
  <PackageReference Include="DevExpress.Drawing.Skia" Version="23.2.1-*"/>
  <PackageReference Include="DevExpress.ExpressApp.Api.EFCore.All" Version="23.2.1-*"/>
  <PackageReference Include="DevExpress.ExpressApp.CodeAnalysis" Version="23.2.1-*"/>
  <PackageReference Include="DevExpress.ExpressApp.Validation" Version="23.2.1-*"/>
  <PackageReference Include="DevExpress.ExpressApp.ReportsV2" Version="23.2.1-*"/>
  <PackageReference Include="Microsoft.AspNetCore.Authentication.JwtBearer" Version="7.0.0"/>
  <PackageReference Include="Swashbuckle.AspNetCore.Annotations" Version="6.4.0"/>
  <PackageReference Include="Swashbuckle.AspNetCore" Version="6.4.0"/>
  <PackageReference Include="StringTemplate4" Version="4.0.8"/>
</ItemGroup>
Now add the code that makes the new data type available through the Web API, and activates the Reports module.
...
services.AddXafWebApi(builder => {
  builder.ConfigureOptions(options => {
    options.BusinessObject<SaleProduct>();
    options.BusinessObject<ReportDataV2>();
  });

  builder.Modules
    .AddReports(options => {
      options.ReportDataType = typeof(ReportDataV2);
    })
    .AddValidation()
    .Add<XAFAppModule>();
...
Finally, a new class is required: the ReportController in XAFApp.WebApi/API/Reports/ReportController.cs.
For brevity, the complete source code is not included here, but you can see it at this URL in the GitHub repository.
Note that this class can be generated by the Visual Studio template, if you choose to add Reports to your project on
creation. I made only one change to it: at the end of the method GetReportContentAsync, I commented the
last parameter passed to the File call:
private async Task<object> GetReportContentAsync(XtraReport report, ExportTarget fileType) {
  Stream ms = await service.ExportReportAsync(report, fileType);
  HttpContext.Response.RegisterForDispose(ms);

  return File(ms,
    service.GetContentType(fileType)
    /*, $"{report.DisplayName}.service.GetFileExtension(fileType)}"*/
  );
}
This change is important for the demo scenario, because the File helper automatically sets the header
content-disposition: attachment in the response if a filename is passed as the third parameter. As you
can read in the documentation of the content-disposition header,
browsers will usually display a “save as” dialog when they encounter the attachment value, and this makes
it impossible to process the content independently. In a real application, it would be your choice whether you need
one behavior or the other, or perhaps both.
Our documentation page Obtain a Report from a Web API Controller Endpoint includes several other scenarios for report controller customization. Additionally, you may also want to compare this MAUI example of report access, or this Blazor WebAssembly example.
Allow the Svelte web app to retrieve and display reports
Begin with a small change to svelte-frontend/src/routes/+layout.svelte: add a Reports menu
button.
...
<div class="w-9/12 max-w-prose m-auto">
  <nav class="mb-8 flex gap-2">
    <a href="/saleProducts">Sale Products</a>
    <a href="/reports">Reports</a>
    <a class="ml-auto" href="/account">
...
Add the file src/routes/reports/+page.server.js. As before, the web app will load data on the server
side, and a simple call to the existing loadData function is sufficient for this.
import { loadData } from '$lib/dataLoading.js';

export function load({ fetch, url }) {
	return loadData(fetch, url, 'ReportDataV2', 'DevExpress.Persistent.BaseImpl.EF.ReportDataV2');
}
Add the file src/routes/reports/+page.svelte. This page is similar to the existing view for the “sale
products” data. The full page is at this URL in the repository, and please note that it uses the
separate component in src/lib/ReportRowActionButtons.svelte. A few
small modifications are required to src/lib/DataTable.svelte to incorporate this extra button
component.
The important bit about the ReportRowActionButtons component is that implements navigation to a report
preview, in the simplest possible way:
<a ... href="/viewReport/{row.ID}"> ... </a>
What remains is to add the viewer page elements. Begin with src/routes/viewReport/[key]/+page.server.js:
export function load({ fetch, params }) {
	const pdfDocumentSerialized = fetch(
		`http://webapi:5273/api/Report/DownloadByKey(${params.key})?fileType=Pdf`
	)
		.then((res) => res.blob())
		.then((blob) => blob.arrayBuffer())
		.then((ab) => Buffer.from(ab).toString('base64'));

	return { pdfDocumentSerialized };
}
This implementation chooses to keep data loading on the server. This is consistent with other data loading mechanisms in the project, and it means that the logic to apply authorization info is already in place. It has the downside that the document, once retrieved, must still be serialized to the client that should display it.
If you prefer, you can implement a client-side loading mechanism that doesn’t require an extra serialization step, but then you need to handle authorization separately, at least for the JWT case.
Finally, the last required piece is the page that previews the PDF document retrieved from the service. Here is
src/routes/viewReport/[key]/+page.svelte:
<script>
  import { onMount } from "svelte";

  export let data;
  $: ({ pdfDocumentSerialized } = data);

  $: pdfDocument = new File(
    [new Uint8Array([...atob(pdfDocumentSerialized)].map((char) => char.charCodeAt(0)))],
    "report.pdf",
    { type: "application/pdf" });

  onMount(() => {
    if (pdfDocument) {
      const url = URL.createObjectURL(pdfDocument);
      iframe.src = url;
    }
  });
  let iframe;
</script>

<div class="flex flex-col h-70vh">
  <iframe bind:this={iframe} class="w-full grow" title="Report Preview" />
</div>
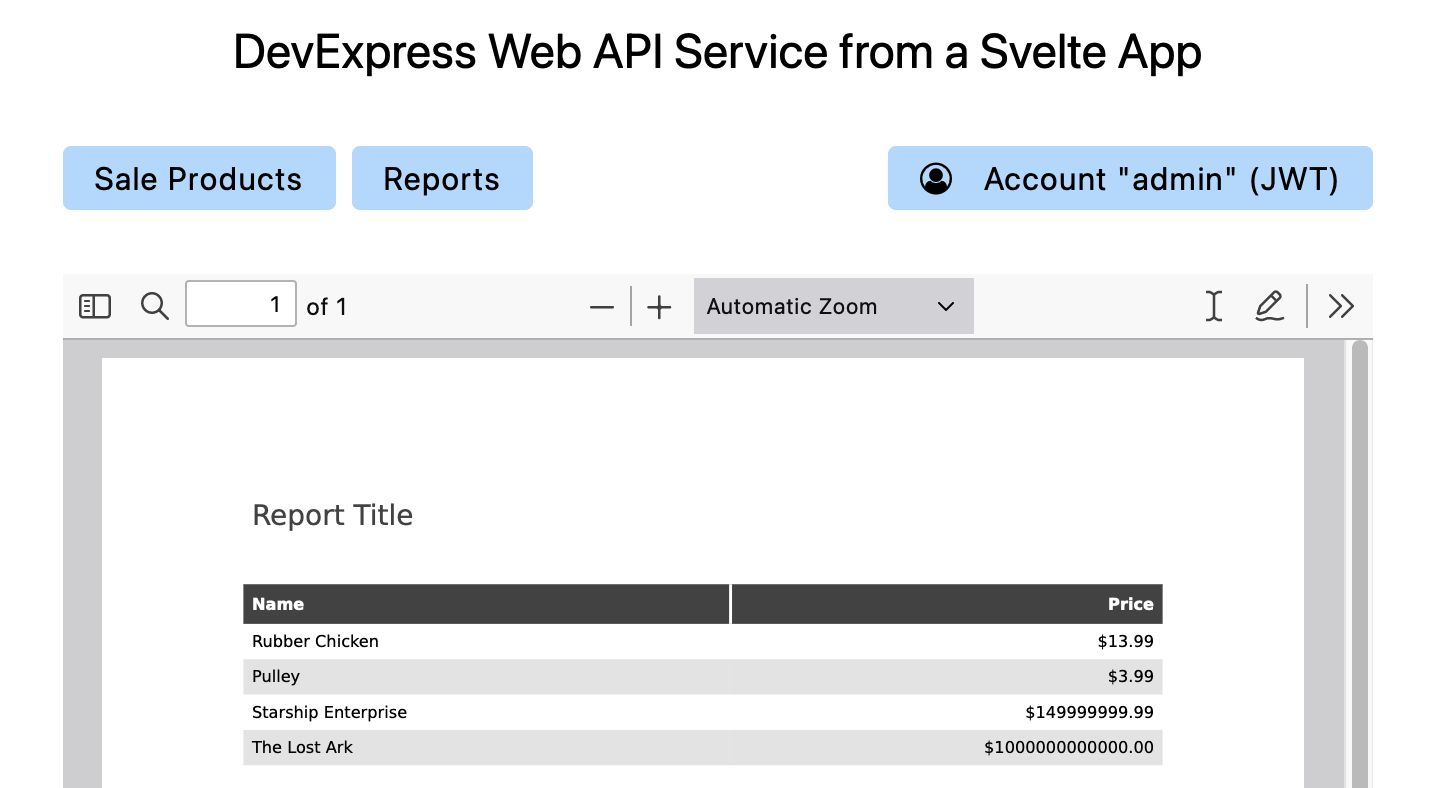
Test the report viewer functionality
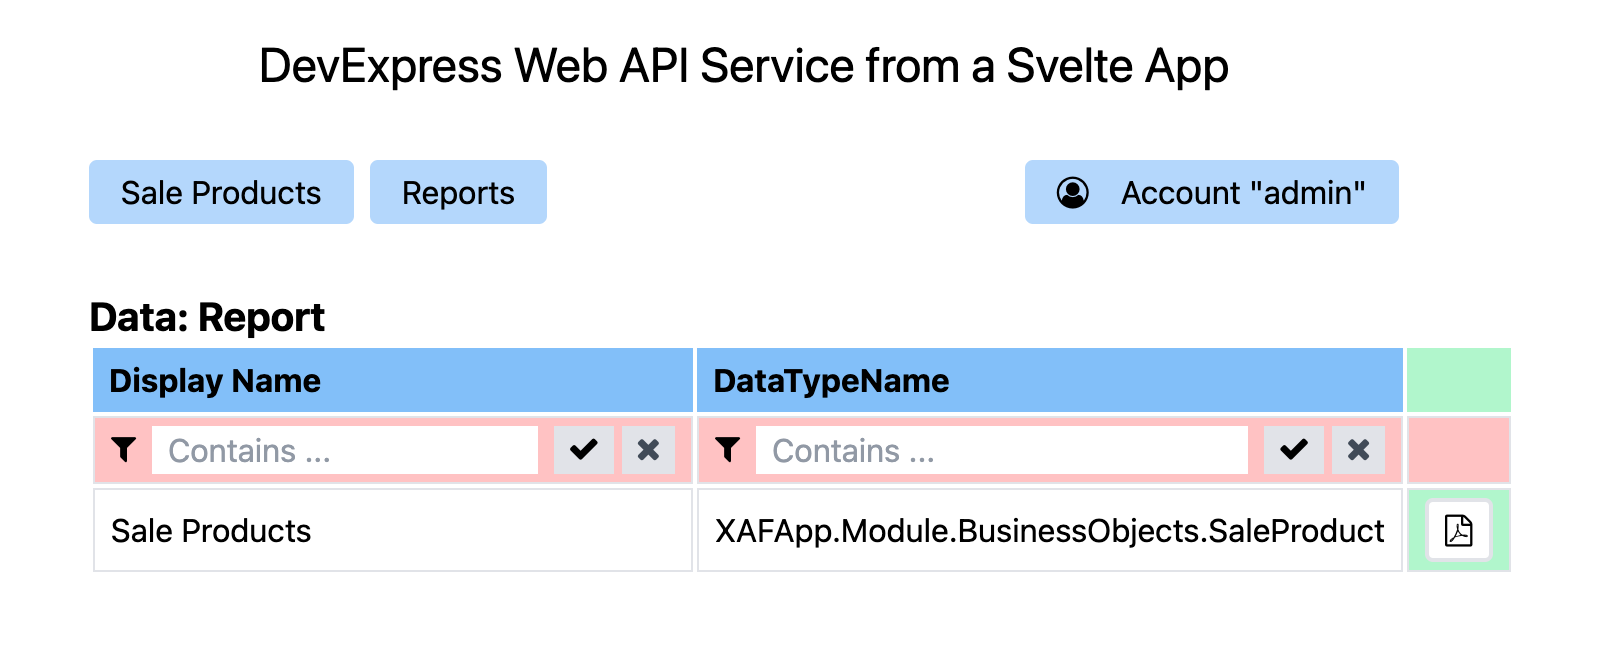
With the application system running, navigate to the web app at http://localhost:5173. Log in using the
same “admin”/“admin” account you used in the Blazor app, and click on the new “Reports” button. The list of reports
appears as expected. On the right of each row, you can see the additional button that brings up the preview.
Click the button and bring up the report preview. The specific appearance and functionality depends on your browser, since the embedded PDF previewer is used.
Conclusion
There are some useful ideas for improvements to this part of the series, specifically the use of the Web Document Viewer and even the Web End-User Report Designer, which allow you to create a fully autonomous report management application. Since the service uses a custom controller to interface with the client app, you can add these features on the basis of existing documentation— please let us know if you need help with these tasks!
As usual, here is the link to the GitHub branch for this post: “stage-6”.
Thank you for reading and following along!
Your Feedback Matters!
Please take a moment to reply to the following questions – your feedback will help us shape/define future development strategies.


