.NET 5 is officially here and as you may already know, our Office File API library v20.2 is fully compatible with .NET 5. In this post, we’ll explain how you can create a Blazor Server application that targets .NET 5 and leverages the capabilities of our Spreadsheet Document API to build a loan amortization schedule.
This is the final post in our blog series dedicated to the use of our Office File API within server-side Blazor apps. If you are new to this series, feel free to review our previous posts using the following links:
- Office File API – How to Convert Documents (DOCX, XLSX, PDF) within Your Blazor Server Apps
- Word Processing – How to Generate and Send Business Letters within Your Blazor Server Apps
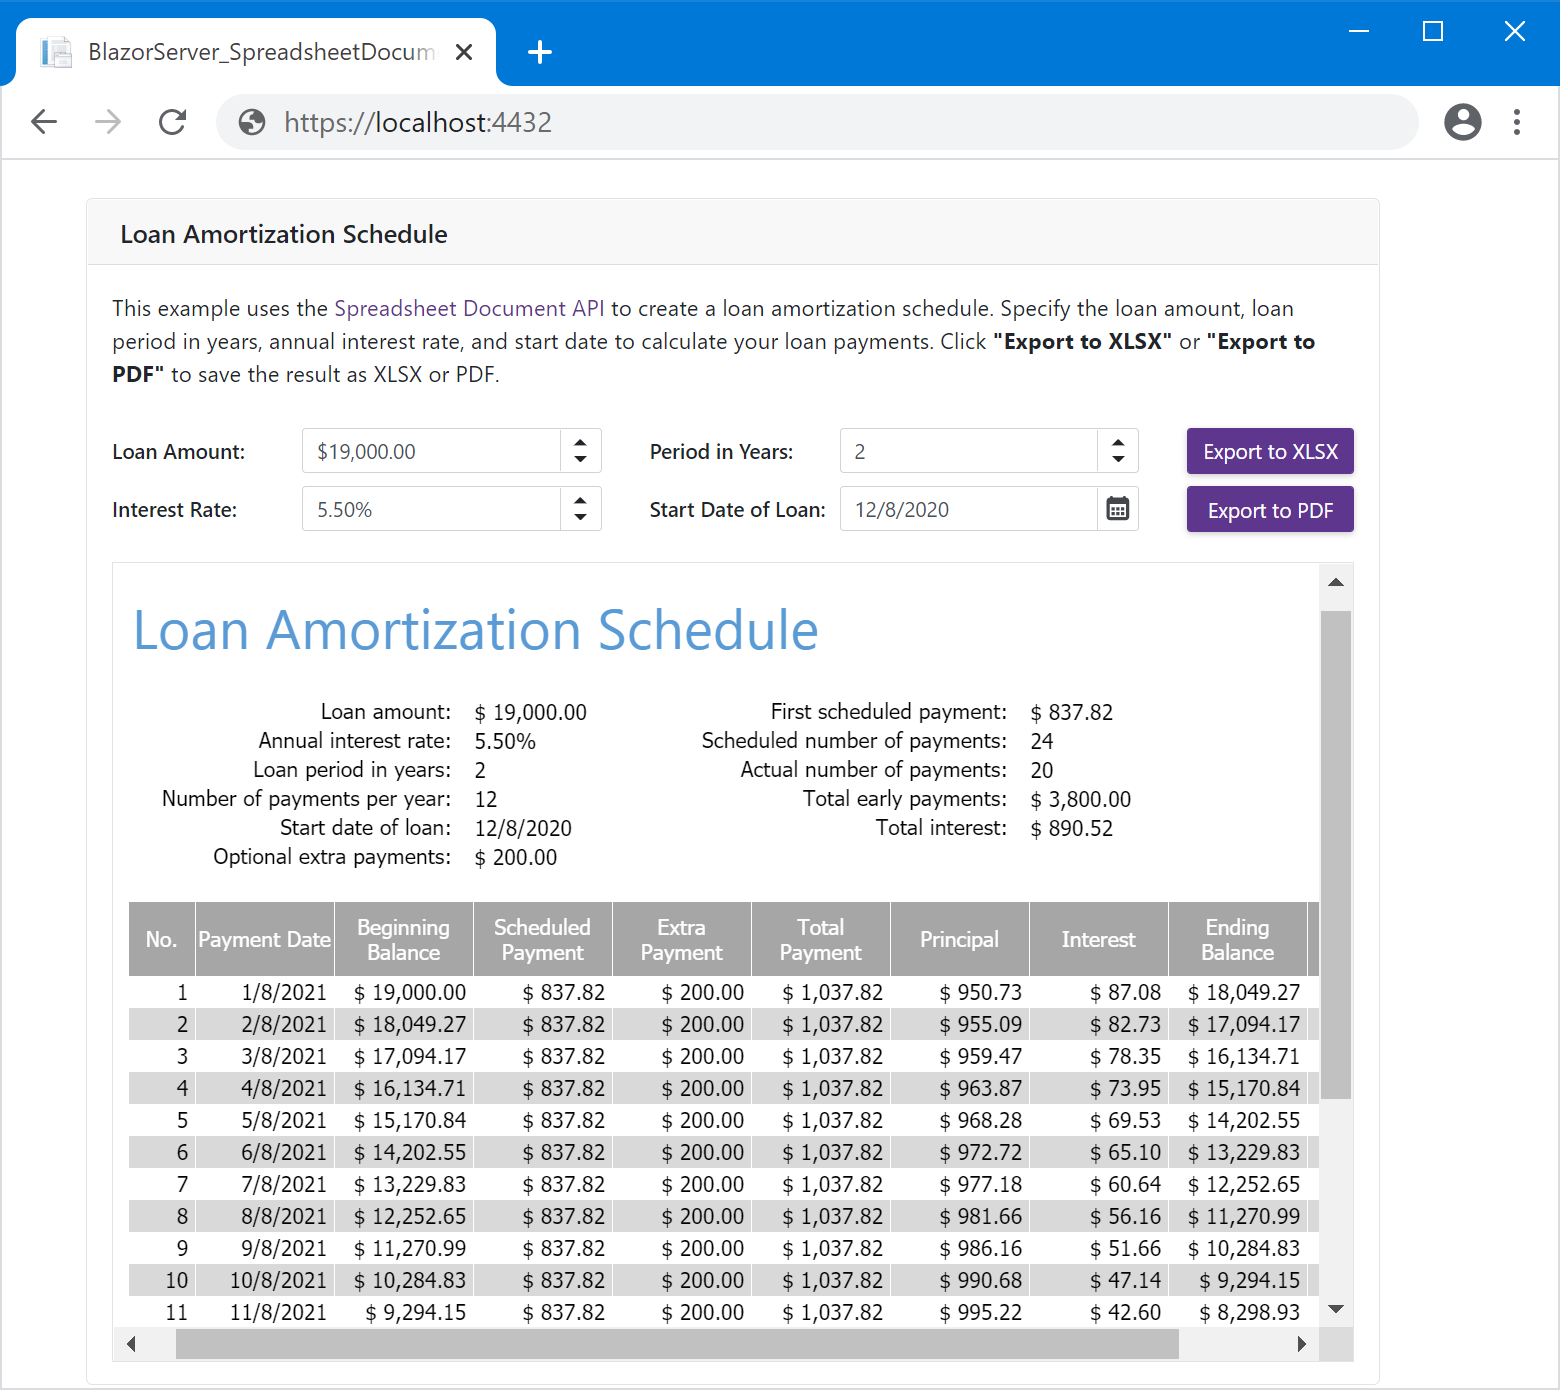
This sample application allows users to enter loan information (loan amount, repayment period in years, annual interest rate, and start date). Once data is entered, the Spreadsheet immediately recalculates loan payments and updates data on the application page. Users can export the result to XLSX or PDF as needed.

Prerequisites
- Visual Studio 2019 16.8 or later with the ASP.NET and web development workload
- .NET 5.0 SDK or later
Source Code
You can download a complete sample project from the following GitHub repository:
Step 1: Create a Blazor Server App
Create a new project in Visual Studio and select the Blazor App template.

Specify project name and location. In the next window, set the target framework to .NET 5.0 and select Blazor Server App as a project template. Click Create.

Step 2: Install DevExpress NuGet Packages
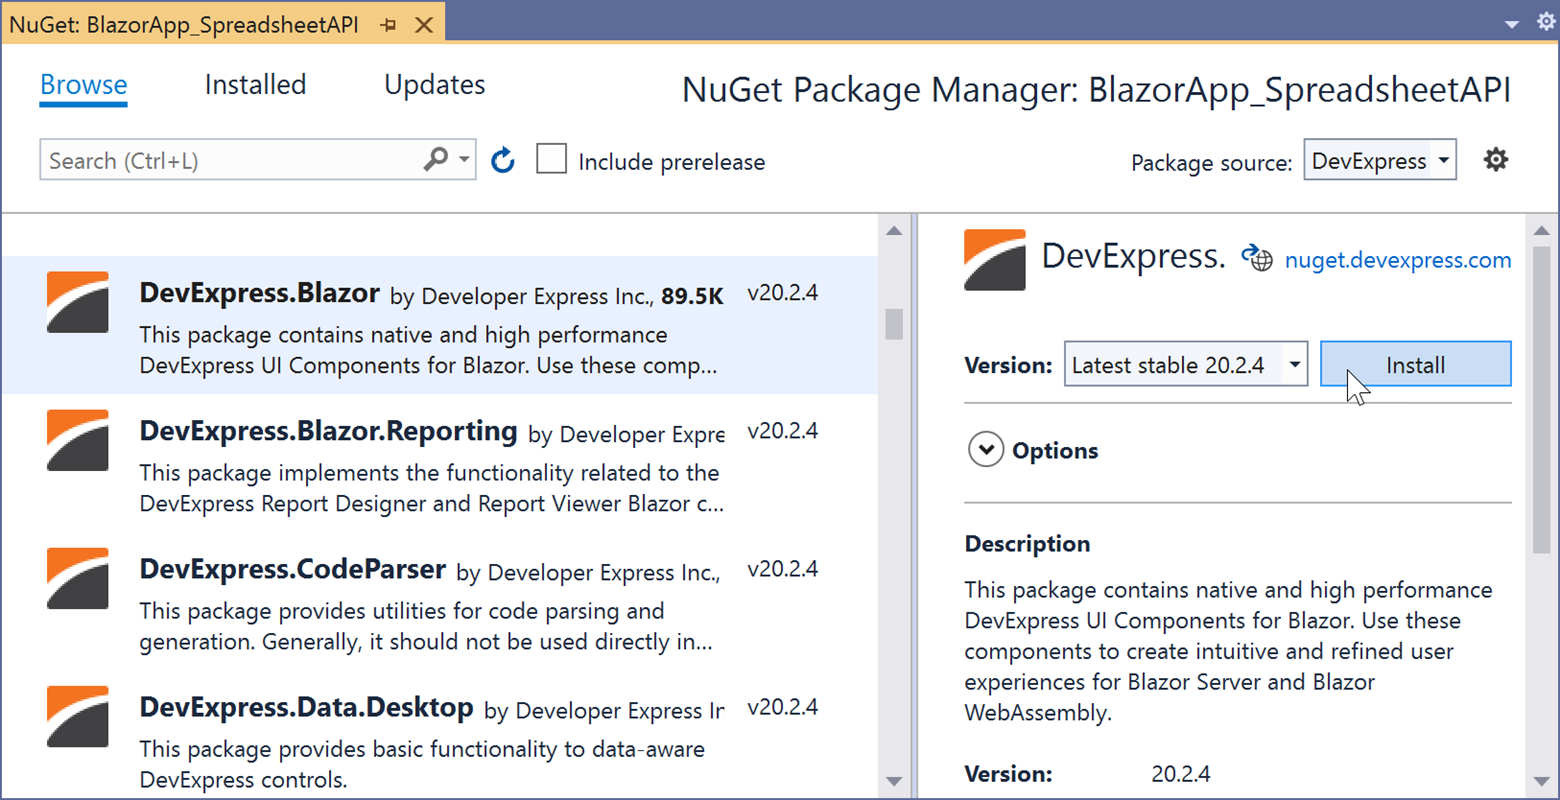
Visit nuget.devexpress.com to obtain the DevExpress NuGet feed URL. Register your feed URL as a package source in the NuGet Package Manager and install the following packages.
DevExpress.Document.Processor
This package contains the DevExpress Office File API components. Please remember that you’ll need an active license for the DevExpress Office File API Subscription or the DevExpress Universal Subscription to use this package in production code/websites. If you don’t have an active subscription, you can evaluate the API for 30 days.

DevExpress.Blazor
Contains all DevExpress Blazor UI components. This product line is available as part of the DevExpress Universal, DXperience, or ASP.NET Subscription. Like our Office File API, you’ll need an active subscription to use this package in production code/websites.

If you are new to NuGet Packages, please refer to the following installation guide for assistance: Install DevExpress Components Using NuGet Packages.
Step 3: Design the Application UI
Add the following line to the HEAD section of the Pages/_Host.cshtml file to register DevExpress resources:
<head>
    <!--...-->
    <link href="_content/DevExpress.Blazor/dx-blazor.css" rel="stylesheet" />
</head>
Open the _Imports.razor file and add the following namespace:
@using DevExpress.BlazorApply the DevExpress Blazing Berry theme to the app as described in this help topic: Apply a DevExpress Bootstrap Theme.
Add the following DevExpress Blazor UI components to the application:
- DxFormLayout - Form Layout component - allows you to construct responsive and auto-aligned edit forms.
- DxSpinEdit - A Spin Edit component. Our application contains four editors. Use the Value property with the @bind attribute to bind editor values to the properties that store loan information. MinValue and MaxValue properties limit the minimum and maximum values for Spin Edit components. The Increment option specifies the step by which a value in the editor changes when a user clicks the up or down arrow.
- DxButton - A button. Use the Text property to define the button's text. Create two buttons to export our loan amortization schedule to XLSX and PDF.
We'll also use an inline frame (defined by the
<iframe>tag) to display the generated loan amortization schedule on the page.Open the Index.razor file and change its code as follows:
@page "/"

<div class="container">
    <DxFormLayout>
        <DxFormLayoutGroup Caption="Loan Amortization Schedule" ColSpanMd="11">
            <DxFormLayoutItem ColSpanMd="12">
                <Template>
                    <p>
                        This example uses the Spreadsheet Document API
                        to create a loan amortization schedule.
                        Specify the loan amount, loan period in years,
                        annual interest rate, and start date to calculate
                        your loan payments. Click <b>"Export to XLSX"</b>
                        or <b>"Export to PDF"</b> to save the result as XLSX or PDF.
                    </p>
                </Template>
            </DxFormLayoutItem>

            <DxFormLayoutItem Caption="Loan Amount:" ColSpanMd="5">
                <Template>
                    <DxSpinEdit @bind-Value="LoanAmount"
                                DisplayFormat="c"
                                Increment="100"
                                MinValue="100"
                                MaxValue="1000000" />
                </Template>
            </DxFormLayoutItem>

            <DxFormLayoutItem Caption="Period in Years:" ColSpanMd="5">
                <Template>
                    <DxSpinEdit @bind-Value="PeriodInYears"
                                Increment="1"
                                MinValue="1"
                                MaxValue="100" />
                </Template>
            </DxFormLayoutItem>

            <DxFormLayoutItem ColSpanMd="2">
                <Template>
                    <DxButton CssClass="btn-block" Text="Export to XLSX" />
                </Template>
            </DxFormLayoutItem>

            <DxFormLayoutItem Caption="Interest Rate:" ColSpanMd="5">
                <Template>
                    <DxSpinEdit @bind-Value="InterestRate"
                                DisplayFormat="p"
                                Increment="0.01"
                                MinValue="0.001"
                                MaxValue="100" />
                </Template>
            </DxFormLayoutItem>

            <DxFormLayoutItem Caption="Start Date of Loan:" ColSpanMd="5">
                <Template>
                    <DxDateEdit @bind-Date="StartDate"></DxDateEdit>
                </Template>
            </DxFormLayoutItem>

            <DxFormLayoutItem ColSpanMd="2">
                <Template>
                    <DxButton CssClass="btn-block" Text="Export to PDF" />
                </Template>
            </DxFormLayoutItem>

            <DxFormLayoutItem ColSpanMd="12">
                <Template>
                    <iframe class="col p-0 preview" height="500" />
                </Template>
            </DxFormLayoutItem>
        </DxFormLayoutGroup>
    </DxFormLayout>
</div>
@code{ double loanAmount = 19000; int periodInYears = 2; double interestRate = 0.055d; DateTime startDate = DateTime.Now; double LoanAmount { get => loanAmount; set { loanAmount = value; UpdateValue(); } } int PeriodInYears { get => periodInYears; set { periodInYears = value; UpdateValue(); } } double InterestRate { get => interestRate; set { interestRate = value; UpdateValue(); } } DateTime StartDate { get => startDate; set { startDate = value; UpdateValue(); } } protected override async Task OnInitializedAsync() { await base.OnInitializedAsync(); } void UpdateValue() => InvokeAsync(StateHasChanged); }
Step 4: Generate a Loan Amortization Schedule Based on a Document Template
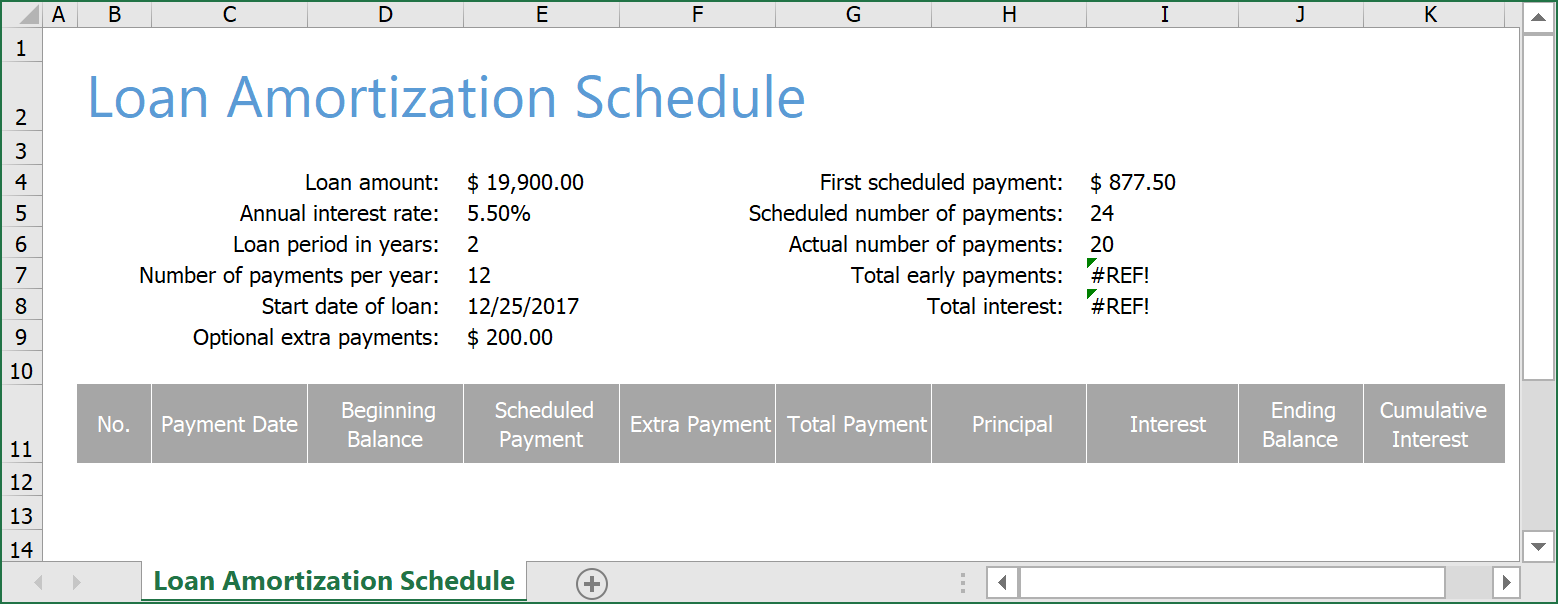
Create a Loan Amortization Schedule template.
![]()
Feel free to download the following document template to proceed: LoanAmortizationScheduleTemplate.xltx. Add this file to the Data folder of the project.
Add a new Code folder to the project and create a DocumentGenerator.cs file within the folder.
Implement a LoanAmortizationScheduleGenerator class. This class calculates loan payments based on the specified loan information (loan amount, repayment period in years, annual interest rate, and start date) and generates an amortization table.
We use the following built-in Spreadsheet functions to create a loan payment schedule:
Add a new DocumentService.cs class file to the Code folder. This class will contain asynchronous methods used to generate a document and export it to various file formats (XLSX, HTML, and PDF).
Use the app's
Startup.ConfigureServicesmethod to register our service implementation. Call the AddSingleton method to create a service instance and add it to the app's service collection. This instance will be available throughout the application for all requests.using BlazorApp_SpreadsheetAPI.Code; // ... public class Startup { public void ConfigureServices(IServiceCollection services) { // ... services.AddSingleton<DocumentService>(); } }Implement the following method within the DocumentService.cs class to asynchronously generate a loan amortization schedule based on the document template and loan information entered by users:
public class DocumentService
{
    async Task<Workbook> GenerateDocumentAsync(double loanAmount,
    	int periodInYears, double interestRate, DateTime loanStartDate)
    {
        var workbook = new Workbook();
        // Load document template.
        await workbook.LoadDocumentAsync("Data/LoanAmortizationScheduleTemplate.xltx");
        // Generate a loan amortization schedule
        // based on the template and specified loan information.
        new LoanAmortizationScheduleGenerator(workbook)
            .GenerateDocument(loanAmount, periodInYears,
            	interestRate, loanStartDate);
        return workbook;
    }
}
Step 5: Preview the Loan Amortization Schedule in the App
To display the generated document within our application, we need to convert it to HTML.
Add the following method to the DocumentService.cs class. This method builds an amortization schedule using the
DocumentService.GenerateDocumentAsyncmethod and then exports the document to HTML.public async Task<byte[]> GetHtmlDocumentAsync(double loanAmount, int periodInYears, double interestRate, DateTime startDateOfLoan) { // Generate a workbook // that contains an amortization schedule. using var workbook = await GenerateDocumentAsync(loanAmount, periodInYears, interestRate, startDateOfLoan); // Export the document to HTML. using var ms = new MemoryStream(); await workbook.ExportToHtmlAsync(ms, workbook.Worksheets[0]); return ms.ToArray(); }Open the Index.razor page. Inject an instance of the DocumentService object into the page.
@page "/"
@inject DocumentService DocumentService
Implement the UpdatePreview method. It calls the
DocumentService.GetHtmlDocumentAsyncmethod to generate an HTML preview of the amortization schedule and displays the result on the page using the<iframe>element. This method is called each time a user updates loan information via the application's UI.<DxFormLayoutItem ColSpanMd="12"> <Template> <iframe class="col p-0 preview" height="500" src="@content"/> </Template> </DxFormLayoutItem>@code{ string content; // ... protected override async Task OnInitializedAsync() { await UpdatePreview(); await base.OnInitializedAsync(); } void UpdateValue() => InvokeAsync(async () => { await UpdatePreview(); StateHasChanged(); }); async Task UpdatePreview() { var document = await DocumentService.GetHtmlDocumentAsync(loanAmount, periodInYears, interestRate, startDate); content = "data:text/html;base64," + Convert.ToBase64String(document); } }
Step 6: Download the Loan Amortization Schedule in XLSX and PDF File Formats to the Browser
In our example, we will use a web API to download the calculated amortization schedule in XLSX and PDF file formats on the client side.
Open the DocumentService.cs class and add the following methods to generate and export a loan amortization schedule to XLSX and PDF.
Implement a web API controller. Add a new Controllers folder to the project and create an ExportController.cs class within the folder. This class contains action methods that handle HTTP GET requests and return files in XLSX and PDF formats.
using BlazorApp_SpreadsheetAPI.Code; using Microsoft.AspNetCore.Mvc; using System; using System.Threading.Tasks; namespace BlazorApp_SpreadsheetAPI.Controllers { [Route("api/[controller]")] [ApiController] public class ExportController : ControllerBase { readonly DocumentService documentService; public ExportController(DocumentService documentService) { this.documentService = documentService; } [HttpGet] [Route("[action]")] public async Task<IActionResult> Xlsx([FromQuery] double loanAmount, [FromQuery] int periodInYears, [FromQuery] double interestRate, [FromQuery] DateTime loanStartDate) { var document = await documentService.GetXlsxDocumentAsync(loanAmount, periodInYears, interestRate, loanStartDate); return File(document, "application/vnd.openxmlformats-officedocument.spreadsheetml.sheet", "output.xlsx"); } [HttpGet] [Route("[action]")] public async Task<IActionResult> Pdf([FromQuery] double loanAmount, [FromQuery] int periodInYears, [FromQuery] double interestRate, [FromQuery] DateTime loanStartDate) { var document = await documentService.GetPdfDocumentAsync(loanAmount, periodInYears, interestRate, loanStartDate); return File(document, "application/pdf", "output.pdf"); } } }Open the Startup.cs file. Call the MapControllers method within
app.UseEndpointsto map incoming HTTP requests to the controller's action methods.public class Startup { // ... app.UseEndpoints(endpoints => { // Add endpoints for controller actions. endpoints.MapControllers(); // ... }); }Open the _Imports.razor file and add the following namespaces:
@using Microsoft.AspNetCore.WebUtilities @using System.GlobalizationOpen the Index.razor page and inject an instance of the IJSRuntime object into the page.
@inject IJSRuntime JSHandle the Click events of the Export to XLSX and Export to PDF buttons. These buttons should call the following methods:
ExportToXlsx- Sends a request to download a loan amortization schedule in XLSX format. The request executes the controller'sXlsxaction method.ExportToPdf- Sends a request to download a loan amortization schedule in PDF format. The request executes the controller'sPdfaction method.
<DxFormLayoutItem ColSpanMd="2"> <Template> <DxButton Click="ExportToXlsx" CssClass="btn-block" Text="Export to XLSX" /> </Template> </DxFormLayoutItem> <!----------------> <DxFormLayoutItem ColSpanMd="2"> <Template> <DxButton Click="ExportToPdf" CssClass="btn-block" Text="Export to PDF" /> </Template> </DxFormLayoutItem>@code{ void ExportToXlsx(MouseEventArgs args) => JS.InvokeAsync<object>("open", GetQueryString("api/Export/Xlsx"), "_self"); void ExportToPdf(MouseEventArgs args) => JS.InvokeAsync<object>("open", GetQueryString("api/Export/Pdf"), "_self"); string GetQueryString(string uri) { var queryParams = new Dictionary<string, string>() { { "loanAmount", loanAmount.ToString() }, { "periodInYears", periodInYears.ToString() }, { "interestRate", interestRate.ToString(CultureInfo.InvariantCulture) }, { "loanStartDate", startDate.ToString("O") }, }; return QueryHelpers.AddQueryString(uri, queryParams); } }
public async Task<byte[]> GetXlsxDocumentAsync(double loanAmount,
    	int periodInYears, double interestRate, DateTime startDateOfLoan)
{
    // Generate workbook
    // that contains an amortization schedule.
    using var workbook = await GenerateDocumentAsync(loanAmount, periodInYears,
    	interestRate, startDateOfLoan);
    // Save document as XLSX.
    return await workbook.SaveDocumentAsync(DocumentFormat.Xlsx);
}

public async Task<byte[]> GetPdfDocumentAsync(double loanAmount,
	int periodInYears, double interestRate, DateTime startDateOfLoan)
{
    // Generate workbook
    // that contains an amortization schedule.
    using var workbook = await GenerateDocumentAsync(loanAmount, periodInYears,
    	interestRate, startDateOfLoan);
    // Export document to HTML.
    using var ms = new MemoryStream();
    await workbook.ExportToPdfAsync(ms);
    return ms.ToArray();
}Try It Now
Our application is now ready. Run the app in your favorite browser and enter your loan information to generate your loan amortization schedule. You can download the amortization table in XLSX and PDF formats.
Your Feedback Matters
Should you have any questions about this example, feel free to comment below. As always, we thank you for choosing DevExpress for your software development needs.
