Did you know CodeRush already has some really cool features to make you even more productive in Blazor?
The last few CodeRush sprints have added several features. I thought it might be a good idea to summarize all of these in a single blogpost as reference material.
Lifecycle Methods
You may have noticed the Visual Studio Editor has some issues with overriding members and code completion inside @code sections in Blazor files.
For example, this happens when you try to override one of the lifecycle methods like OnInitialized(Async) or OnParametersSet(Async) etc.
Fortunately, CodeRush already has code templates to help take away those frustrations.
Just move the caret to the @code section and type one of the templates below (followed by a Tab or Space, depending on your template expansion settings):
| Template | Description |
|---|---|
| oar | Creates an OnAfterRenderAsync override. |
| oi | Creates an OnInitializedAsync override. |
| onch | Creates an OnChangeAsync override. |
| ops | Creates an OnParametersSetAsync override. |
| sr | Creates a ShouldRender override. |
If you want to override one of the synchronous equivalents, just expand the same template followed by a comma. For example, “oi,” generates a synchronous OnInitialized method.
Component Creation
Some other useful templates for creating components including dependency injection, parameters and cascading values, which will save you a boatload of keystrokes include:
| Template | Description |
|---|---|
| bch | Creates a child component with a parameter. |
| bcmp | Creates a blank component. |
| bht | Creates a component with an HTTP call. |
| cv | Creates a <CascadingValue> component. |
| dav | Creates a <DataAnnotationsValidator> component. |
| en | Creates an <EditForm> component. |

These templates all work in the markup sections of razor files.
Input Control Creation
For creating standard html input controls, you can use the following templates:
| Template | Description |
|---|---|
| icb | Creates an <InputCheckbox> component. |
| idt | Creates an <InputDate> component. |
| in | Creates an <InputNumber> component. |
| it | Creates an <InputText> component. |
| ita | Creates an <InputTextArea> component. |
| isel | Creates an <InputSelect> component. |
Blazor Directives
To quickly add a directive above your Blazor component, you can use the following templates:
| Template | Description |
|---|---|
| ba | Creates an @attribute directive. |
| bc | Creates a Blazor @code block. |
| bf | Creates a Blazor @functions block. |
| bh | Creates an @inherits directive. |
| bj | Creates an @inject directive. |
| bjc | Creates an @inject IConfiguration configuration directive. |
| bjh | Creates an @inject HttpClient Http directive. |
| bl | Creates a @layout directive. |
| bm | Creates a @model directive. |
| bp | Creates a @page "/" directive. |
Blazor Markup Templates for Conditionals and Controls
One of the beautiful things about Razor is that you can put conditional logic inside your markup.
CodeRush offers the following templates to help control program flow:
| Template | Description |
|---|---|
| do, dw | Creates a @do (do/while) control statement. |
| fe | Creates a @foreach control statement. |
| for, fri, frj | Creates @for control statement. |
| if | Creates an @if conditional. |
| ife, ifl | Creates an @if @else conditional. |
| sw | Creates a @switch conditional. |
| tc | Creates a @try/catch block. |
| tcf | Creates a @try/catch/finally block. |
| tf | Creates a @try/finally block. |
| u | Creates a @using statement. |
| wh, while | Creates a @while control statement. |
Blazor Refactoring
One of the other great things in CodeRush is its refactoring power, which is based on the Roslyn engine.
For Blazor there are some awesome refactorings which can help save you a lot of work.
Move to Code Behind
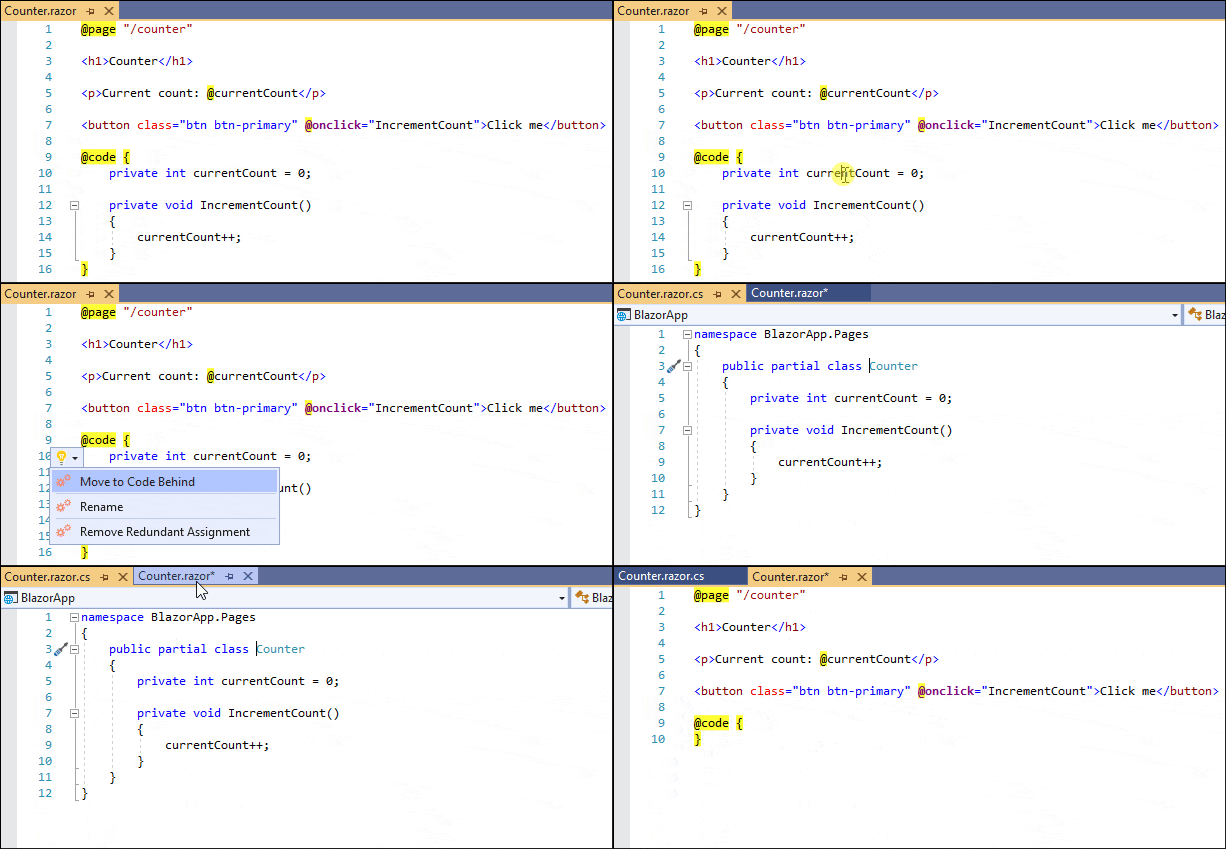
Suppose you are building a Blazor Component, adding features and functionality. Over time you realize the @code section is growing in size. There comes to be a point where it makes a lot of sense to put all that code in a separate C# class.
With CodeRush, this can be done in seconds! Just navigate to the @code section.

Activate the CodeRush Action Menu by pressing Ctrl + ` or Ctrl + . (depending on your configuration) and select “Move to Code Behind”.
CodeRush creates a new code-behind file (if it doesn’t already exist), including the partial class. It will then move code from the razor page right into the partial class, including attributes, comments and references.
Extract Razor Component
Another powerful refactoring, Extract Razor Component, allows you to extract the currently selected markup and create a component from it. CodeRush will ask for a new component name inside the original code, and next it will put the extracted code in a new razor file in the ~/Components folder of your project.
Let me know how this works for you!
If you find this post has helped you be more productive by using these features, please let me know by replying to this post below. More importantly, if you have any ideas or tips on how we can improve CodeRush to become even more productive in Blazor, reply as well.
Download CodeRush Today!
Check out CodeRush and discover how to become more productive with your Blazor development!
Get it at https://devexpress.com/coderush or at the Visual Studio Gallery.